Cranberry Glow Holiday Throw Free Pattern – Knit a Cozy Festive Heirloom
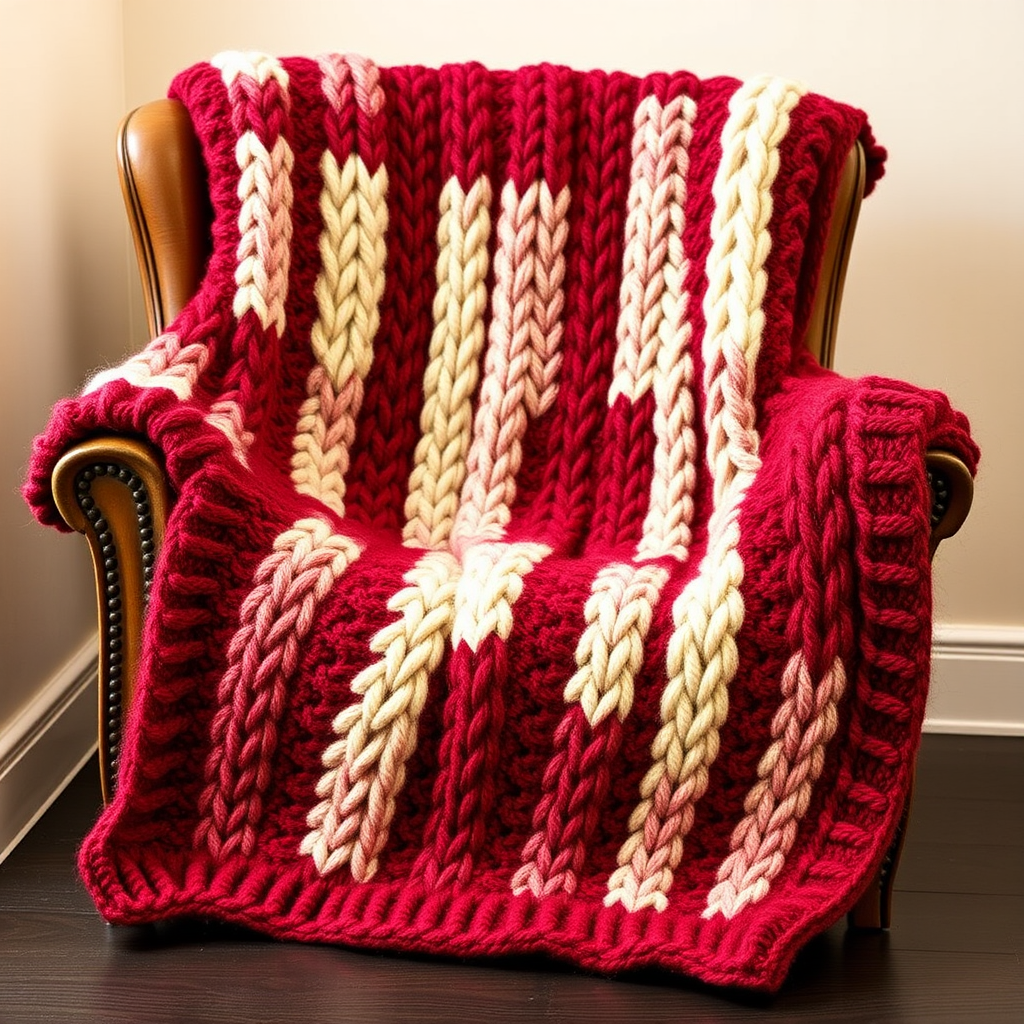
Cranberry Glow Holiday Throw: A Cozy Cable-Knit Heirloom
There's something magical about wrapping yourself in a hand-knit throw during the holiday season—the weight of the yarn, the rhythm of the cables, the warmth that seems to radiate from every stitch. The Cranberry Glow Holiday Throw captures that magic perfectly. This richly textured blanket features a classic cable-and-lattice motif in deep cranberry and cream, creating a modern take on a traditional holiday heirloom. Whether draped over the back of a wooden armchair or spread across your lap by the fire, this throw becomes the heart of your winter gatherings.
Designed with both beauty and practicality in mind, this pattern uses worsted-weight yarn and a simple combination of knit, purl, and cable stitches. The result is a deeply dimensional fabric that feels as luxurious as it looks. Best of all, the entire throw is knitted in one piece from the bottom up—no seaming required! With clear instructions and a symmetrical color-block design, even intermediate knitters can create this stunning centerpiece for their holiday decor.
Materials Needed
Before you begin, gather the following supplies. All materials are readily available at most craft stores or online retailers.
Yarn
- Red Heart Super Saver (worsted weight, 100% acrylic, 7 oz/364 yds per skein)
- Color A (Cranberry): 5 skeins
- Color B (Aran): 3 skeins
Needles & Notions
- US 9 (5.5 mm) circular knitting needle, 32-inch or longer (to accommodate the wide stitch count)
- Cable needle (any style you prefer—straight, curved, or hook-style)
- Stitch markers (at least 2, to mark the border sections)
- Tapestry needle for weaving in ends
- Blocking mat and pins (optional but recommended for finishing)
Gauge
For the best results, take time to check your gauge before casting on. The gauge for this pattern is:
- Stockinette stitch: 18 stitches and 24 rows = 4 inches
- Cable pattern: 20 stitches and 26 rows = 4 inches
If your gauge doesn't match, adjust your needle size accordingly. A swatch with the cable pattern is especially important, as cables tend to pull in the fabric.
Step-by-Step Instructions
This throw is knitted in one piece from the bottom up. The pattern uses a combination of knit, purl, and cable stitches to create a beautiful lattice and braided cable design. The border is worked in a simple garter stitch for a clean, finished edge. Follow along carefully, and you'll have a gorgeous heirloom-quality throw in no time.
Special Stitches
Before you begin, familiarize yourself with these four cable stitches. Practice them on a small swatch if you're new to cabling—it will make the main pattern much smoother.
- C4B (Cable 4 Back): Slip next 2 stitches onto cable needle and hold in back of work, knit next 2 stitches from left needle, then knit 2 stitches from cable needle.
- C4F (Cable 4 Front): Slip next 2 stitches onto cable needle and hold in front of work, knit next 2 stitches from left needle, then knit 2 stitches from cable needle.
- T3B (Twist 3 Back): Slip next stitch onto cable needle and hold in back of work, knit next 2 stitches from left needle, then purl the stitch from cable needle.
- T3F (Twist 3 Front): Slip next 2 stitches onto cable needle and hold in front of work, purl next stitch from left needle, then knit 2 stitches from cable needle.
Border (Garter Stitch)
With Color A (Cranberry), cast on 160 stitches loosely. A long-tail cast on works beautifully here.
Knit every row for 8 rows total. This creates 4 garter ridges (each ridge is 2 rows of knitting). This border will frame the bottom of your throw.
Main Body – Lattice Pattern Section 1
Now you'll begin the main body of the throw. The lattice pattern creates a beautiful woven texture that's perfect for the holiday aesthetic.
Row 1 (RS): With Color A, knit 8 stitches (border), place marker, work Row 1 of Lattice Pattern across next 144 stitches, place marker, knit 8 stitches (border).
Lattice Pattern (multiple of 12 + 2):
- Row 1 (RS): P2, *C4B, P4, C4F, P2; repeat from * to end of pattern section.
- Row 2 (WS): K2, *P4, K4, P4, K2; repeat from * to end.
- Row 3: P2, *K4, P4, K4, P2; repeat from * to end.
- Row 4: K2, *P4, K4, P4, K2; repeat from * to end.
- Row 5: P2, *C4F, P4, C4B, P2; repeat from * to end.
- Row 6: Same as Row 2.
- Row 7: Same as Row 3.
- Row 8: Same as Row 4.
Repeat Rows 1-8 for the lattice pattern. Work a total of 40 rows (5 full repeats of the 8-row pattern). Remember to always knit the first and last 8 stitches on every row to maintain the garter stitch border.
Cable Panel Section 1
After completing the lattice section, you'll transition to the more intricate cable panel. This creates the braided cable motif that gives the throw its heirloom feel.
Row 1 (RS): With Color A, knit 8 stitches (border), place marker, work Cable Panel Pattern across next 144 stitches, place marker, knit 8 stitches (border).
Cable Panel Pattern (multiple of 18 + 2):
- Row 1 (RS): P2, *C4B, P2, T3B, T3F, P2, C4F, P2; repeat from * to end.
- Row 2 (WS): K2, *P4, K2, P2, K2, P2, K2, P4, K2; repeat from * to end.
- Row 3: P2, *K4, P2, T3F, T3B, P2, K4, P2; repeat from * to end.
- Row 4: K2, *P4, K2, P2, K2, P2, K2, P4, K2; repeat from * to end.
- Row 5: P2, *C4B, P2, K2, P2, K2, P2, C4F, P2; repeat from * to end.
- Row 6: K2, *P4, K2, P2, K2, P2, K2, P4, K2; repeat from * to end.
- Row 7: P2, *K4, P2, T3B, T3F, P2, K4, P2; repeat from * to end.
- Row 8: K2, *P4, K2, P2, K2, P2, K2, P4, K2; repeat from * to end.
- Row 9: P2, *C4F, P2, T3F, T3B, P2, C4B, P2; repeat from * to end.
- Row 10: K2, *P4, K2, P2, K2, P2, K2, P4, K2; repeat from * to end.
- Row 11: P2, *K4, P2, T3B, T3F, P2, K4, P2; repeat from * to end.
- Row 12: K2, *P4, K2, P2, K2, P2, K2, P4, K2; repeat from * to end.
Repeat Rows 1-12 for the cable panel pattern. Work a total of 36 rows (3 full repeats of the 12-row pattern).
Color Transition 1
Now it's time to introduce the cream color. This creates the beautiful contrast that makes the cranberry sections pop.
Switch to Color B (Aran) and work in Lattice Pattern for 40 rows (5 full repeats of the 8-row pattern). Remember to maintain the 8-stitch garter border on each side throughout.
Center Stripe
Switch back to Color A (Cranberry) and work in Cable Panel Pattern for 36 rows (3 full repeats of the 12-row pattern). This forms the center of your throw.
Color Transition 2
Switch to Color B (Aran) again and work in Lattice Pattern for 40 rows (5 full repeats). This mirrors the first cream section for a symmetrical design.
Final Cable Section
Switch back to Color A (Cranberry) and work in Cable Panel Pattern for 36 rows (3 full repeats). This completes the top cable section.
Border & Bind Off
With Color A, knit every row for 8 rows (4 garter ridges) to match the bottom border.
Bind off loosely in knit. A loose bind-off is essential here—if you bind off too tightly, the edge will pucker. Consider using a larger needle for the bind-off row if needed.
Finishing
Weave in all ends with your tapestry needle. Take your time with this step—secure ends well so they don't work loose with use.
Block the throw to measurements (approximately 50 inches wide by 60 inches long) by pinning to a blocking mat and steaming gently. Cables really benefit from blocking—it opens up the stitches and makes the pattern more defined. Allow the throw to dry completely before removing pins.
Tips for Success
- Use stitch markers wisely: The two markers separating the border from the main pattern are essential. They help you keep track of where the pattern begins and ends.
- Count your stitches regularly: Cables can sometimes cause accidental increases or decreases. Check your stitch count at the end of each pattern repeat to catch any errors early.
- Keep your tension consistent: Cable stitches naturally pull in more than knit or purl stitches. Be mindful not to pull your yarn too tightly when working the cable crossings.
- Take breaks: This is a large project. Working in shorter sessions will help maintain even tension and prevent hand fatigue.
The Cranberry Glow Holiday Throw is more than just a blanket—it's a labor of love that will become a cherished part of your holiday traditions for years to come. Whether you're curling up with a cup of hot cocoa, reading by the fire, or simply adding a festive touch to your living room, this throw delivers warmth, beauty, and the unmistakable charm of handmade craftsmanship.
Happy knitting, and may your holidays be filled with warmth and joy!


