Coastal Sunrise Crown Free Crochet Pattern
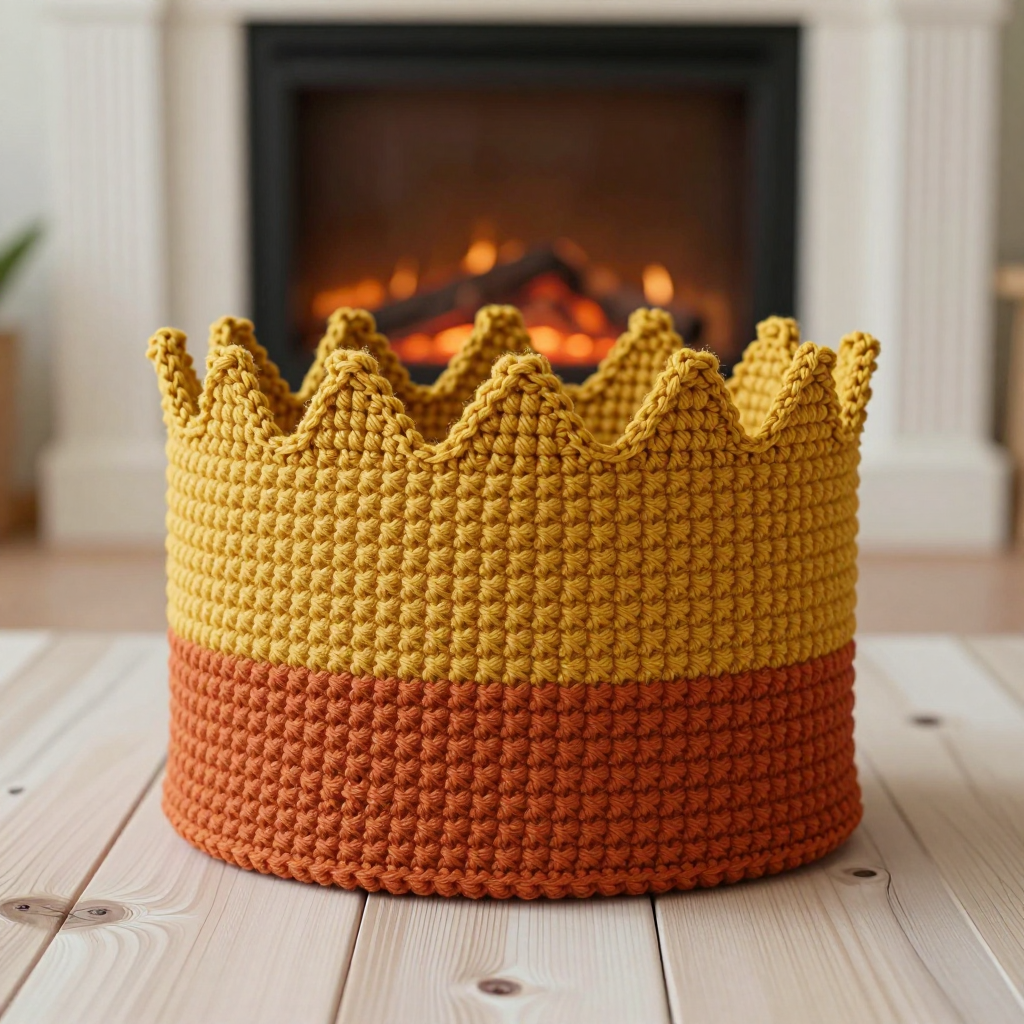
Coastal Sunrise Crown: A Free Beginner Crochet Pattern
Introduction
If you have ever wanted to make something truly magical with your own two hands, this Coastal Sunrise Crown is the perfect place to begin. It is designed for complete beginners who have never held a crochet hook before, and it uses only the most basic stitch in all of crochet: the single crochet. The finished crown is a simple, straight tube about 20 inches around and 3 inches tall, with a warm terracotta band on the bottom and a sunny mustard band on top, topped off with ten little triangular sun-ray points that stand up along the rim. It looks like a tiny sunrise you can wear, and it feels soft, light, and wonderfully cheerful in the hand. Whether you are making it for a child's dress-up box, a birthday photo prop, or just because it makes you smile, this is a relaxing, forgiving project that you can finish in an afternoon.
Materials Needed
- Yarn: Worsted weight (category 4) acrylic or cotton yarn, approximately 60–70 yards total. You will need about 35 yards of terracotta (a warm burnt orange) and about 30 yards of mustard (a golden yellow).
- Crochet hook: Size G/6, which is 4.0 mm.
- Stitch marker: One removable stitch marker (or a small safety pin, or a scrap of contrasting yarn) to mark the first stitch of each round.
- Tapestry needle: A blunt-tipped needle with a large eye, for weaving in your yarn ends.
- Scissors: Any sharp pair for cutting yarn.
- Finished size: Crown band circumference is approximately 20 inches (51 cm) unstretched, to fit a child or small adult head. The band height before the points is approximately 3 inches (7.5 cm). The sun-ray points add approximately 1 inch (2.5 cm) above the band.
Abbreviations and Beginner Glossary
Every pattern is written in a kind of shorthand. Here is every abbreviation used in this pattern, explained in plain English as if you have never crocheted before. All terms are in US crochet terms.
- ch – chain. Make a loop of yarn on your hook, then wrap the yarn over the hook and pull it through the loop. That is one chain. A row of chains is the foundation you build on.
- sc – single crochet. Insert your hook into the next stitch, wrap the yarn over the hook, and pull up a loop (you now have two loops on your hook). Wrap the yarn over again and pull it through both loops on the hook. One single crochet made.
- sl st – slip stitch. Insert your hook into the stitch, wrap the yarn over, and pull it through both the stitch and the loop on your hook in one motion. It makes a nearly invisible joining stitch.
- st – stitch. One completed stitch (or the space where you work the next stitch).
- sts – stitches. More than one stitch.
- sc2tog – single crochet 2 stitches together. This is a decrease, which makes your work narrower. Insert your hook into the next stitch, wrap the yarn over, and pull up a loop. Insert your hook into the following stitch, wrap the yarn over, and pull up a loop (you now have three loops on your hook). Wrap the yarn over and pull through all three loops on the hook. Two stitches have become one.
- turn. Flip your work over so you can work back in the other direction.
- fasten off. Cut the yarn a few inches from your work, then pull the tail all the way through the last loop on your hook to lock it.
- join. Connect the end of a round back to its beginning, usually with a slip stitch.
- round. One complete circle of stitches worked around the tube.
- row. One line of stitches worked back and forth (used here for the points).
Gauge
Gauge: 16 single crochet stitches x 18 rows = 4 inches (10 cm) in single crochet worked in the round.
Gauge simply means how big your stitches turn out. It matters because it controls the final size of your crown: if your stitches are looser than the gauge, the crown will come out too big and floppy; if they are tighter, it will be too small. For this project gauge is not critical for fit, but a tighter gauge gives a firmer crown that stands up on its own, so aim for slightly dense stitches rather than loose, airy ones.
How to make a gauge swatch: With your terracotta yarn and 4.0 mm hook, chain 21. Work 1 single crochet in the second chain from the hook and in each chain across (20 stitches). Work 18 rows of single crochet, turning at the end of each row. Lay the swatch flat and measure a 4-inch square in the middle. Count how many stitches fit across 4 inches and how many rows fit in 4 inches. If you have more than 16 stitches, your stitches are too small, so try a larger hook. If you have fewer than 16, your stitches are too big, so try a smaller hook.
Beginner Tips Before You Start
- Use a stitch marker to track your rounds. Place the marker in the very first stitch of each round and move it up as you go. Because the crown is worked in a spiral, this is the only way to know where each round begins and ends.
- Do not pull your yarn too tight. Beginners often grip the yarn hard, which makes tiny, stiff stitches that are hard to work into. Keep a relaxed, even tension so your hook slides in easily.
- Count your stitches at the end of every round. Every round of the band should have exactly 80 stitches. Counting takes ten seconds and saves you from discovering a mistake many rounds later.
- Change colors at the end of a round, not the beginning. Pull the new color through the final loop of the last stitch of the previous round. This keeps the color change clean and invisible.
- Keep your chain ring untwisted. When you join your starting chain into a ring, make sure the chain lies flat and is not twisted, or your crown will have a permanent spiral kink.
- Work the points loosely. The sun-ray points are small and worked back and forth; keep those stitches relaxed so the points lie flat and taper neatly.
Step-by-Step Instructions
Note on Construction
The crown is worked in continuous rounds in single crochet, so do not join or turn at the end of each round unless the pattern tells you to. Place a stitch marker in the first stitch of each round and move it up as you work. The band is a straight tube with no increasing or decreasing. Color changes are made at the beginning of a round by pulling the new color through the final loop of the last stitch of the previous round.
Band (Terracotta)
Setup: With terracotta, ch 80. Being careful not to twist the chain, join with a sl st to the first ch to form a ring.
Round 1: Ch 1 (does not count as a st). Work 1 sc in each ch around. Join with a sl st to the first sc. (80 sc)
Rounds 2–7: Ch 1. Work 1 sc in each st around. Join with a sl st to the first sc. (80 sc)
Fasten off terracotta. Join mustard with a sl st in the first st of Round 7.
Band (Mustard)
Rounds 8–13: Ch 1. Work 1 sc in each st around. Join with a sl st to the first sc. (80 sc)
Do not fasten off mustard. Continue to the sun-ray points.
Sun-Ray Points
The points are worked directly into the top edge of the band, one point every 8 stitches, for a total of 10 points. Each point uses 8 stitches of the band edge (3 + 2 + 3), so 10 points x 8 sts = 80 sts, using the full circumference.
Row 1 (point row): Ch 1. *Sc in each of the next 3 sts, sc2tog, sc in each of the next 3 sts, ch 1, turn. (This begins the first point.)
Point shaping:
Row 2: Skip the ch-1, sc2tog over the first 2 sts, sc in each of the next 3 sts, sc2tog over the last 2 sts, ch 1, turn. (5 sts)
Row 3: Skip the ch-1, sc2tog over the first 2 sts, sc in the next st, sc2tog over the last 2 sts, ch 1, turn. (3 sts)
Row 4: Skip the ch-1, sc2tog over the first 2 sts, sc in the last st, ch 1, turn. (2 sts)
Row 5: Skip the ch-1, sc2tog over the 2 sts. Fasten off.
Rejoin mustard with a sl st in the next unworked stitch of the band top edge and repeat from * for each point, working 10 points total around the rim.
Assembly and Finishing
Weave in all ends. Thread each yarn tail onto your tapestry needle. Working on the wrong side (the inside of the crown), slide the needle through the backs of several stitches, then back through a few more in the opposite direction to lock it. Trim the tail close to the fabric. Do this for every tail: the starting tail, the terracotta fasten-off, and each point's fasten-off.
Block the crown. Lightly steam or wet block the crown. To wet block, mist the crown with water until damp but not soaking, then shape the points with your fingers so each one tapers to a soft tip. Place a small cup or jar inside the band to hold its round shape while it dries completely. Do not stretch the band while blocking, or the crown will come out too large.
Final check. Once dry, remove the cup. The crown should stand upright on its own with ten evenly spaced points around the rim. If any point curls, mist it again and press it flat with your fingers.
Pro Tips and Variations
- Change the colors. Swap terracotta and mustard for any two colors you love, such as ocean blue and seafoam, or pink and cream. Just keep the same yardage and change colors at the same round.
- Adjust the size. To make the crown larger or smaller, change the starting chain in multiples of 8 stitches (so the points still divide evenly). For example, ch 72 for a smaller crown or ch 88 for a larger one, and work the same number of rounds.
- Substitute the yarn. Cotton gives a crisper, firmer crown that stands up beautifully; acrylic is softer and slightly more flexible. Just check your gauge with a swatch first.
- Add a third color block. Work 4 rounds in a third color between the terracotta and mustard for a striped sunrise effect, keeping the total band height at about 3 inches.


