Aurora Ridge Pullover Free Pattern
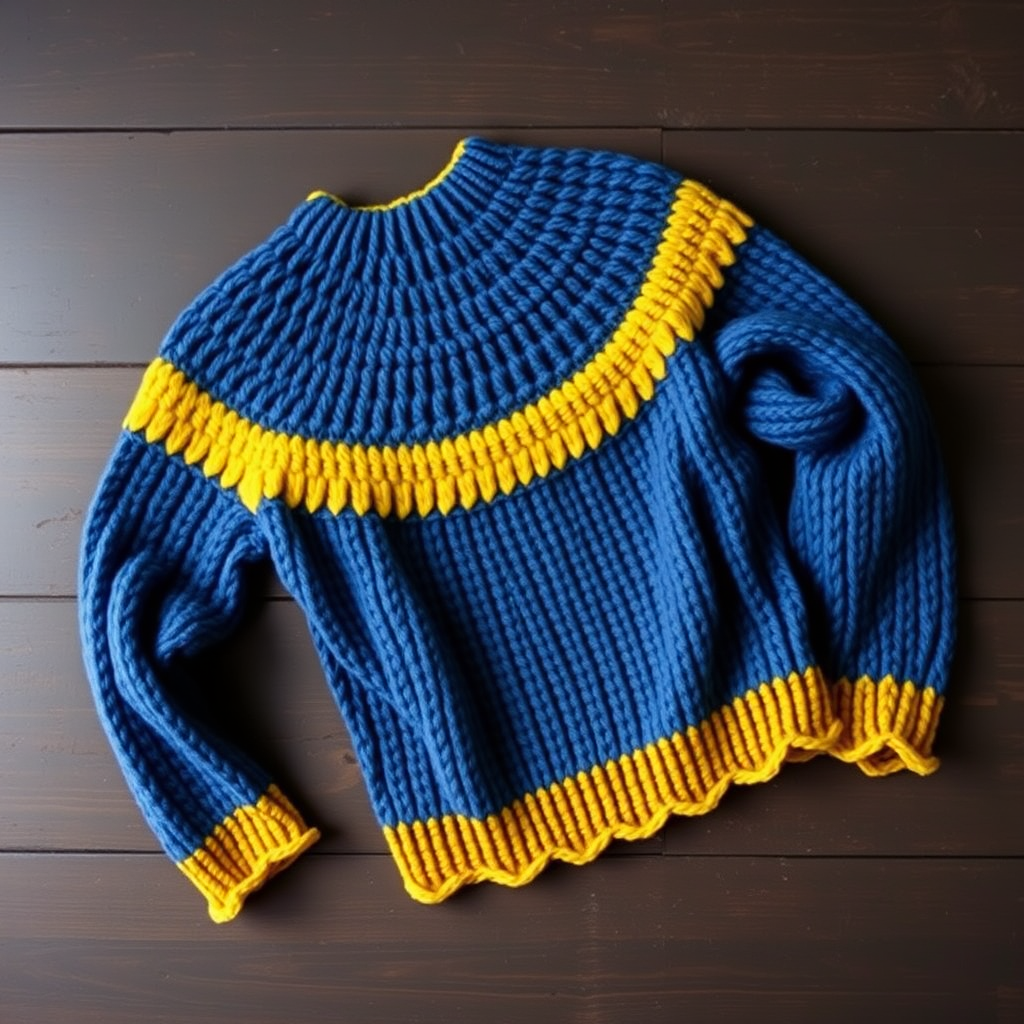
The Aurora Ridge Pullover: A Cozy Textured Crochet Sweater You'll Love to Make
Wrap yourself in the cozy embrace of the Aurora Ridge Pullover, a modern crochet sweater with a stunning textured yoke and a relaxed, flattering fit. This pattern is perfect for intermediate crocheters looking to create a wardrobe staple with a unique twist. The combination of a rich denim blue main color and a mustard yellow accent creates a striking, contemporary look that will turn heads. Whether you're a seasoned crocheter or a confident beginner ready for a challenge, this pullover is a rewarding project that results in a beautiful, handmade garment you'll treasure for years.
Materials Needed
Before you begin, gather all your materials to ensure a smooth and enjoyable crocheting experience. Here's what you'll need:
- Yarn: Worsted weight yarn (Category 4) in two colors:
- Main Color (MC): 800 (850, 900, 950, 1000, 1050, 1100) yards. Suggested: Lion Brand Wool-Ease in 'Denim'.
- Contrast Color (CC): 200 (220, 240, 260, 280, 300, 320) yards. Suggested: Lion Brand Wool-Ease in 'Mustard'.
- Crochet Hook: US Size G/6 (4.0 mm) crochet hook, or size needed to obtain gauge.
- Notions: Stitch markers, tapestry needle for weaving in ends.
Gauge
18 stitches x 12 rows = 4 inches in half double crochet (hdc). Always take the time to check your gauge to ensure your sweater fits as intended. If your gauge is off, adjust your hook size accordingly.
Sizes and Measurements
This pattern is written for sizes XS (S, M, L, XL, 2XL, 3XL). The finished bust measurements are:
32 (36, 40, 44, 48, 52, 56) inches
Choose the size that best matches your bust measurement, keeping in mind the relaxed, slightly oversized fit of this design.
Step-by-Step Instructions
Notes Before You Start
- The sweater is worked top-down in one piece, meaning you'll start at the neckline and work your way down to the hem.
- The yoke features a beautiful textured stitch pattern using front post and back post double crochet.
- The body and sleeves are worked in the round with a simple half double crochet (hdc) stitch.
- Each round begins with a ch 2 that counts as your first hdc, and you'll join with a slip stitch to the top of that ch-2.
Creating the Yoke
The yoke is the heart of this design, featuring the stunning ribbed texture that radiates from the neckline. Follow these steps carefully:
Round 1: With MC, ch 90 (96, 102, 108, 114, 120, 126). Join with a sl st to form a ring, being careful not to twist your chain. Ch 2 (counts as hdc), hdc in each ch around. Join with sl st to top of ch-2. You should now have 90 (96, 102, 108, 114, 120, 126) hdc.
Round 2 (Raglan Increases Begin): Ch 2, hdc in same st, hdc in next 14 (15, 16, 17, 18, 19, 20) sts, 2 hdc in next st (this is your first raglan increase), hdc in next 14 (15, 16, 17, 18, 19, 20) sts, 2 hdc in next st, hdc in next 28 (30, 32, 34, 36, 38, 40) sts, 2 hdc in next st, hdc in next 14 (15, 16, 17, 18, 19, 20) sts, 2 hdc in next st, hdc in next 14 (15, 16, 17, 18, 19, 20) sts. Join. You should now have 94 (100, 106, 112, 118, 124, 130) hdc.
Round 3: Ch 2, hdc in each st around, working 2 hdc in the center st of each raglan increase (the st between the two increases from the previous round). Join. You should now have 98 (104, 110, 116, 122, 128, 134) hdc.
Rounds 4-5: Repeat Round 3. You will continue to increase by 4 stitches each round, one at each raglan line.
Round 6 (Begin Textured Stitch Pattern): Ch 2, *fpdc around next st, bpdc around next st*, repeat from * to * around, working the raglan increases as 2 hdc in the center st. This means when you reach a raglan increase stitch, you'll work 2 hdc into that single stitch, even if the surrounding stitches are post stitches.
Rounds 7-15: Continue the pattern established in Round 6, alternating fpdc and bpdc each round. Remember to work your raglan increases as 2 hdc in the center stitch of each increase. After completing Round 15, you will have 162 (172, 182, 192, 202, 212, 222) sts. The yoke should now measure approximately 7-8 inches from the neckline.
Dividing for Body and Sleeves
Now it's time to separate the yoke into the body and sleeves. This is an exciting step as you'll start to see your sweater take shape!
Round 16: Ch 2, hdc in next 46 (49, 52, 55, 58, 61, 64) sts (this is the front), skip next 35 (37, 39, 41, 43, 45, 47) sts (this is the first sleeve), ch 4 (6, 8, 10, 12, 14, 16) for the underarm, hdc in next 46 (49, 52, 55, 58, 61, 64) sts (this is the back), skip next 35 (37, 39, 41, 43, 45, 47) sts (this is the second sleeve), ch 4 (6, 8, 10, 12, 14, 16) for the underarm. Join. You should now have 100 (110, 120, 130, 140, 150, 160) sts for the body.
Working the Body
The body is worked in a simple, smooth hdc stitch, providing a clean contrast to the textured yoke.
Rounds 17-40: Ch 2, hdc in each st around (including the underarm chains). Join with sl st to top of ch-2. Continue working these rounds until the body measures 12 (13, 14, 15, 16, 17, 18) inches from the underarm, or your desired length. Try it on to check the length as you go!
Body Edging: Ch 1, sc in same st, *ch 3, skip 1 st, sc in next st*, repeat from * to * around. Join with sl st to first sc. Fasten off and weave in the end.
Creating the Sleeves
Now for the sleeves! You'll work each sleeve in the round, starting from the underarm.
Round 1: With MC, join yarn at the center of the underarm chain. Ch 2, hdc in each ch and in each st around the armhole. Join. You should now have 39 (43, 47, 51, 55, 59, 63) hdc.
Rounds 2-30: Ch 2, hdc in each st around. Join. Continue working these rounds until the sleeve measures 12 (13, 14, 15, 16, 17, 18) inches from the underarm, or your desired length. You can make the sleeves shorter or longer to suit your preference.
Sleeve Edging: Repeat the same edging as the body: Ch 1, sc in same st, *ch 3, skip 1 st, sc in next st*, repeat from * to * around. Join with sl st to first sc. Fasten off and weave in the end.
Finishing Touches
Congratulations, you've completed the main construction of your Aurora Ridge Pullover! Now for the final steps:
- Weave in all ends using your tapestry needle. Take your time to ensure all ends are securely hidden.
- Block your sweater to size. This is crucial for achieving the perfect fit and showcasing the beautiful stitch work. Lay the sweater flat on a blocking mat, gently shape it to the correct measurements, and pin it in place. Allow it to dry completely before wearing.
Your Aurora Ridge Pullover is now ready to wear! The combination of the textured yoke, the smooth body, and the mustard yellow edging creates a truly unique and stylish garment. This sweater is perfect for cozy fall days, chilly winter evenings, or any time you want to wrap yourself in handmade warmth. Enjoy wearing your beautiful creation, and don't forget to show it off – you've earned it!


