Aurora Cloud Slipper Socks Free Pattern – A Dreamy Gradient Crochet Cocoon
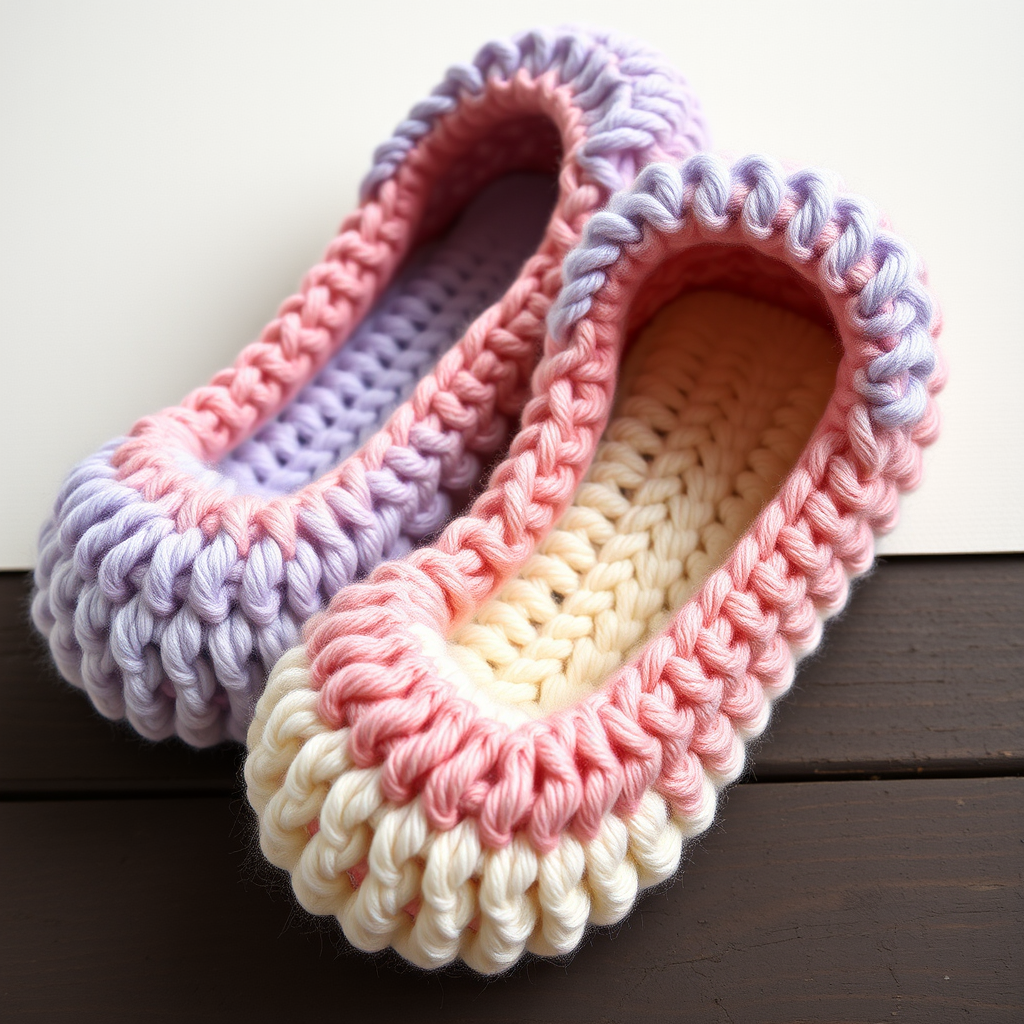
Aurora Cloud Slipper Socks Free Pattern – A Dreamy Gradient Crochet Cocoon
Wrap your feet in a handcrafted cloud of gradient yarn with these plush, textured crochet slipper socks. The unique spiral stitch pattern and soft color transitions make them a cozy, modern statement for lounging. Whether you're curling up with a good book or padding around the house on a chilly morning, these slipper socks will keep your toes warm and your style elevated. Best of all, this pattern is beginner-friendly, so even if you're new to crochet, you can create these dreamy socks with confidence.
Materials Needed
Before you begin, gather the following supplies:
- Yarn: Worsted weight (#4) yarn in 3 colors:
- Color A: Soft lavender (approximately 70g)
- Color B: Dusty rose (approximately 65g)
- Color C: Cream (approximately 65g)
- Hook: 5.0 mm (H-8) crochet hook
- Gauge: 14 sc x 16 rows = 4 x 4 inches (10 x 10 cm) in single crochet
- Other: Yarn needle for weaving in ends, scissors
Sizes and Abbreviations
Sizes
This pattern is written for sizes S (M, L) – fits US women's 5-7 (8-10, 11-13). To adjust for a custom fit, simply add or subtract stitches in multiples of 6 during the toe increases, and adjust the foot length accordingly.
Abbreviations
- ch = chain
- sc = single crochet
- hdc = half double crochet
- dc = double crochet
- sl st = slip stitch
- st(s) = stitch(es)
- rnd = round
- inc = increase (2 sc in same st)
- dec = decrease (sc2tog)
Pattern Notes
These slipper socks are worked from the toe up in continuous rounds, which creates a seamless, spiral texture that is both beautiful and cushioned underfoot. The color transitions are worked in simple stripes, creating a gradient effect that is both modern and dreamy. The heel is shaped with a flat flap that is folded and sewn, making it easy to achieve a perfect fit.
Step-by-Step Instructions
TOE (Make 2)
Starting with Color A (soft lavender), create the toe of the slipper sock:
- Rnd 1: Make a magic ring, ch 1, 6 sc in ring. (6 sts)
- Rnd 2: Inc in each st around. (12 sts)
- Rnd 3: (Inc, sc in next st) around. (18 sts)
- Rnd 4: (Inc, sc in next 2 sts) around. (24 sts)
- Rnd 5: (Inc, sc in next 3 sts) around. (30 sts)
- Rnd 6: (Inc, sc in next 4 sts) around. (36 sts)
- Rnd 7: (Inc, sc in next 5 sts) around. (42 sts)
- Rnd 8: (Inc, sc in next 6 sts) around. (48 sts)
- Rnd 9: (Inc, sc in next 7 sts) around. (54 sts)
- Rnd 10: Sc in each st around. (54 sts)
Tip: Mark the first stitch of each round with a stitch marker to keep track of your rounds.
FOOT (Continue with Color A)
Now you'll work the main body of the foot, transitioning through your gradient colors:
- Rnd 11-20: Sc in each st around. (54 sts) – Work even for 10 rounds.
- Rnd 21: Switch to Color B (dusty rose). Sc in each st around. (54 sts)
- Rnd 22-30: Sc in each st around. (54 sts) – Work even for 9 rounds.
- Rnd 31: Switch to Color C (cream). Sc in each st around. (54 sts)
- Rnd 32-40: Sc in each st around. (54 sts) – Work even for 9 rounds.
Note: When changing colors, work the last yarn over of the previous stitch with the new color to create a clean transition.
HEEL (Continue with Color C)
Now we'll shape the heel. This is worked back and forth in rows, leaving the instep stitches unworked:
- Rnd 41: Sc in next 36 sts, turn. (Leave remaining 18 sts unworked for instep.)
- Row 42: Ch 1, sc in next 36 sts, turn. (36 sts)
- Row 43-50: Repeat Row 42 for 8 more rows, working back and forth. (36 sts each row)
Now we'll decrease to shape the heel curve:
- Row 51: Ch 1, sc2tog, sc in next 32 sts, sc2tog, turn. (34 sts)
- Row 52: Ch 1, sc2tog, sc in next 30 sts, sc2tog, turn. (32 sts)
- Row 53: Ch 1, sc2tog, sc in next 28 sts, sc2tog, turn. (30 sts)
- Row 54: Ch 1, sc2tog, sc in next 26 sts, sc2tog, turn. (28 sts)
- Row 55: Ch 1, sc2tog, sc in next 24 sts, sc2tog, turn. (26 sts)
- Row 56: Ch 1, sc2tog, sc in next 22 sts, sc2tog, turn. (24 sts)
- Row 57: Ch 1, sc2tog, sc in next 20 sts, sc2tog, turn. (22 sts)
- Row 58: Ch 1, sc2tog, sc in next 18 sts, sc2tog, turn. (20 sts)
- Row 59: Ch 1, sc2tog, sc in next 16 sts, sc2tog, turn. (18 sts)
- Row 60: Ch 1, sc2tog, sc in next 14 sts, sc2tog, turn. (16 sts)
- Row 61: Ch 1, sc2tog, sc in next 12 sts, sc2tog, turn. (14 sts)
- Row 62: Ch 1, sc2tog, sc in next 10 sts, sc2tog, turn. (12 sts)
- Row 63: Ch 1, sc2tog, sc in next 8 sts, sc2tog, turn. (10 sts)
- Row 64: Ch 1, sc2tog, sc in next 6 sts, sc2tog, turn. (8 sts)
- Row 65: Ch 1, sc2tog, sc in next 4 sts, sc2tog, turn. (6 sts)
- Row 66: Ch 1, sc2tog, sc in next 2 sts, sc2tog, turn. (4 sts)
- Row 67: Ch 1, sc2tog twice, turn. (2 sts)
- Row 68: Ch 1, sc2tog. (1 st)
Fasten off, leaving a long tail (about 12 inches) for sewing the heel seam.
CUFF (Optional, for a taller sock)
If you'd like a taller slipper sock, add this simple cuff:
- Attach Color C to the top edge of the foot (the 18 unworked sts from Rnd 41).
- Rnd 1: Ch 1, sc in each of the 18 sts, then sc evenly along the top of the heel flap (about 18 sts), join with sl st to first sc. (36 sts)
- Rnd 2-6: Ch 1, sc in each st around, join with sl st. (36 sts)
Fasten off and weave in the end.
Finishing
Now it's time to assemble your slipper sock:
- Fold the heel flap in half so the wrong sides are together, aligning the edges.
- Sew the edges together using the long tail you left when fastening off. Use a whip stitch or mattress stitch for a neat, invisible seam.
- Weave in all ends using your yarn needle, making sure to secure them well so they don't unravel with wear.
- Repeat the entire process for the second slipper sock.
Tips for Success
- Check your gauge: If your slipper socks are coming out too tight or too loose, adjust your hook size accordingly. A proper gauge ensures the perfect fit.
- Use stitch markers: Marking the first stitch of each round will save you from counting mistakes, especially during the toe increases.
- Customize your colors: Feel free to swap the gradient colors to match your personal style or home decor. Any worsted weight yarn will work beautifully.
- Blocking: If desired, lightly steam block your finished slipper socks to even out the stitches and give them a polished look.
These Aurora Cloud Slipper Socks are the perfect weekend project – cozy, stylish, and surprisingly quick to make. The gradient color transition from soft lavender to dusty rose to cream creates a dreamy, cloud-like effect that will make you want to wear them every day. Whether you're making them for yourself or as a thoughtful handmade gift, these slipper socks are sure to bring warmth and joy. Happy crocheting!