Agave Point Lace Cap Free Crochet Pattern
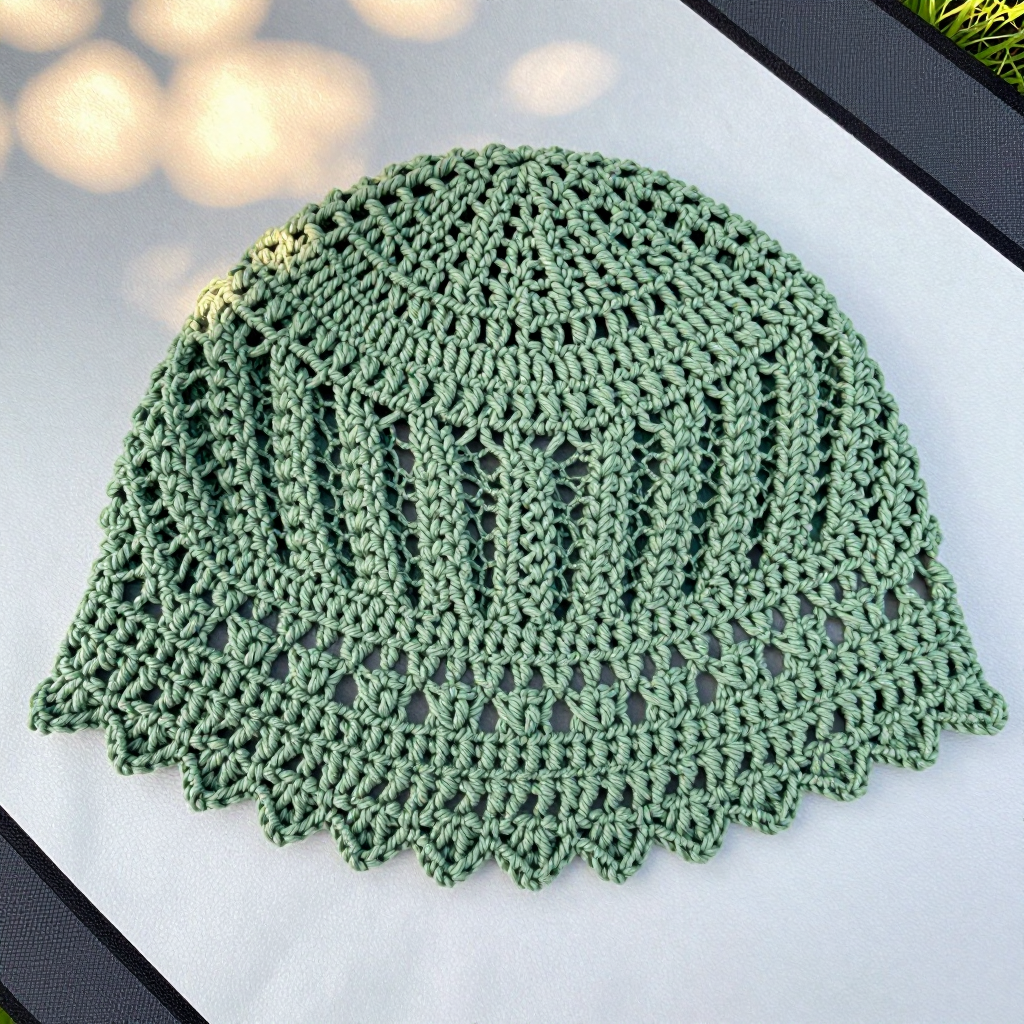
Agave Point Lace Cap: A Desert-Boho Crochet Hat for Beginners
If you have ever admired a lacy, textured hat in a shop window and thought "I could never make that," this Agave Point Lace Cap is here to prove you wrong. It is a fitted, sage-green cap worked in simple rounds from the top down, and the magic comes from one easy repeat: a five-stitch "shell" that fans out into radiating bands, giving the surface a pointed, agave-like texture. The finished cap measures about 21.5 inches around and 7.5 inches deep, sits close to the head, and feels light and airy thanks to the open lace between the shells. A narrow picot-trimmed edge finishes the bottom with tiny loops that look delicate but are wonderfully simple to make. Every stitch is explained below, so even if you have never held a hook, you can follow along one round at a time.
Materials Needed
- Yarn: Worsted weight (category 4) cotton-blend yarn, approximately 150–170 yards (137–155 m) of sage green. The sample used a smooth cotton/acrylic blend for crisp stitch definition.
- Crochet hook: E/4 (3.5 mm), or whatever size you need to match the gauge below.
- Stitch marker: 1 (a removable marker or a scrap of contrasting yarn works).
- Tapestry needle: a blunt-tipped needle with a large eye for weaving in ends.
- Scissors: any small sharp pair.
- Blocking supplies (optional but recommended): a spray bottle of water, rustproof pins, and a blocking mat.
- Finished size: Fits an average adult head of 21–23 inches (53–58 cm). Finished cap circumference is 21.5 inches (55 cm) unstretched, with a crown depth of 7.5 inches (19 cm) from center to lower edge.
Abbreviations and Beginner Glossary
All terms are US crochet terms. Read every definition once before you begin — no prior knowledge is assumed.
- ch – chain: yarn over the hook, pull the hook through the loop on your hook. This makes one chain stitch.
- sl st – slip stitch: insert the hook into the stitch, yarn over, and pull that loop straight through the loop on your hook. It joins things without adding height.
- sc – single crochet: insert the hook into the stitch, yarn over, pull up a loop (2 loops on hook), yarn over again, pull through both loops. One loop remains.
- dc – double crochet: yarn over, insert the hook into the stitch, yarn over, pull up a loop (3 loops on hook), yarn over and pull through 2 loops, yarn over and pull through the last 2 loops.
- shell – 5 dc worked into the same stitch or space.
- ch-1 sp / ch-3 sp – chain-1 space / chain-3 space: the little gap under a chain you made in a previous round. You work into the gap, not into the chain itself.
- picot – ch 3, then sl st into the third ch from the hook. This makes a tiny bump.
- magic ring – an adjustable loop of yarn you crochet into, then pull closed so there is no hole in the center.
- beg – beginning; rep – repeat; st(s) – stitch(es).
- join with sl st – finish a round by making a slip stitch into the top of the starting chain so the round closes into a circle.
- fasten off – cut the yarn a few inches from the work and pull the tail all the way through the last loop to lock it.
Gauge
Gauge: 4 shells (each shell = 5 dc) and 8 rounds = 4 inches (10 cm) in the shell-stitch pattern after blocking. The crown circle of the first 5 rounds should measure 3.5 inches (9 cm) across.
Gauge matters because it is how you control the size of the finished cap. If your shells are bigger than the gauge, the hat will be too loose; if they are smaller, it will be too tight. To check, crochet Rounds 1–8 of the crown with your chosen hook and yarn, then lay the piece flat and measure across. If your circle is larger than 3.5 inches after Round 5, switch to a smaller hook; if smaller, go up one hook size. Always measure after gently stretching the lace flat, since the openwork relaxes once blocked.
Beginner Tips Before You Start
- Mark your first stitch. This cap is worked in continuous rounds, so the beginning of each round spirals upward. Place a stitch marker in the first stitch of each round so you never lose your place.
- Don't pull the yarn tight. Keep your chains and shells relaxed. Tight tension makes the lace stiff and shrinks the cap; loose, even tension is what gives this hat its airy look.
- Count your shells every round. Each round should have exactly the number of shells in parentheses. If you are off by one, fix it before moving on — errors multiply in the round.
- Work into the center dc of each shell. The "point" of the agave texture comes from stacking each new shell on the middle stitch of the shell below. Take a moment to find that middle stitch each time.
- Try it on as you go. After Round 10, slip the cap on your head. The lower edge should sit just above the ears. If it feels too shallow, add extra even rounds before the edging.
- Blocking is not optional here. The picot edge and shell points only look sharp after a light blocking, so plan for it.
Step-by-Step Instructions
Crown (Flat Circle)
Set-up: Make a magic ring (or ch 4 and join with sl st to form a ring).
Round 1: Ch 3 (counts as first dc), work 11 dc into the ring. Join with sl st to top of beg ch-3. (12 dc)
Round 2: Ch 3, dc in same st as join, 2 dc in each st around. Join with sl st to top of beg ch-3. (24 dc)
Round 3: Ch 3, dc in same st, dc in next st, [2 dc in next st, dc in next st] around. Join with sl st to top of beg ch-3. (36 dc)
Round 4: Ch 3, dc in same st, dc in next 2 sts, [2 dc in next st, dc in next 2 sts] around. Join with sl st to top of beg ch-3. (48 dc)
Round 5: Ch 3, dc in same st, dc in next 3 sts, [2 dc in next st, dc in next 3 sts] around. Join with sl st to top of beg ch-3. (60 dc)
Round 6 (first shell round): Ch 3 (counts as first dc of first shell), work 4 more dc in same st as join (first shell made), ch 1, skip 2 sts, [shell in next st, ch 1, skip 2 sts] around. Join with sl st to top of beg ch-3. (20 shells, 20 ch-1 sps)
Round 7: Sl st in next 2 dc to reach center dc of first shell, ch 3, work 4 more dc in same st (shell made over center of previous shell), ch 1, [shell in center dc of next shell, ch 1] around. Join with sl st to top of beg ch-3. (20 shells)
Round 8: Rep Round 7. (20 shells)
Round 9 (increase round): Sl st to center dc of first shell, ch 3, 4 dc in same st (shell made), ch 1, shell in center dc of next shell, ch 1, [shell in center dc of next shell, ch 1, shell in same center dc, ch 1] around, ending with shell in center dc of last shell, ch 1. Join with sl st to top of beg ch-3. (30 shells) This round adds 10 shells evenly, bringing the crown circle to about 7 inches (18 cm) across — the correct flat-circle size for a 21.5-inch cap (7 × 3.14 ≈ 22 inches).
Side Tube (Worked Even)
Round 10: Sl st to center dc of first shell, ch 3, 4 dc in same st (shell made), ch 1, [shell in center dc of next shell, ch 1] around. Join with sl st to top of beg ch-3. (30 shells)
Rounds 11–18: Rep Round 10 eight times. Do not increase. (30 shells) The tube measures about 4 inches (10 cm) from the crown edge, giving a total crown depth of about 7.5 inches (19 cm).
Optional fit check: Try the cap on. The lower edge should sit just above the ears and cover the top of the head comfortably. If you want a deeper cap, work 1–2 additional even shell rounds before the edging.
Picot-Trimmed Edge
Round 19 (edging): Ch 1, sc in same st as join, picot (ch 3, sl st in third ch from hook), skip next st, [sc in next st, picot, skip next st] around the entire lower edge, working into the dc stitches and ch-1 spaces of the final shell round so the edge lies flat. Join with sl st to first sc. Fasten off. (Approximately 30 picots around the edge.)
Assembly and Finishing
Weave in ends: Thread each yarn tail onto the tapestry needle and run it back and forth through the inside of the fabric for about 2 inches, following the path of the stitches. Do not knot the tails — weaving hides them and keeps the lace smooth.
Blocking: Mist the cap lightly with water until it is damp but not dripping. Lay it on a blocking mat and pin the lower edge out to a 21.5-inch circumference circle. Pin each shell point gently outward to sharpen the agave-like texture, and pin each picot loop so it sits open. Leave it to dry completely — usually overnight. Do not press with a hot iron; if you must, use gentle steam held a few inches above the fabric.
Final check: Once dry, remove the pins and try the cap on. The lace has slight give, so it should sit fitted and close to the head.
Pro Tips and Variations
- Change the color: Work the crown in one shade and the side tube in another for a two-tone look, or add a contrasting picot edge in a deeper green or terracotta for extra desert-boho flair.
- Adjust the size: For a smaller head, stop the crown increases at Round 8 (20 shells) and work the side tube even from there. For a larger head, add one more increase round before the side tube, spacing the extra shells evenly.
- Substitute yarn: Any worsted weight (category 4) yarn works — cotton gives crisp stitch definition, while a wool blend gives more stretch and warmth. Always crochet a gauge swatch first, since fiber changes the finished size.
- Make it slouchier: Work 2–4 extra even shell rounds before the edging for a relaxed, slouchy beanie instead of a fitted cap.


