Whispering Wildflower Felted Sachet Free Pattern – A Knitted Botanical Keepsake
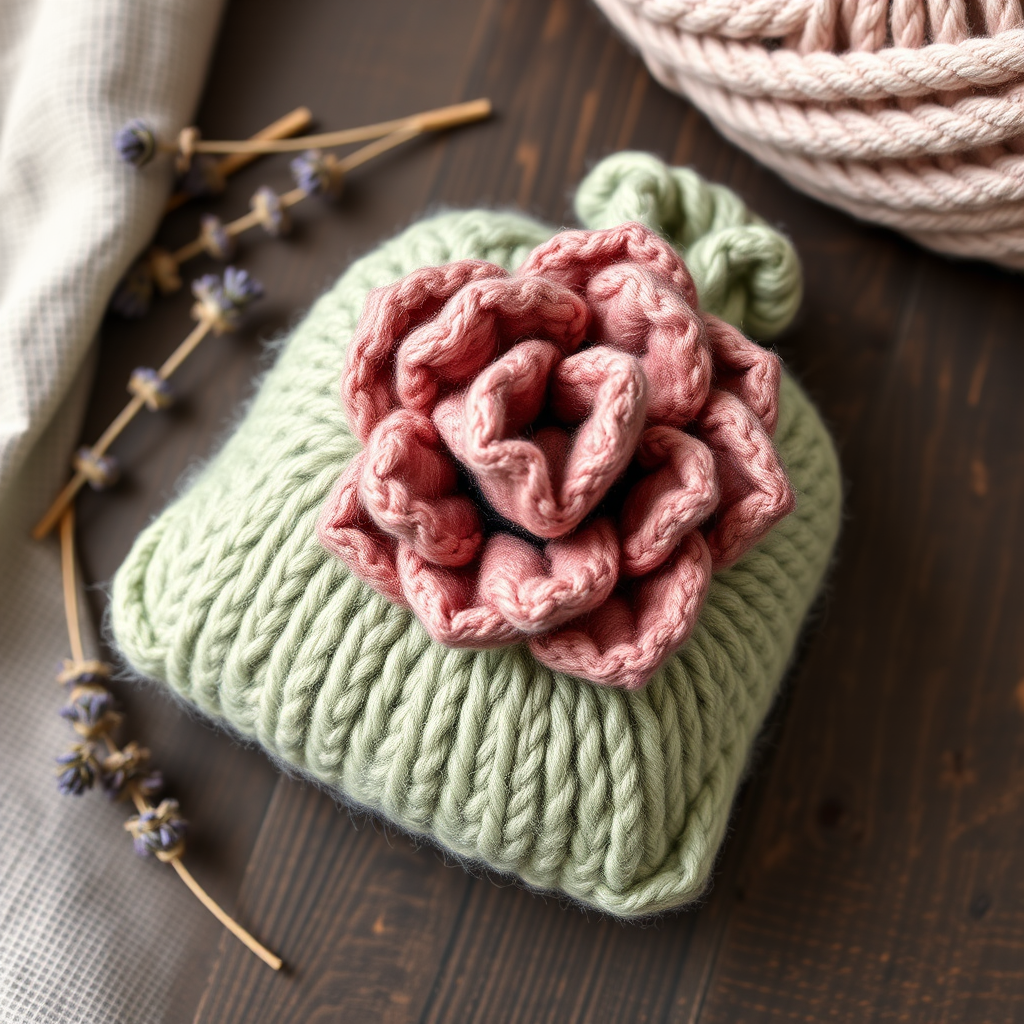
Whispering Wildflower Felted Sachet: A Beginner-Friendly Knitted Botanical Keepsake
Imagine opening your drawer to a gentle whiff of lavender, nestled inside a soft, handcrafted sachet that looks like it was plucked straight from a cottage garden. The Whispering Wildflower Felted Sachet is exactly that—a charming blend of rustic wool and delicate botanical beauty. This free knitting pattern is perfect for beginners who want to try their hand at felting, seed stitch, and creating a sweet, functional gift. The magic of felting means your stitches will soften and meld together, producing a sturdy, plush fabric that hides any minor imperfections—making it an incredibly forgiving project for new knitters.
In this guide, we'll walk you through every step, from casting on to the final assembly, ensuring you can recreate this fragrant keepsake with confidence. Let's dive into the world of felted knitting and create something truly special.
Materials Needed
Before you begin, gather the following supplies. The beauty of this project is its simplicity—you only need a few basic tools and two colors of yarn.
Yarn
- Main Color (MC): Worsted weight 100% wool yarn (e.g., Cascade 220) in soft sage green. Approximately 100 yards.
- Contrast Color (CC): Worsted weight 100% wool yarn in dusty rose pink. Approximately 50 yards.
Important: For felting to work, your yarn must be 100% animal fiber (wool, alpaca, etc.). Superwash or acrylic yarns will not felt properly.
Needles & Tools
- Knitting Needles: US Size 8 (5.0 mm) straight needles for the sachet body. For the flower, you'll need either a set of double-pointed needles (DPNs) in the same size or a long circular needle (24" or longer) for the magic loop technique.
- Tapestry Needle: A blunt-tipped tapestry needle for seaming, gathering, and embroidery.
- Washing Machine: For the felting process (plus a pillowcase or mesh laundry bag).
- Mild Detergent: A small amount of wool wash or gentle detergent.
- Dried Lavender or Potpourri: For filling the finished sachet.
Gauge
18 stitches and 24 rows = 4 inches in stockinette stitch before felting. Gauge is not critical for this project, but maintaining consistent tension throughout will ensure your piece felts evenly. Don't worry if your gauge is slightly off—the felting process will shrink everything by about 20-30%.
Step-by-Step Instructions
This project has three main components: knitting the sachet body, knitting the flower accent, and the felting process. We'll tackle each one in detail.
Part 1: Knitting the Sachet Body
The sachet body is knitted flat in a beautiful seed stitch pattern, which creates a nubby, textured fabric that felts beautifully. The garter stitch edges give it a clean, finished look.
Step 1: Cast On
With your Main Color (MC) yarn, cast on 30 stitches using your preferred method (long-tail cast on works well).
Step 2: Garter Stitch Edge
Row 1: Knit all stitches.
Row 2: Knit all stitches.
This creates a garter stitch border at the bottom of your piece, which will form the top edge of the sachet after seaming.
Step 3: Seed Stitch Body
Row 3: *K1, P1; repeat from * to end of row.
Rows 4-30: Repeat Row 3 for the seed stitch pattern. This means you'll continue the K1, P1 ribbing across all 27 rows. The seed stitch will naturally alternate, creating that lovely, bumpy texture.
Pro Tip: To keep track of your rows, place a stitch marker every 10 rows or use a row counter. The piece should measure approximately 6.5 inches wide and 6 inches tall before felting.
Step 4: Garter Stitch Edge (Top)
Row 31: Knit all stitches.
Row 32: Knit all stitches.
This mirrors the bottom edge and will form the opening of your sachet.
Step 5: Bind Off
Bind off all stitches knitwise. Cut your yarn, leaving a long tail (about 12 inches) for seaming.
Part 2: Seaming the Sachet Body
Now we'll transform your flat knitted square into a pouch.
Step 1: Fold and Pin
Fold the knitted square in half with the right sides (the seed stitch texture side) together. The garter stitch edges should be at the top and bottom. Pin the side seams to keep everything aligned.
Step 2: Sew the Side Seams
Thread your tapestry needle with the MC yarn tail. Using a mattress stitch or simple whip stitch, sew up one side seam from the bottom to the top. Repeat on the other side. Leave the top edge (the garter stitch rows) open—this is where you'll fill the sachet later.
Step 3: Turn Right Side Out
Carefully turn the pouch right side out, gently pushing out the corners. Set it aside while you knit the flower.
Part 3: Knitting the Flower Accent
The flower is knitted in the round, starting from the center and increasing outward to create ruffled petals. This is a fantastic introduction to working in the round and yarn overs.
Step 1: Cast On and Join
With your Contrast Color (CC) yarn, cast on 6 stitches. If using DPNs, distribute them evenly across 3 needles (2 stitches each). If using the magic loop method, pull the cable through the middle of your stitches. Join in the round, being very careful not to twist your stitches.
Step 2: Knit the Base Round
Round 2: Knit all 6 stitches.
Step 3: Increase Round 1
Round 3: *K1, YO (yarn over); repeat from * to end. You should now have 12 stitches on your needles.
What is a YO? A yarn over is simply wrapping the yarn over the right needle before knitting the next stitch. This creates an extra loop and a small hole, which will become part of the flower's delicate texture.
Step 4: Knit Even Round
Round 4: Knit all stitches, working each YO as a regular knit stitch. You'll still have 12 stitches.
Step 5: Increase Round 2
Round 5: *K2, YO; repeat from * to end. You should now have 18 stitches.
Step 6: Knit Even Round
Round 6: Knit all stitches, working YOs as knit stitches. (18 stitches)
Step 7: Increase Round 3
Round 7: *K3, YO; repeat from * to end. You should now have 24 stitches.
Step 8: Knit Even Round
Round 8: Knit all stitches, working YOs as knit stitches. (24 stitches)
Step 9: Bind Off
Round 9: Bind off all stitches loosely. It's important to bind off loosely so the edge can ruffle. Cut your yarn, leaving a long tail (about 18 inches) for gathering.
Part 4: Finishing the Flower
This is where the magic happens—transforming a flat circle into a ruffled bloom.
Step 1: Thread the Tail
Thread the long tail through your tapestry needle.
Step 2: Gather the Edge
Insert the needle through each bound-off stitch, running the yarn through all 24 stitches. Once you've gone all the way around, gently pull the yarn tight. The edge will gather and ruffle, forming a beautiful, organic flower shape.
Step 3: Secure the Center
With the flower gathered, take a few small stitches through the center to secure the shape. Weave in the end securely. The flower should be about 3 inches in diameter before felting.
Part 5: The Felting Process
Felting is the transformative step that turns your loose knitting into a dense, cozy fabric. This is where the sachet really comes to life.
Step 1: Prepare for the Wash
Place both the sachet body and the flower in a pillowcase or mesh laundry bag. This protects your knitting and catches any loose fibers. Add a small amount of mild detergent (like wool wash or a gentle liquid soap).
Step 2: Set Your Machine
Set your washing machine to a hot water, low agitation cycle. The combination of heat, moisture, and agitation causes the wool fibers to interlock and shrink.
Step 3: Monitor the Felting
Start the cycle and check on your pieces every 5-10 minutes. You want them to shrink by about 20-30%. The sachet should be about 5 inches square and the flower about 2.5 inches in diameter. The stitches should no longer be distinct—they'll look soft and melded together.
Important: Don't walk away! Felting can happen quickly, and you don't want to over-felt. If the pieces are shrinking too fast, stop the cycle immediately.
Step 4: Rinse and Dry
Once felted to your liking, remove the pieces from the machine. Rinse them in cold water to remove any soap. Gently squeeze out excess water—do not wring, as this can distort the shape. Roll them in a clean towel to absorb more moisture, then shape them gently and allow them to air dry completely.
Part 6: Assembly
Now for the final touches that bring your sachet to life.
Step 1: Attach the Flower
Once everything is completely dry, position the felted flower on the front of the sachet. Using your tapestry needle and CC yarn, sew the flower securely in place with a few hidden stitches around the center.
Step 2: Embroider Leaves (Optional)
For an extra botanical touch, use green yarn and a simple backstitch to embroider small leaves or stems around the flower. This adds a lovely detail that ties the whole design together.
Step 3: Fill the Sachet
Leave a small opening at the top of the sachet (you can leave one side seam partially unsewn, or create a small gap in the top edge). Fill the sachet with dried lavender or your favorite potpourri. Don't overstuff—you want it to be plump but not bursting.
Step 4: Close the Opening
Using your tapestry needle and MC yarn, sew the opening closed with a neat whip stitch. Weave in all loose ends.
Your Finished Keepsake
Congratulations! You've created a beautiful, fragrant Whispering Wildflower Felted Sachet. The soft sage green seed stitch body, adorned with a ruffled dusty rose flower, is a testament to your knitting skills. This sachet makes a thoughtful handmade gift for birthdays, housewarmings, or just because. Place it in a drawer to scent your linens, tuck it into a closet, or display it on a shelf as a charming piece of cottage-core decor.
Remember, felting is an art, and each piece will have its own unique character. Embrace the organic, slightly irregular shape of your flower—it's what makes your sachet one-of-a-kind. Happy knitting!


