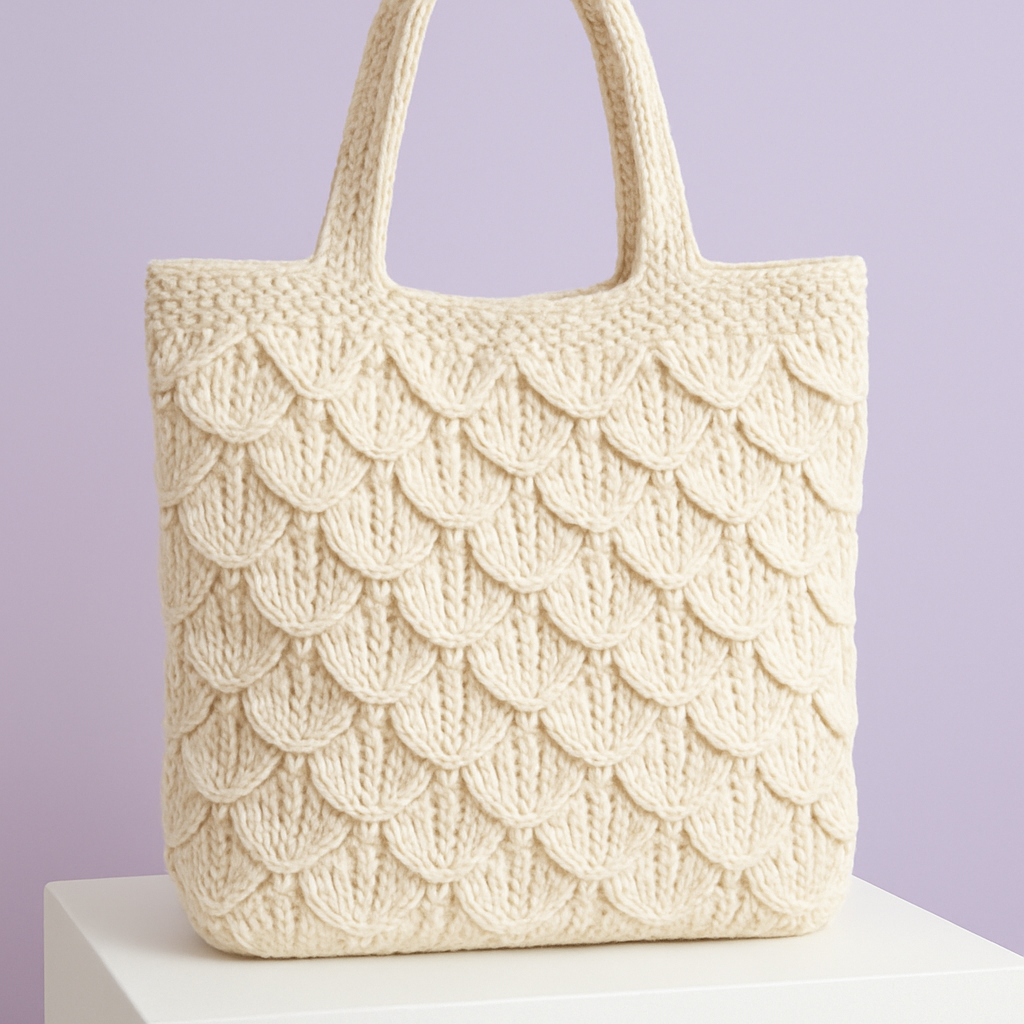
The Seafoam Ripple Tote Free Pattern – A Knitted Ode to Ocean Waves

The Seafoam Ripple Tote Free Pattern – A Knitted Ode to Ocean Waves
Carry the calming rhythm of the shore with this textured knitted tote, featuring a mesmerizing wave stitch that mimics the ebb and flow of the sea. Crafted in soft, sandy neutrals and seafoam greens, this bag is as practical as it is beautiful. Whether you're heading to the beach, the farmer's market, or simply want a touch of coastal serenity in your daily life, this tote is the perfect companion. Best of all, it's beginner-friendly, so even if you're new to knitting, you can create a stunning, functional piece of fiber art.
This pattern uses a simple combination of knit, purl, yarn overs, and decreases to create a gorgeous rippling texture. The result is a sturdy, eco-friendly bag that you'll be proud to carry. Let's dive in and start knitting your own ode to the ocean!
Materials Needed
Before you begin, gather the following materials. Having everything ready will make your knitting experience smooth and enjoyable.
Yarn
- Worsted weight cotton yarn (e.g., Lion Brand 24/7 Cotton) in three colors:
- Color A (Sand): Approximately 250g (about 5 skeins of 50g)
- Color B (Seafoam): Approximately 200g (about 4 skeins of 50g)
- Color C (Deep Teal): Approximately 150g (about 3 skeins of 50g)
Note: Cotton yarn is ideal for this project because it's durable, washable, and holds its shape well. The worsted weight ensures a thick, sturdy fabric perfect for a tote bag.
Needles and Tools
- US 7 (4.5 mm) knitting needles – straight or circular (circular needles can be more comfortable for longer projects)
- Tapestry needle – for seaming and weaving in ends
- Stitch markers – to help keep track of pattern repeats
- Scissors
Gauge
20 stitches and 28 rows = 4 inches in stockinette stitch (after blocking).
Be sure to check your gauge before starting. If your gauge is off, adjust your needle size accordingly. A proper gauge ensures your bag turns out the correct size.
Step-by-Step Instructions
This tote is knitted flat in two panels (front and back) and then seamed together. The wave pattern is created using a combination of knit, purl, and yarn over decreases. Follow along carefully, and you'll have a beautiful bag in no time.
Panel 1 (Make 2)
Cast on: With Color A (Sand), cast on 60 stitches.
Row 1 (Right Side): Knit all stitches.
Row 2 (Wrong Side): Purl all stitches.
Row 3: Switch to Color B (Seafoam). K2, *yo, k2tog, k4, ssk, yo, k2; repeat from * to last 2 stitches, k2.
Let's break down this row:
- K2: Knit the first 2 stitches.
- yo (yarn over): Bring the yarn to the front, then over the needle to the back, creating an extra loop on the needle. This creates a decorative hole and adds a stitch.
- k2tog (knit two together): Insert the right needle into the next two stitches as if to knit, and knit them together. This decreases one stitch.
- k4: Knit the next 4 stitches.
- ssk (slip, slip, knit): Slip the next two stitches knitwise, one at a time, to the right needle. Then insert the left needle into the front of these two slipped stitches and knit them together. This also decreases one stitch but leans in the opposite direction of k2tog, creating a balanced wave.
- yo: Yarn over again.
- k2: Knit the next 2 stitches.
Repeat the sequence between the asterisks (*) across the row. You'll do this sequence 7 times total (since 60 - 4 = 56, and 56 / 8 = 7). End the row with k2.
Row 4: With Color B, purl all stitches.
Row 5: Switch back to Color A. Knit all stitches.
Row 6: Purl all stitches.
Row 7: Switch to Color C (Deep Teal). K2, *yo, k2tog, k4, ssk, yo, k2; repeat from * to last 2 stitches, k2. (Same as Row 3, but with Color C.)
Row 8: With Color C, purl all stitches.
Row 9: Switch to Color A. Knit all stitches.
Row 10: Purl all stitches.
Repeat Rows 3–10 until the panel measures 14 inches from the cast-on edge, ending with a Row 10 (a purl row with Color A).
Bind off: Bind off loosely in knit. To bind off, knit the first two stitches, then pass the first stitch over the second stitch and off the needle. Knit one more stitch, pass the previous stitch over, and continue until one stitch remains. Cut the yarn, leaving a tail, and pull it through the last loop.
Repeat the entire process to make a second panel.
Finishing
Now that you have two beautiful panels, it's time to assemble your tote.
Step 1: Block the panels. Wet block both panels to ensure they are the same dimensions (approximately 12 inches wide by 14 inches tall). To wet block, soak the panels in lukewarm water, gently squeeze out excess water (don't wring), lay them flat on a towel, and pin them to the desired measurements. Allow them to dry completely.
Step 2: Seam the sides and bottom. Place the two panels with right sides together (the nice, textured sides facing each other). Using a tapestry needle and Color A yarn, sew the side seams and bottom seam using a mattress stitch. This stitch creates an invisible seam. Leave the top open.
How to do the mattress stitch: Thread your tapestry needle with a long piece of Color A yarn. Starting at the bottom corner, insert the needle between the first and second stitches on one side, then between the first and second stitches on the other side. Continue zigzagging back and forth, pulling the yarn snugly every few stitches. This will create a neat, flat seam.
Step 3: Turn the bag right side out. Gently push the corners out to make them crisp.
Handles (Make 2)
With Color A, cast on 8 stitches.
Work in stockinette stitch (knit on the right side, purl on the wrong side) until the handle measures 18 inches long.
Bind off loosely in knit. Repeat to make a second handle.
Tip: Stockinette stitch will curl at the edges. This is normal and actually gives the handles a nice, rolled look. If you prefer flat handles, you could work in garter stitch (knit every row) instead.
Attach Handles
Fold each handle in half to find the center point. This will help you position them evenly.
Attach one handle to the front panel and one to the back panel. Position the ends of each handle about 3 inches from the side seams and 2 inches down from the top edge.
Using a tapestry needle and matching Color A yarn, sew the handle ends securely to the inside of the bag. Make several passes through the handle and the bag fabric to ensure it's strong enough to hold weight. Repeat for all four handle ends.
Optional Lining
For extra durability and to prevent items from slipping through the knitted stitches, you can add a fabric lining.
- Cut a piece of cotton or canvas fabric to the same dimensions as your bag (approximately 12 inches wide by 14 inches tall), plus seam allowance.
- Fold the fabric in half with right sides together and sew the side and bottom seams, leaving the top open.
- Place the fabric lining inside the knitted bag, wrong sides together.
- Fold the top edge of the fabric lining down about 1 inch and pin it to the inside of the knitted bag.
- Hand-stitch the lining to the bag using a blind stitch or whip stitch, leaving a small opening.
- Turn the bag right side out through the opening, then hand-stitch the opening closed.
Your Seafoam Ripple Tote is now complete! Fill it with your favorite books, beach essentials, or market finds, and enjoy the coastal calm it brings to your day. Happy knitting!