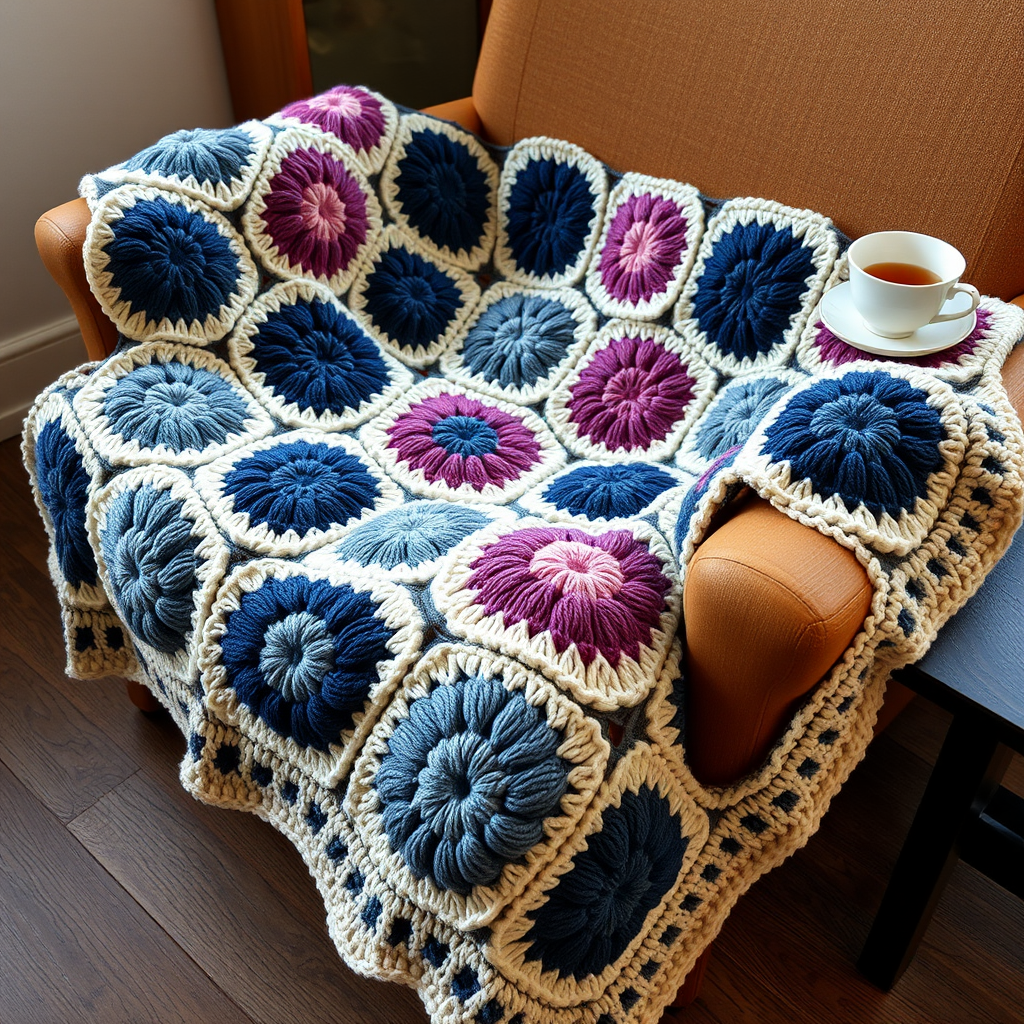
Riley's Rainbow Blocks Afghan Free Pattern – Crochet a Joyful Heirloom Throw

Riley's Rainbow Blocks Afghan: A Joyful Crochet Heirloom
There's something magical about a handmade blanket—it carries warmth, love, and memories in every stitch. Riley's Rainbow Blocks Afghan is a vibrant patchwork throw that weaves together soft pastel and jewel-tone squares, creating a cozy masterpiece that celebrates every color of the rainbow. Each block is a simple crochet motif, making this a perfect weekend project for beginners and a delightful gift for little ones (or anyone who needs a splash of color in their life).
This pattern is designed to be approachable yet rewarding. You'll create 49 individual 6-inch squares, each worked in four rounds with a different color per round, then join them in a stunning 7x7 grid. The result? A dense, cozy, heirloom-quality afghan that will be treasured for generations. Whether you're new to crochet or a seasoned maker looking for a joyful project, this rainbow throw is sure to brighten your home and your heart.
Materials Needed
Before you begin, gather these supplies to ensure a smooth and enjoyable crochet experience:
- Yarn: Worsted weight yarn in 7 colors—red, orange, yellow, green, blue, indigo, and violet—plus a neutral cream for joining. You'll need approximately 200g of each rainbow color and 400g of cream. (Tip: Choose soft, washable acrylic or a cotton blend for easy care.)
- Crochet Hook: 5.5 mm (I-9) crochet hook—this size pairs perfectly with worsted weight yarn for a balanced, not-too-tight, not-too-loose fabric.
- Tapestry Needle: For weaving in ends and whip-stitching blocks together.
- Scissors: For cutting yarn.
- Stitch Markers (optional): Helpful for keeping track of corners, especially if you're new to granny-square-style patterns.
Gauge: Each block measures 6 inches x 6 inches; 4 rounds = 4 inches in pattern. Gauge is important for ensuring your afghan comes out the right size, so take a moment to check your tension before diving in.
Step-by-Step Instructions
Block Pattern (Make 7 Blocks Per Color, 49 Total)
Each block uses four different colors (A, B, C, D). To create a rainbow gradient across your afghan, you'll want to plan your color placement. For example, if you're making a red block, use shades of red for rounds 1-4, or mix complementary colors for a more eclectic look. The choice is yours!
Round 1 (Color A):
- Make a magic ring (also called a magic circle). If you're new to this technique, wrap the yarn around your fingers twice, insert your hook, and pull up a loop to begin.
- Chain 3 (this counts as your first double crochet).
- Work 2 double crochet (dc) into the ring.
- Chain 2 (this forms your first corner space).
- Repeat the sequence (3 dc, ch 2) three more times into the ring. You should now have 4 groups of 3 dc and 4 ch-2 corners.
- Join with a slip stitch (sl st) to the top of the beginning chain-3.
- Fasten off and weave in the end. (You should have 12 dc and 4 ch-2 corners.)
Round 2 (Color B):
- Join Color B in any ch-2 corner space by pulling up a loop.
- Chain 3 (counts as first dc).
- Work (2 dc, ch 2, 3 dc) in the same corner space. This creates the corner cluster.
- *Chain 1, skip the next 3 dc from the previous round.
- Work (3 dc, ch 2, 3 dc) in the next ch-2 corner space.
- Repeat from * around the block, ending with a chain 1 after the last corner.
- Join with a sl st to the top of the beginning chain-3.
- Fasten off and weave in the end. (You should have 24 dc and 4 ch-2 corners.)
Round 3 (Color C):
- Join Color C in any ch-2 corner space.
- Chain 3 (counts as first dc).
- Work (2 dc, ch 2, 3 dc) in the same corner space.
- *Chain 1, work 3 dc in the next ch-1 space (the space between corner clusters from Round 2).
- Chain 1, then work (3 dc, ch 2, 3 dc) in the next corner space.
- Repeat from * around, ending with a chain 1, then 3 dc in the last ch-1 space, and a final chain 1.
- Join with a sl st to the top of the beginning chain-3.
- Fasten off and weave in the end. (You should have 36 dc and 4 ch-2 corners.)
Round 4 (Color D):
- Join Color D in any ch-2 corner space.
- Chain 3 (counts as first dc).
- Work (2 dc, ch 2, 3 dc) in the same corner space.
- *Chain 1, work 3 dc in the next ch-1 space.
- Chain 1, work 3 dc in the next ch-1 space.
- Chain 1, then work (3 dc, ch 2, 3 dc) in the next corner space.
- Repeat from * around, ending with a chain 1, then 3 dc in each remaining ch-1 space, and a final chain 1.
- Join with a sl st to the top of the beginning chain-3.
- Fasten off and weave in the end. (You should have 48 dc and 4 ch-2 corners.)
Pro Tip: As you complete each block, gently stretch it to check its shape. It should be square and measure approximately 6 inches across. If it's slightly off, adjust your tension on the next block.
Assembly: Joining the Blocks
Now comes the fun part—watching your rainbow come together!
- Arrange your blocks: Lay out all 49 blocks in a 7x7 grid. For a classic rainbow gradient, arrange them in horizontal rows: Row 1 all red, Row 2 all orange, Row 3 all yellow, and so on. Alternatively, create a diagonal rainbow by staggering the colors. Play with the layout until you're happy with the visual flow.
- Whip stitch join: Using your cream yarn and a tapestry needle, thread the needle with a long piece of yarn (about 18-24 inches). Place two blocks side by side with right sides facing up. Insert your needle through the back loops only of the corresponding stitches on both blocks, working from one edge to the other. This creates a flat, nearly invisible seam on the front.
- Match corners and edges: Be careful to match the corners and edges of each block precisely. The ch-2 corner spaces should align perfectly. Continue whip stitching blocks together in rows first, then join the rows to each other.
- Ensure flat seams: As you work, periodically lay the joined pieces flat to check that the seams are lying smooth and not puckering. If you notice any bunching, gently adjust your tension.
Border
The cream border frames your colorful masterpiece and gives it a polished, finished look.
Round 1:
- With the right side facing you, join cream yarn in any corner of the assembled afghan.
- Chain 3 (counts as first dc).
- Work 2 dc in the same corner space.
- *Double crochet in each dc across to the next corner.
- Work (3 dc, ch 2, 3 dc) in the corner space.
- Repeat from * around the entire afghan, ending with 3 dc in the starting corner, chain 2, and join with a sl st to the top of the beginning chain-3.
Round 2:
- Chain 3 (counts as first dc).
- Double crochet in each dc around the entire afghan.
- When you reach each corner ch-2 space, work (2 dc, ch 2, 2 dc) in that space to create a neat corner turn.
- Join with a sl st to the top of the beginning chain-3.
Round 3:
- Repeat Round 2 exactly. This adds width to your border, creating a lovely, substantial frame.
- Fasten off and weave in all ends carefully.
Finishing Touches
Your afghan is almost complete! The final step is blocking, which ensures your blanket lies flat and has crisp, straight edges.
- Blocking: Lay the afghan on a clean, flat surface (a bed or carpet works well). Gently mist it with water using a spray bottle, or use a steam iron held a few inches above the fabric (never directly on the yarn).
- Shape and pin: Gently stretch the afghan to its intended dimensions, smoothing out any wavy edges. If needed, use rust-proof pins to hold the corners and edges in place.
- Dry completely: Allow the afghan to air dry completely before removing pins or moving it. This sets the stitches and ensures your edges are perfectly straight.
Once dry, your Riley's Rainbow Blocks Afghan is ready to be draped over a rocking chair, spread across a bed, or wrapped around someone you love. This colorful heirloom is more than just a blanket—it's a labor of love, a celebration of color, and a cozy companion for years to come.
Happy crocheting, and enjoy watching your rainbow come to life, one block at a time!