Pink and Red Bandana Granny Square Free Crochet Pattern
A Pink and Red Bandana Granny Square You'll Be Proud Of
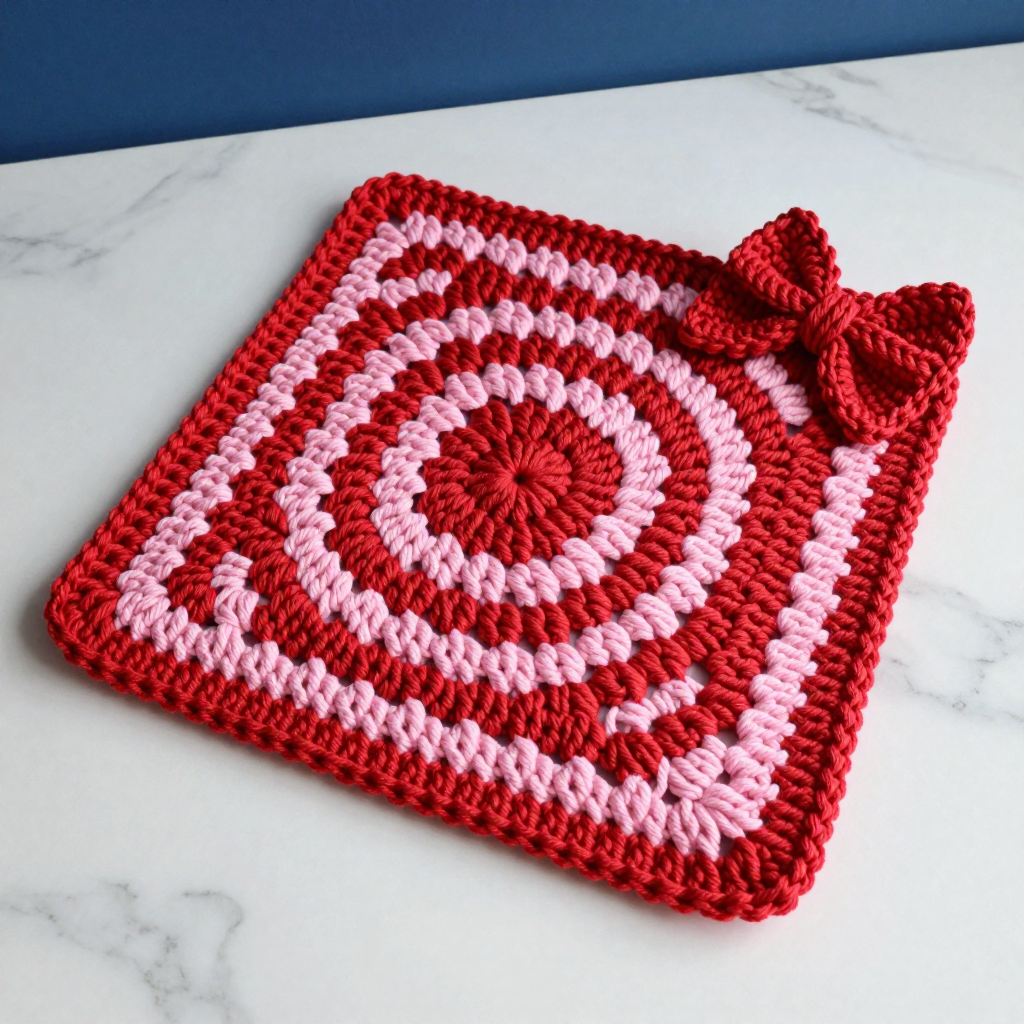
This sweet little square is the perfect first project for anyone who has never held a crochet hook before. It's a classic granny square worked in alternating rounds of cherry red and bubblegum pink, so it looks like a Western bandana, and it's finished with a tiny cherry red bow sewn onto one corner. The finished square is flat, soft, and about the size of your hand, and the repeating clusters of stitches make a soothing, rhythmic pattern that's easy to learn. You only need two colors of yarn and one hook, and you'll have a finished square in under an hour. Make one to sew onto a tote bag, or make a stack and join them into a cozy blanket.
Materials Needed
- Yarn: Worsted weight (category 4) acrylic or cotton yarn in two colors: cherry red (Color A) and bubblegum pink (Color B). You'll use about 15–20 yards total per square (roughly 8–10 yards of each color).
- Crochet hook: G/6 (4.0 mm).
- Stitch markers: At least 4, to mark your corners and your first stitch.
- Tapestry needle: A blunt-tipped needle with a large eye, for weaving in ends and sewing on the bow.
- Scissors: Sharp, small snips are easiest.
- Finished size: Approximately 6 x 6 inches (15 x 15 cm) per square.
Abbreviations and Beginner Glossary
- ch – chain. Wrap the yarn over your hook and pull it through the loop on your hook. This makes a small link.
- sl st – slip stitch. Insert your hook into the stitch, wrap yarn over, and pull it through both the stitch and the loop on your hook at once. It joins things without adding height.
- dc – double crochet. Wrap yarn over your hook, insert hook into the stitch, wrap yarn over and pull up a loop (3 loops on hook), wrap yarn over and pull through 2 loops, wrap yarn over and pull through the last 2 loops. This is a tall stitch.
- sp – space. The little gap created by a chain (for example, a "ch-2 space" is the hole made by two chains).
- st – stitch. One completed loop or cluster in your fabric.
- magic ring – an adjustable loop you make with the yarn tail so you can pull the center hole closed tight. If you've never made one, you can instead chain 4 and join with a sl st to form a ring.
- fasten off – cut the yarn a few inches from your work and pull the tail all the way through the last loop to lock it.
- join – attach a new color by making a slip stitch into the place directed, using the new yarn.
- turn – flip your work over so you work back the other way. (This pattern does not turn; you always work with the right side facing you.)
- right side – the front, prettier face of your work.
Gauge
Gauge: 4 double-crochet clusters and 4 rounds = 4 inches (10 cm).
Gauge means how big your stitches come out. It matters because if your stitches are looser or tighter than mine, your square will be bigger or smaller than 6 inches, and squares you make later may not match. To check, crochet the first 4 rounds of the square, then lay it flat and measure across the middle. If it's much smaller than about 4 inches, try a larger hook; if it's much larger, try a smaller hook. A quick swatch saves a lot of guessing.
Beginner Tips Before You Start
- Use stitch markers. Place one in each of the four ch-2 corner spaces as you make them, and one in your very first stitch of each round. It stops you from losing your place.
- Don't pull the yarn too tight. Keep a relaxed, even tension. Tight stitches make a stiff, cupped square that won't lie flat.
- Count your clusters every round. Each round adds one cluster per side, so the numbers grow predictably. Counting as you go is faster than fixing later.
- Work with the right side facing you. Do not turn your work between rounds; you always join and start again in the same direction.
- Keep your ch-2 corners open. Those little gaps are what make a granny square a granny square, so don't cinch them closed.
- Snug the magic ring early. Pull the tail tight after Round 1 so the center hole disappears.
Step-by-Step Instructions
Note: Each square is worked in joined rounds. Do not turn after each round; work with the right side facing you throughout. Change colors at the join as directed. The ch-3 at the start of each round counts as your first double crochet.
Square Body
Round 1 (cherry red): Make a magic ring. Ch 3 (counts as first dc). Work 2 dc into the ring. *Ch 2, work 3 dc into the ring.* Repeat from * to * two more times. Ch 2, join with a sl st to the top of the beginning ch-3. (12 dc, 4 ch-2 corner spaces) Pull the magic ring tail snug. Fasten off cherry red.
Round 2 (bubblegum pink): Join pink with a sl st in any ch-2 corner space. Ch 3 (counts as first dc). Work 2 dc in the same corner space. *Ch 2, work 3 dc in the same corner space (corner made). Ch 1, skip to the next ch-2 corner space, work 3 dc, ch 2, 3 dc in that corner space.* Repeat from * to * around, working the final corner into the starting corner space. Ch 1, join with a sl st to the top of the beginning ch-3. (24 dc, 4 ch-2 corners, 4 ch-1 side spaces) Fasten off pink.
Round 3 (cherry red): Join cherry red with a sl st in any ch-2 corner space. Ch 3. Work 2 dc in the same corner space. *Ch 2, work 3 dc in the same corner space. Ch 1, work 3 dc in the next ch-1 side space, ch 1.* Repeat from * to * around, working the final corner into the starting corner space. Ch 1, join with a sl st to the top of the beginning ch-3. (36 dc, 4 ch-2 corners, 8 ch-1 side spaces) Fasten off cherry red.
Round 4 (bubblegum pink): Join pink with a sl st in any ch-2 corner space. Ch 3. Work 2 dc in the same corner space. *Ch 2, work 3 dc in the same corner space. (Ch 1, work 3 dc in the next ch-1 side space) twice, ch 1.* Repeat from * to * around, working the final corner into the starting corner space. Ch 1, join with a sl st to the top of the beginning ch-3. (48 dc, 4 ch-2 corners, 12 ch-1 side spaces) Fasten off pink.
Round 5 (cherry red): Join cherry red with a sl st in any ch-2 corner space. Ch 3. Work 2 dc in the same corner space. *Ch 2, work 3 dc in the same corner space. (Ch 1, work 3 dc in the next ch-1 side space) three times, ch 1.* Repeat from * to * around, working the final corner into the starting corner space. Ch 1, join with a sl st to the top of the beginning ch-3. (60 dc, 4 ch-2 corners, 16 ch-1 side spaces) Fasten off cherry red and weave in all ends. Square should measure approximately 6 x 6 inches (15 x 15 cm).
Corner Bow Appliqué (make 1 per square, cherry red)
Bow Center: Ch 6. Row 1: Dc in the 4th ch from hook and in each of the next 2 ch. (3 dc) Ch 3, turn. Row 2: Dc in each dc across. (3 dc) Fasten off, leaving a 6-inch tail. This small rectangle forms the knot of the bow.
Bow Loops (make 2): Ch 8. Row 1: Dc in the 4th ch from hook and in each ch across. (5 dc) Ch 3, turn. Row 2: Dc in each dc across. (5 dc) Fasten off, leaving a 6-inch tail. Repeat for the second loop.
Assembly and Finishing
1. Build the bow. Pinch the center of one bow loop and stitch it to one short end of the bow center rectangle using the tail and tapestry needle. Repeat with the second loop on the opposite end, angling the loops slightly outward so the bow sits flat.
2. Attach the bow. Using the remaining tails, sew the finished bow securely to one corner of the square, placing it just inside the ch-2 corner space so the bow sits on the corner point. Weave in all ends.
3. Weave in ends. Thread each loose tail onto the tapestry needle and run it back and forth through the back of the stitches for about an inch, then trim close. Never tie a knot; weaving hides the tail.
4. Block the square. Lightly mist the square with water (or hold a steam iron a few inches above it, never touching the yarn) and pin it flat to a towel or blocking mat, easing the corners square. Let it dry completely. This settles the stitches and makes the corners crisp.
5. Join squares (optional). If making a blanket, whipstitch or single crochet squares together through the back loops, matching corner spaces. For a tote embellishment, sew the square to the bag front with a running stitch around the outer edge.
Pro Tips and Variations
- Change the colors. Swap cherry red and pink for any two colors you love, or work each round in a different color for a scrappy look. Just keep the same yarn weight so your squares stay the same size.
- Make it bigger or smaller. To grow the square, simply keep repeating the Round 5 pattern (each round adds one more cluster per side). To make a smaller square, stop after Round 3 or 4.
- Substitute yarn. Cotton gives crisp, defined stitches; acrylic is softer and cozier. Stay with worsted weight (category 4) and check your gauge so your squares match.
- Skip the bow. Leave the corner plain for a simpler square, or add a tiny crocheted flower or button instead for a different Western touch.