Chevron Plait Cuff Duo Free Pattern: Crochet Braid Cuffs in Burgundy & Gold
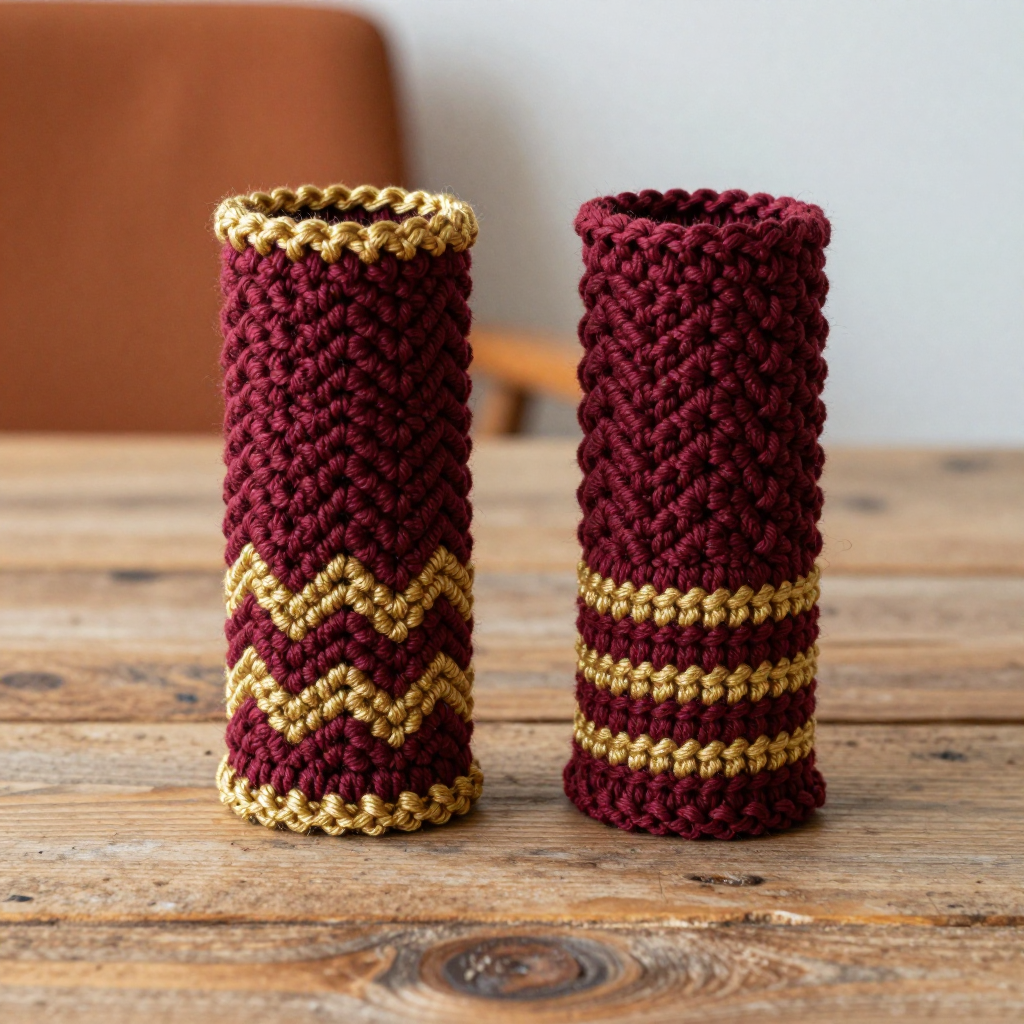
Chevron Plait Cuff Duo Free Pattern: Crochet Braid Cuffs in Burgundy & Gold
Introduction
If you have ever wanted to make something that looks like it came from a folk-art market stall but takes only an evening to finish, these chevron plait cuffs are exactly that project. They are perfect for complete beginners because each cuff is a small, flat rectangle of simple single crochet and double decreases that you seam into a little tube — no shaping, no complicated stitch work, no fitting. The finished cuffs are snug 4-inch tubes with a gentle zigzag texture and a softly ruffled contrasting edge at each opening, one in deep solid burgundy and one in burgundy with warm gold stripes. Slip them over a single braid or ponytail and a plain plait instantly becomes a statement, and the bulky wool feels soft, springy and cosy against your hair.
Materials Needed
- Yarn: Bulky (weight category 5) wool, approx. 55 yd (50 m) total — 30 yd (27 m) burgundy and 25 yd (23 m) gold. A smooth, slightly felted wool works best because the chevron texture shows clearly.
- Crochet hook: 6.0 mm (US J-10), or whatever size gives you the gauge below.
- Stitch markers: 2–4, to mark the first stitch of each row and your colour changes.
- Tapestry needle (yarn needle): a blunt-tipped needle with an eye big enough for bulky yarn, for seaming and weaving in ends.
- Scissors for cutting yarn.
- Finished size: Each cuff measures 4 in (10 cm) in circumference x 3 in (7.5 cm) tall, worked flat and seamed into a tube. It fits snugly around a single braid or ponytail. You will make 2 cuffs: Cuff A solid burgundy, Cuff B gold-striped.
Abbreviations and Beginner Glossary
Every abbreviation used in this pattern is listed here. Read this once before you begin — nothing is assumed.
- ch – chain. Make a loop with the yarn, then pull a new loop through it. Each loop you pull through is one chain. Chains form your starting foundation.
- sc – single crochet. Insert your hook into the next stitch, wrap yarn over the hook, pull up a loop (2 loops on hook), wrap yarn over again, pull through both loops. One loop remains. This is the shortest, tightest basic stitch.
- dc – double crochet. Wrap yarn over the hook first, insert hook into the stitch, pull up a loop (3 loops on hook), yarn over and pull through 2 loops, yarn over and pull through the last 2 loops. (This pattern does not use dc in the body, but it appears in the glossary so you recognise it.)
- sc2tog – single crochet 2 together. This is a decrease: it turns 2 stitches into 1. Insert hook in the next stitch, yarn over, pull up a loop; insert hook in the following stitch, yarn over, pull up a loop (3 loops on hook); yarn over and pull through all 3 loops. One loop remains.
- 3 sc in next st – work three single crochet stitches into the same single stitch. This is an increase and creates the upward peak of the chevron.
- st(s) – stitch(es).
- rep – repeat. Do the instruction again the number of times stated.
- RS – right side. The “public” side of your work that faces out when worn.
- sl st – slip stitch. Insert hook into the stitch, yarn over, pull the loop straight through the loop on your hook. It joins without adding height.
- Rnd – round. A circle of stitches worked around an opening and joined with a slip stitch.
- yarn over – wrap the working yarn over your hook from back to front.
- fasten off – cut the yarn a few inches from the work and pull the tail all the way through the last loop to lock it.
- whipstitch – a simple seaming stitch: pass the needle over the edge of both pieces and back through, over and over, like a spiral of small diagonal stitches.
Gauge
14 sts and 8 rows = 4 in (10 cm) in chevron pattern. In practice this means one 14-stitch repeat measures 4 in (10 cm) wide, and one full chevron repeat (2 rows) measures about 1 in (2.5 cm) tall.
Why gauge matters: gauge is simply how big your stitches come out. If your stitches are bigger than the pattern expects, your cuff will be too loose and slide off the braid; if they are smaller, it will be too tight to pull on. How to swatch: chain 29 and work Rows 1–2 of the Chevron Stitch below, then repeat Row 2 until your swatch is about 4 in (10 cm) tall. Lay it flat without stretching and measure across the middle. If you have more than 14 stitches in 4 in, go up a hook size; if you have fewer, go down a hook size. The swatch also doubles as your practice piece — a lovely bonus for a first project.
Beginner Tips Before You Start
- Count every row. The chevron pattern keeps a constant 29 stitches, so if your count drifts, you have dropped or added a stitch. Count at the end of each row before moving on.
- Use a stitch marker in the first stitch of each row. The first stitch is easy to miss, and marking it keeps your edges straight.
- Do not pull the yarn too tight. Tension should be relaxed enough that your hook slides easily. Tight stitches make a stiff, small cuff that will not fit over a braid.
- Keep the two sc2tog pairs next to each other. They form the downward point of the zigzag; the 3-sc group forms the peak. If they drift apart, the chevron loses its shape.
- For Cuff B, twist the yarns at each colour change. Lay the old colour over the new one before you pick up the new colour, so no gap or hole appears at the edge.
- Work the edging loosely. The ripple ridge is meant to ruffle gently; if you crochet it tightly it will pucker the opening.
Step-by-Step Instructions
The Chevron Stitch (multiple of 14 sts + 1)
Row 1 (RS): Ch 1, sc in first st, *sc in next 5 sts, sc2tog over next 2 sts, sc2tog over next 2 sts, sc in next 5 sts, 3 sc in next st; rep from * to end, working the last 3-sc group into the final st.
Row 2: Ch 1, sc in first st, *sc in next 5 sts, sc2tog over next 2 sts, sc2tog over next 2 sts, sc in next 5 sts, 3 sc in next st; rep from * to end.
Repeat Row 2 for the pattern. Each 14-stitch repeat forms one downward point (the two sc2tog pairs) and one upward peak (the 3-sc group).
Cuff A — Solid Burgundy
With burgundy, ch 29.
Row 1 (RS): Work Chevron Row 1 across the chain. (29 sts — 2 chevron repeats)
Rows 2–12: Work Chevron Row 2, keeping 29 sts. (29 sts) The piece now measures approx. 3 in (7.5 cm) tall.
Fasten off, leaving a 12 in (30 cm) tail for seaming.
Cuff B — Gold-Striped
With burgundy, ch 29.
Row 1 (RS): Work Chevron Row 1 in burgundy. (29 sts)
Rows 2–3: Chevron Row 2 in burgundy. (29 sts)
Rows 4–5: Change to gold; Chevron Row 2. (29 sts)
Rows 6–7: Change to burgundy; Chevron Row 2. (29 sts)
Rows 8–9: Change to gold; Chevron Row 2. (29 sts)
Rows 10–11: Change to burgundy; Chevron Row 2. (29 sts)
Row 12: Change to gold; Chevron Row 2. (29 sts)
Fasten off, leaving a 12 in (30 cm) tail. Carry the colours up the side edge, twisting the yarns every row to avoid gaps.
Seaming (Both Cuffs)
Fold each piece in half with RS together so Row 1 meets Row 12. Thread the long tail onto your yarn needle and whipstitch the short side edges together to form a tube: bring the needle from front to back over both edges, then repeat along the whole edge, keeping the stitches even and snug but not tight. Weave in the ends.
Contrasting Ripple Ridge Edging (Both Openings, Both Cuffs)
Hold the cuff with RS facing. Join the contrasting yarn (gold on Cuff A, burgundy on Cuff B) to any stitch at one opening.
Rnd 1: Ch 1, sc evenly around the opening, working 1 sc in each row-end along the seam edge and 1 sc in each stitch along the cast-on/final edge — approx. (28 sc). Join with sl st to first sc.
Rnd 2 (ripple ridge): Ch 1, *sc in next 2 sts, 2 sc in next st; rep from * around, join with sl st — approx. (37 sts). The extra stitches create a gently ruffled ripple ridge.
Fasten off and weave in ends. Repeat the edging around the second opening of each cuff.
Assembly and Finishing
Seam check: before you weave anything in, turn each cuff RS out and slip it over your wrist to confirm the tube is snug but not tight. If it is too loose, re-seam a little deeper into the edge; if it is too tight, undo the seam and re-seam closer to the edge.
Weaving in ends: thread each tail onto the tapestry needle and run it through the inside of several stitches in one direction, then back through a few stitches in the opposite direction. Trim close to the work. Never knot the ends — knots create lumps that show through the chevron texture.
Blocking: steam-block each cuff flat. Hold a steam iron an inch or two above the fabric (never press the iron directly onto the wool) and let the steam relax the stitches, then pat the cuff into a neat 4 in x 3 in (10 cm x 7.5 cm) rectangle and leave it to dry completely. This opens up the chevron points and softens the ripple ridge.
Wearing: slip one cuff over a braid or ponytail. Wear one cuff per braid, or stack both on a single plait for a bolder folk-art look.
Pro Tips and Variations
- Change the colours: swap burgundy and gold for any two contrasting bulky wools — forest green and cream, navy and mustard, or black and rust all look wonderful in this chevron texture. Keep one colour solid and stripe the other for the same duo effect.
- Adjust the size: the chevron repeat is 14 stitches + 1. To make a larger cuff, chain 43 (3 repeats) instead of 29 and work the same number of rows; to make a smaller one for fine braids, chain 15 (1 repeat). The edging instructions stay the same — just work evenly around whatever opening you have.
- Substitute the yarn: a worsted (category 4) wool works too — go down to a 5.0 mm (US H-8) hook and check your gauge again, since a thinner yarn makes a smaller cuff.
- Make it a matching set: use the leftover yarn to crochet a simple 3-chain tie or a tiny sc flower to sew onto the seam of each cuff for extra folk-art charm.


