Whispering Dunes Braided Puff Baby Blanket Free Pattern – A Cloud-Soft Heirloom
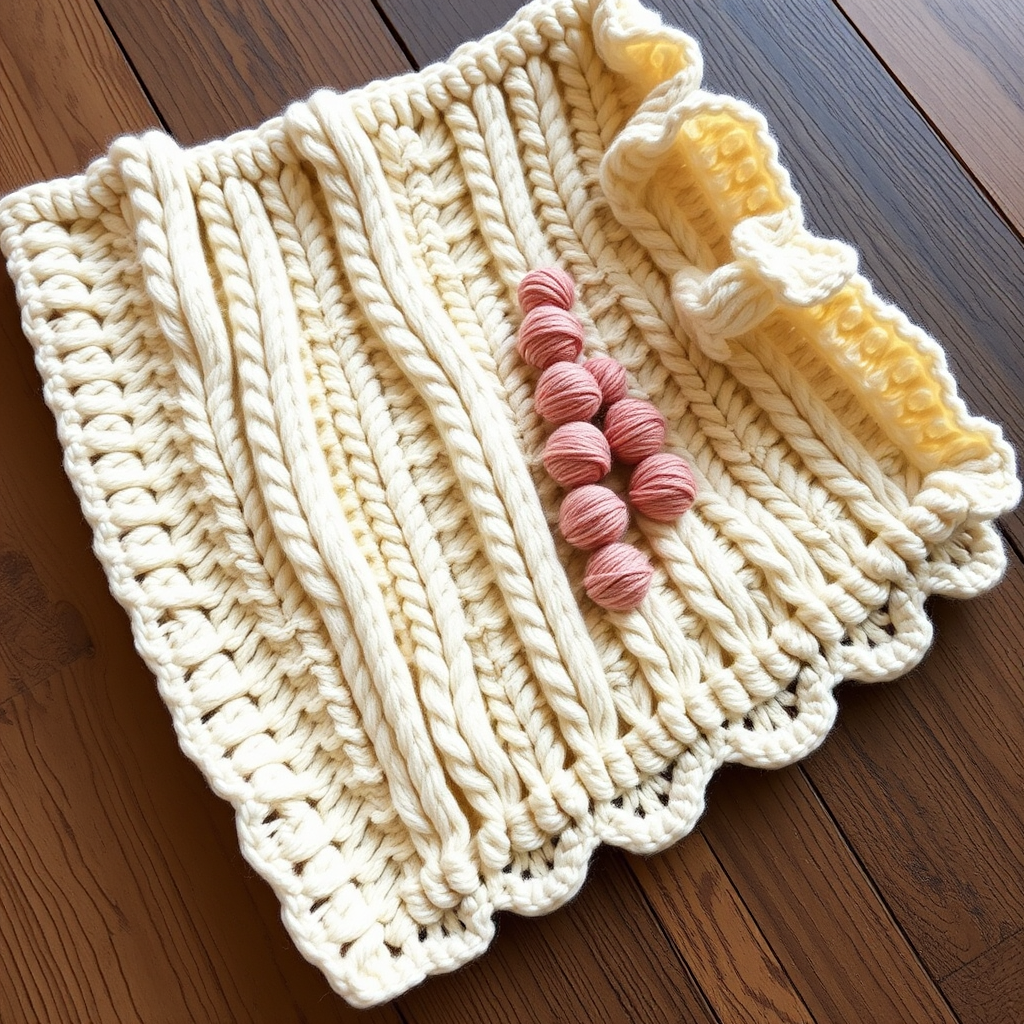
Whispering Dunes Braided Puff Baby Blanket Free Pattern – A Cloud-Soft Heirloom
Wrap your little one in the gentle luxury of the Whispering Dunes blanket, where plush braided cables meet airy puff stitches for a texture that feels like a warm hug. This heirloom-quality pattern uses a serene palette of sand, blush, and cream to create a modern, calming nursery centerpiece. Whether you're a seasoned knitter or a confident beginner looking for a rewarding project, this blanket is designed to become a cherished family keepsake. The combination of classic cables and playful puff stitches creates a dimensional, cloud-like softness that is both visually stunning and irresistibly touchable.
Materials Needed
Before you begin, gather the following materials to ensure a smooth and enjoyable knitting experience. The quality of your materials will directly impact the final look and feel of your blanket, so choose soft, durable yarns that are gentle on baby's skin.
Yarn
- Weight: Worsted weight (Category 4) superwash merino wool or a soft acrylic blend; approximately 1200 yards total.
- Color A (Cream): 500 yards – for the main body, borders, and cable panels.
- Color B (Blush): 350 yards – for the center puff stitch column.
- Color C (Sand): 350 yards – for the two outer puff stitch columns.
Needles & Hooks
- Knitting Needles: US Size 8 (5.0 mm) circular knitting needles with a 32-inch cable. The long cable is essential for holding all 120 stitches comfortably.
- Crochet Hook: US Size G/6 (4.0 mm) crochet hook for creating the puff stitch accents and the optional border.
- Cable Needle: A small cable needle (or double-pointed needle) for the braided cable panels.
Notions
- Stitch Markers: At least 8 markers to delineate the different sections of the pattern.
- Tapestry Needle: For weaving in ends and seaming the border.
- Scissors: For cutting yarn.
Gauge
- Stockinette Stitch: 18 stitches and 24 rows = 4 inches (knit flat).
- Braided Cable Panel: 24 stitches = 4 inches. Adjust needle size if necessary to achieve the correct gauge for a professional finish.
Step-by-Step Instructions
This pattern is worked flat in one piece from the bottom up. The braided cable panel runs vertically down the center, flanked by puff stitch columns and garter stitch borders. Follow these detailed instructions carefully, and you'll create a stunning heirloom blanket.
Finished Size
Approximately 30 inches wide x 36 inches long (including border).
Abbreviations
- K = knit
- P = purl
- K2tog = knit two together (decrease)
- SSK = slip, slip, knit (decrease)
- C4F = cable 4 front (slip 2 stitches to cable needle, hold in front, knit next 2 stitches, then knit 2 from cable needle)
- C4B = cable 4 back (slip 2 stitches to cable needle, hold in back, knit next 2 stitches, then knit 2 from cable needle)
- Yo = yarn over
- Sc = single crochet (for puff stitch border)
- Puff stitch (using crochet hook): Yo, insert hook into stitch, pull up loop (3 loops on hook), repeat 3 more times into same stitch (7 loops on hook), yo and pull through all 7 loops, ch 1 to close.
Pattern Notes
- Worked flat in one piece from bottom up. The braided cable panel runs vertically down the center, flanked by puff stitch columns and garter stitch borders.
- Use a separate ball of yarn for each color section to avoid long floats; twist yarns at color changes to prevent holes.
- Always read the pattern carefully and mark your place with a highlighter or sticky note to avoid mistakes.
Foundation and Border
Foundation: With Color A (Cream), cast on 120 stitches using the long-tail method or your preferred cast-on.
Border (Rows 1-8): Knit every row (garter stitch) for 8 rows. This creates a sturdy, non-curling edge that frames the blanket beautifully.
Begin Main Pattern (Row 9)
Row 9 (RS): K6 (garter border), place marker, work Row 1 of Braided Cable Panel over next 24 stitches (see below), place marker, work Puff Stitch Section over next 60 stitches (see below), place marker, work Row 1 of Braided Cable Panel over next 24 stitches, place marker, K6 (garter border).
Row 10 (WS): K6, P24 (cable panel), work Puff Stitch Section (purl all stitches in this section on WS), P24, K6.
Braided Cable Panel (24 stitches, repeat 12 rows)
This panel creates the beautiful rope-like braids that give the blanket its name. Follow the row-by-row instructions carefully, and use a cable needle for the C4F and C4B stitches.
- Row 1 (RS): P2, C4F, C4B, P4, C4F, C4B, P2.
- Row 2 and all WS rows: Knit the knit stitches as they appear, purl the purl stitches (i.e., P2, K8, P4, K8, P2).
- Row 3: P2, K8, P4, K8, P2.
- Row 5: P2, C4B, C4F, P4, C4B, C4F, P2.
- Row 7: P2, K8, P4, K8, P2.
- Row 9: P2, C4F, C4B, P4, C4F, C4B, P2.
- Row 11: P2, K8, P4, K8, P2.
- Row 12: Repeat Row 2.
Tip: Keep your cable needle handy and always hold it in the correct direction (front for C4F, back for C4B) to ensure the braids twist consistently.
Puff Stitch Section (60 stitches, worked in stockinette with puff stitch columns)
This section adds the delicate, cloud-like texture that makes this blanket so special. It is divided into three columns of 20 stitches each, with the center column in Color B (Blush) and the two outer columns in Color C (Sand).
- Column Setup: The 60-stitch section is divided as follows: 20 stitches in Color C (Sand), 20 stitches in Color B (Blush), 20 stitches in Color C (Sand). Use separate balls of yarn for each column and twist the yarns at the boundaries on the WS to avoid holes.
- Stitch Pattern: Each column is worked in stockinette (knit on RS, purl on WS) for 6 rows. On the 7th row (RS), work a puff stitch (using the crochet hook) into the 10th stitch of each column (the center of the column). Continue in stockinette for 6 more rows, then work another puff stitch. Repeat this 13-row sequence throughout the blanket.
- Puff Stitch Technique: To make a puff stitch, insert the crochet hook into the specified stitch, yarn over, and pull up a loop (3 loops on hook). Repeat this three more times into the same stitch (7 loops on hook). Yarn over and pull through all 7 loops, then chain 1 to close the puff. This creates a rounded, dimensional bobble.
Tip: Work the puff stitches loosely to maintain the soft, airy feel of the blanket. If your puff stitches are too tight, the fabric may pucker.
Continue Pattern
Repeat Rows 9-10 (with the 12-row cable repeat and 13-row puff sequence) until the piece measures approximately 34 inches from the cast-on edge, ending with a WS row. This ensures that the pattern is symmetrical and the final border aligns correctly.
Final Border
Border (Rows 1-8): Knit every row (garter stitch) for 8 rows. Bind off loosely in knit to maintain the stretchy edge. A loose bind-off is crucial to prevent the edge from pulling in.
Finishing
Weave in all ends using a tapestry needle, being careful to secure them tightly so they don't unravel with use. Block the blanket gently to size. Lay it flat on a towel, pin it to the desired dimensions, and mist with water. Allow it to dry completely before removing the pins. This will even out the stitches and enhance the cable and puff textures.
Optional Crochet Puff Border
For an extra-special finish, add a decorative crochet border around the entire blanket:
- Round 1: Using the crochet hook and Color A (Cream), work a round of single crochet (sc) around the entire blanket, working 3 sc in each corner to turn the corners smoothly.
- Round 2: Work a round of puff stitches (as defined above) in each sc, with ch 1 between puffs. This creates a scalloped, cloud-like edge.
- Round 3: Finish with a round of sc in Color B (Blush) to frame the puffs beautifully.
- Weave in ends: Secure all loose ends and trim.
Your Whispering Dunes Braided Puff Baby Blanket is now complete! This heirloom-quality piece is sure to be treasured for generations, offering warmth, comfort, and a touch of serene elegance to any nursery. Enjoy the process, and don't hesitate to reach out if you have any questions. Happy knitting!


