Whimsical Woodland Gnome Basket Free Pattern
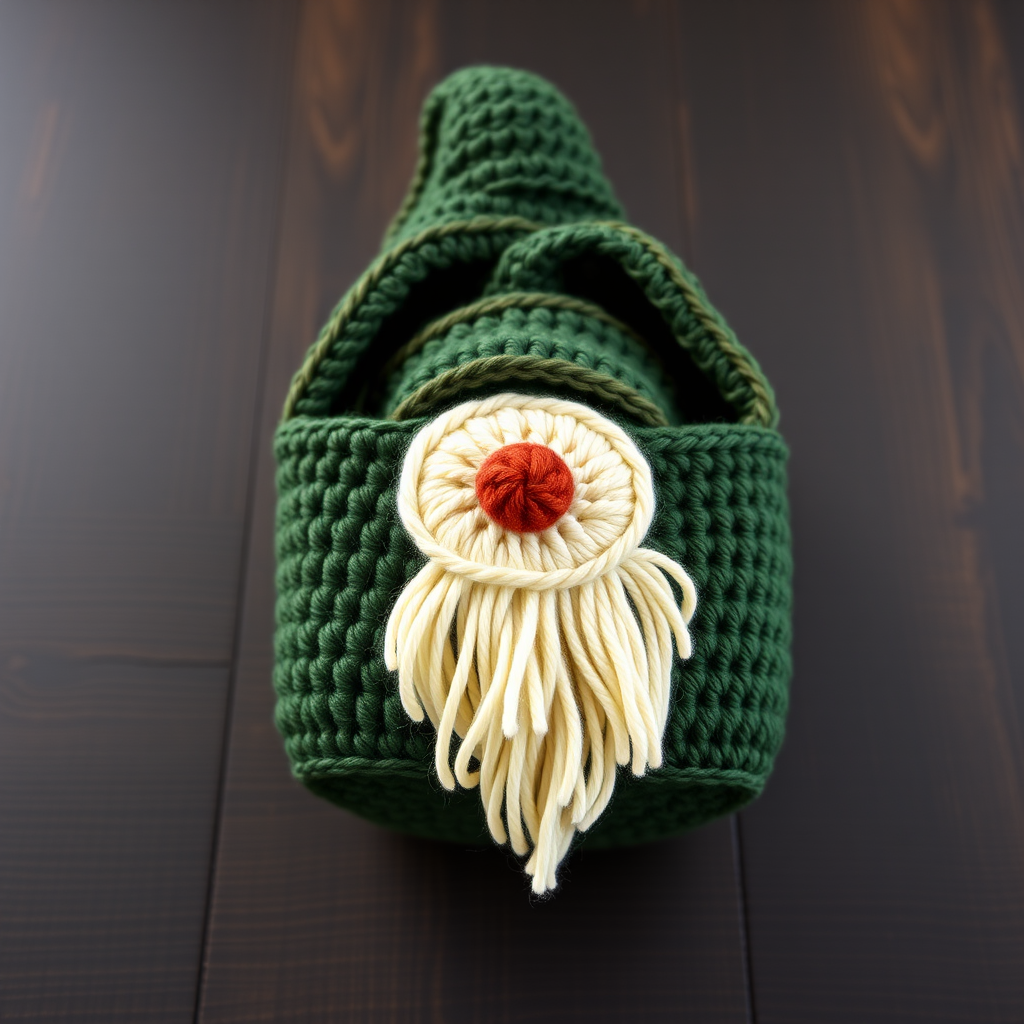
Whimsical Woodland Gnome Basket: A Free Crochet Pattern
Bring a touch of forest magic into your home with this charming Whimsical Woodland Gnome Basket! This delightful project is the perfect blend of functional storage and adorable decor. Whether you're looking to organize trinkets, create a festive centerpiece, or simply enjoy a fun and rewarding crochet session, this pattern is designed with beginners in mind. With its rich forest green walls, a fluffy cream beard, and a rust-red nose, this gnome basket is sure to become a cherished handmade treasure.
This pattern uses basic single crochet stitches and simple shaping, making it an excellent next step for those who have mastered the fundamentals. Let's gather your materials and get started on creating this whimsical woodland companion!
Materials Needed
Before we dive into the crochet magic, let's make sure you have everything you need. This project is wonderfully portable and requires just a few supplies:
- Yarn: Worsted weight yarn in three colors:
- Forest Green: For the basket and hat (approx. 200-250 yards)
- Cream: For the face panel and beard (approx. 100 yards)
- Rust Red: For the nose (small amount, approx. 10 yards)
- Crochet Hook: 5.0 mm (H/8) crochet hook
- Other Tools: Yarn needle for weaving in ends and sewing pieces together, scissors, and a small amount of polyester fiberfill for stuffing the nose.
Gauge: 16 single crochet (sc) x 18 rows = 4 inches. While gauge is important for size, this project is forgiving—just keep your tension consistent for a neat finish.
Step-by-Step Instructions
Let's break this down into manageable sections. We'll start with the basket base, build up the walls, create the gnome's face features, and finally assemble everything together. Take your time, follow each step carefully, and you'll have a beautiful gnome basket in no time.
Part 1: Basket Base
We'll begin by crocheting a flat, circular base. This will give our basket a sturdy foundation.
- Round 1: Make a magic ring. Chain 1 (this does not count as a stitch), then work 6 single crochet (sc) into the ring. Pull the tail to tighten the ring closed. (6 stitches)
- Round 2: Work 2 sc into each stitch around. (12 stitches)
- Round 3: *Sc in the next stitch, 2 sc in the next stitch.* Repeat from * to * around. (18 stitches)
- Round 4: *Sc in the next 2 stitches, 2 sc in the next stitch.* Repeat from * to * around. (24 stitches)
- Round 5: *Sc in the next 3 stitches, 2 sc in the next stitch.* Repeat from * to * around. (30 stitches)
- Round 6: *Sc in the next 4 stitches, 2 sc in the next stitch.* Repeat from * to * around. (36 stitches)
- Round 7: *Sc in the next 5 stitches, 2 sc in the next stitch.* Repeat from * to * around. (42 stitches)
- Round 8: *Sc in the next 6 stitches, 2 sc in the next stitch.* Repeat from * to * around. (48 stitches)
- Round 9: *Sc in the next 7 stitches, 2 sc in the next stitch.* Repeat from * to * around. (54 stitches)
- Round 10: *Sc in the next 8 stitches, 2 sc in the next stitch.* Repeat from * to * around. (60 stitches)
Your circular base should now measure about 5 inches in diameter. If it's slightly larger or smaller, don't worry—just keep your tension consistent for the rest of the project.
Part 2: Basket Walls
Now we'll start building upward to create the sides of the basket. This is where the magic happens!
- Round 11: This round creates a crisp, clean edge for the bottom of the basket. Working in the back loops only, sc in each stitch around. (60 stitches)
- Rounds 12-25: Sc in each stitch around for all these rounds. (60 stitches each round)
Continue working these rounds until your basket measures about 5 inches tall from the base. The walls will naturally curl upward, creating a sturdy container. Once you've reached the desired height, fasten off your yarn and weave in the loose end securely with your yarn needle.
Part 3: Gnome Face Panel
Now for the fun part—creating the gnome's face! We'll start with the cream-colored oval panel that forms the base of his face.
- With your cream yarn, chain 11.
- Row 1: Starting in the 2nd chain from your hook, sc in each chain across. (10 stitches)
- Row 2: Chain 1, turn your work. Sc in each stitch across. (10 stitches)
- Rows 3-10: Repeat Row 2 until your panel is roughly square, about 10 rows total. Fasten off and set aside.
Part 4: Gnome Beard
The beard adds that classic, fluffy gnome look. We'll build it directly onto the bottom edge of the face panel.
- Attach your cream yarn to the bottom edge of the face panel with a slip stitch.
- Row 1: Sc evenly across the bottom edge of the panel. (10 stitches)
- Row 2: Chain 1, turn. Work 2 sc in each stitch across. (20 stitches)
- Rows 3-5: Repeat Row 2 three more times. Each row will double the stitch count, creating a lovely, flared beard shape. After Row 5, you should have 80 stitches. Fasten off and weave in the ends.
Pro Tip: If you want an even fluffier beard, you can work 2 sc in each stitch for one more row, but the pattern as written creates a beautiful, full beard.
Part 5: Gnome Nose
This little rust-red nose is the perfect pop of color and character. We'll make it in the round and stuff it lightly.
- With rust red yarn, make a magic ring. Chain 1, work 6 sc into the ring. Pull tight. (6 stitches)
- Round 2: Work 2 sc in each stitch around. (12 stitches)
- Round 3: Sc in each stitch around. (12 stitches)
- Round 4: Sc2tog (single crochet two together) around. (6 stitches)
- Fasten off, leaving a long tail (about 12 inches) for sewing. Lightly stuff the nose with a small amount of fiberfill, then sew it to the center of the face panel, just above the beard.
Part 6: Gnome Hat
No gnome is complete without his pointed hat! We'll make this in forest green to match the basket.
- With forest green yarn, chain 2.
- Round 1: Work 6 sc into the 2nd chain from your hook. (6 stitches)
- Round 2: Work 2 sc in each stitch around. (12 stitches)
- Round 3: *Sc in the next stitch, 2 sc in the next stitch.* Repeat from * to * around. (18 stitches)
- Round 4: *Sc in the next 2 stitches, 2 sc in the next stitch.* Repeat from * to * around. (24 stitches)
- Rounds 5-10: Sc in each stitch around. (24 stitches each round)
- Round 11: *Sc in the next 2 stitches, sc2tog.* Repeat from * to * around. (18 stitches)
- Round 12: *Sc in the next stitch, sc2tog.* Repeat from * to * around. (12 stitches)
- Round 13: Sc2tog around. (6 stitches)
- Fasten off, leaving a long tail for sewing. The hat should naturally taper to a point. Sew the hat to the top of the face panel, covering the top edge and allowing the point to flop over slightly for that whimsical look.
Part 7: Assembly
Now for the final step—bringing it all together! This is where your gnome basket really comes to life.
- Position the completed face panel (with beard, nose, and hat) onto the front of the basket. Place it about 1 inch below the top rim so it sits nicely on the basket wall.
- Using your yarn needle and the tails you left, sew the face panel securely to the basket. Make sure to catch both the panel and the basket stitches firmly. Sew around the entire perimeter of the face panel, including the beard area, to ensure it's well-attached.
- Weave in all remaining ends securely with your yarn needle. Trim any excess yarn.
Congratulations! You've just completed your very own Whimsical Woodland Gnome Basket. Stand back and admire your handiwork—this charming piece is perfect for holding small treasures, displaying faux flowers, or simply adding a cozy, magical touch to any room. The visible stitch texture and rich colors give it a beautiful, handcrafted feel that's perfect for woodland-themed decor.
We'd love to see your finished gnome basket! Share your creation with us and happy crocheting!


