Whimsical Woodland Acorn Gnome Free Pattern – Crochet a Forest Friend
Whimsical Woodland Acorn Gnome Free Pattern – Crochet a Forest Friend
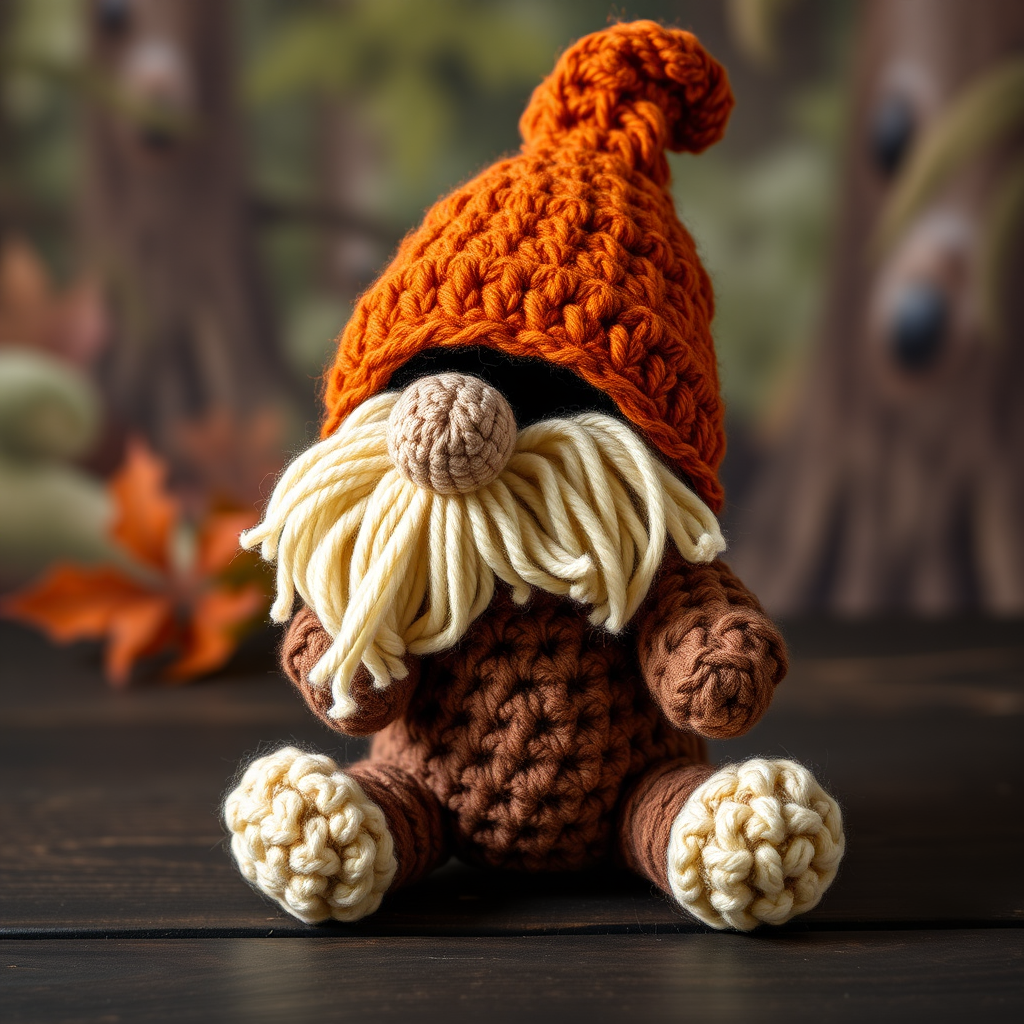
Bring a touch of enchanted woodland charm to your home with this adorable crochet acorn gnome. With its soft, textured body and cozy earthy tones, it's the perfect handmade companion for nature lovers. This little forest friend makes a wonderful gift, a charming shelf decoration, or a delightful addition to any cozy nook. Whether you're a seasoned crocheter or just starting your amigurumi journey, this pattern is designed to be accessible and enjoyable. Let's pick up our hooks and create a little piece of magic together!
Materials Needed
Before we begin our crafting adventure, let's gather all the necessary supplies. This project uses simple, readily available materials:
- Yarn: Worsted weight yarn in earthy brown (for the body), cream (for the beard), and rust orange (for the acorn cap).
- Crochet Hook: 3.5mm (E) crochet hook.
- Gauge: 4 sc x 4 rows = 1 inch (not critical for amigurumi).
- Other Supplies: Yarn needle, scissors, stuffing (polyester fiberfill), and either black embroidery thread or 6mm safety eyes.
Step-by-Step Instructions
Follow these detailed instructions carefully, and you'll have your very own woodland gnome in no time. We'll work from the bottom up, starting with the body and head, then moving to the cap, beard, nose, and arms.
Head & Body (worked in one piece)
We'll begin with the main body of the gnome, using your earthy brown yarn. This piece is worked in a continuous spiral, so no need to join rounds unless specified.
- Round 1: Create a magic ring and work 6 single crochets (sc) into the ring. Pull the tail to close the ring tightly. (6 stitches)
- Round 2: Work 2 sc into each stitch around (an increase, or inc, in every stitch). (12 stitches)
- Round 3: *Sc in the next stitch, inc in the next stitch*; repeat from * to * around. (18 stitches)
- Round 4: *Sc in the next 2 stitches, inc in the next stitch*; repeat from * to * around. (24 stitches)
- Round 5: *Sc in the next 3 stitches, inc in the next stitch*; repeat from * to * around. (30 stitches)
- Rounds 6-10: Sc in each stitch around for 5 rounds. This will form the main body of the gnome. (30 stitches)
- Round 11: *Sc in the next 3 stitches, decrease (dec) in the next stitch*; repeat from * to * around. To decrease, insert your hook into the next stitch, yarn over and pull up a loop, insert into the following stitch, yarn over and pull up a loop, then yarn over and pull through all three loops on your hook. (24 stitches)
- Round 12: *Sc in the next 2 stitches, dec in the next stitch*; repeat from * to * around. (18 stitches)
- Stuff firmly: Now is the time to stuff your gnome's body with polyester fiberfill. Make sure it's nice and plump but not so tight that the stitches stretch.
- Round 13: *Sc in the next stitch, dec in the next stitch*; repeat from * to * around. (12 stitches)
- Round 14: Dec around. (6 stitches)
- Fasten off, leaving a long tail. Use your yarn needle to weave the tail through the front loops of the remaining 6 stitches and pull tight to close the hole. Weave in the end securely.
Acorn Cap
Now, let's create the charming rust-orange cap that gives our gnome his acorn look. This piece is also worked in a spiral.
- Round 1: Create a magic ring and work 6 sc into the ring. (6 stitches)
- Round 2: Inc in each stitch around. (12 stitches)
- Round 3: *Sc in the next stitch, inc in the next stitch*; repeat from * to * around. (18 stitches)
- Round 4: *Sc in the next 2 stitches, inc in the next stitch*; repeat from * to * around. (24 stitches)
- Rounds 5-6: Sc in each stitch around for 2 rounds. (24 stitches)
- Round 7: *Sc in the next 2 stitches, dec in the next stitch*; repeat from * to * around. (18 stitches)
- Fasten off, leaving a long tail for sewing. Lightly stuff the cap with a small amount of fiberfill. Position the cap on the top of the gnome's head (the closed end of the body) and sew it securely in place using your yarn needle and the long tail. Weave in the end.
Beard
This fluffy beard is what gives our gnome his wise and whimsical character. We'll use the cream yarn to create several crocheted strands.
- Attach the cream yarn to the front of the head, just below the acorn cap, using a slip stitch.
- Chain 10 stitches.
- Sc in the 2nd chain from the hook and in each chain across. You'll have 9 single crochets.
- Fasten off, leaving a small tail. Use your yarn needle to weave this tail into the head to secure the strand.
- Repeat this process to create a total of 5-6 strands, attaching them side-by-side in a row to form a full, fluffy beard. You can slightly overlap them for a denser look.
Nose
Our gnome needs a cute, round nose. We'll use the cream yarn for this, or you could use a slightly pinker shade for a rosy look.
- Round 1: Create a magic ring and work 6 sc into the ring. (6 stitches)
- Round 2: Inc in each stitch around. (12 stitches)
- Round 3: Sc in each stitch around. (12 stitches)
- Fasten off, leaving a long tail for sewing. Position the nose in the center of the face, just above the beard, and sew it securely in place. Weave in the end.
Arms (make 2)
Let's give our gnome some little stubby arms using the brown yarn.
- Round 1: Create a magic ring and work 6 sc into the ring. (6 stitches)
- Rounds 2-4: Sc in each stitch around for 3 rounds. (6 stitches)
- Fasten off, leaving a long tail. Do not stuff the arms; they should be flat and floppy. Sew them to the sides of the gnome's body, positioning them about halfway down the body. Weave in the ends.
Finishing Touches
Your gnome is almost complete! The final step is to give him a face.
- Eyes: You can either embroider simple eyes using black yarn or embroidery thread, or attach 6mm safety eyes. If using safety eyes, position them on the face above the nose before sewing the nose on. If embroidering, create a small "X" or a French knot for each eye, placing them symmetrically above the nose.
- Weave in all ends: Take your yarn needle and carefully weave in any remaining loose ends to ensure your gnome is neat and durable.
And there you have it—your very own Whimsical Woodland Acorn Gnome! This little forest friend is sure to bring a smile to anyone's face. Enjoy your handmade creation, and happy crocheting!


