Teal Ladder-Lace Yoga Socks Free Crochet Pattern
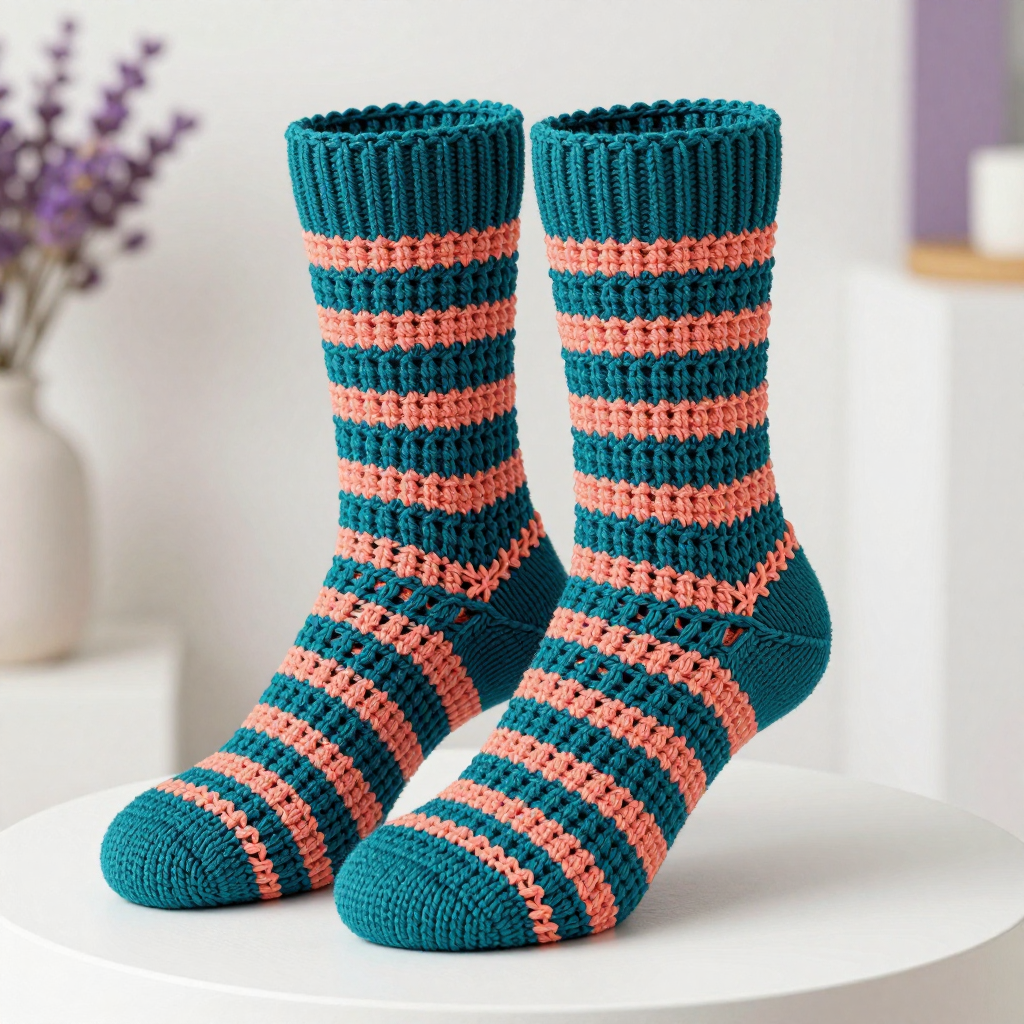
Teal Ladder-Lace Yoga Socks — Free Beginner Crochet Pattern
Introduction
These openwork yoga socks are the perfect first "real" project for someone who has just learned a few basic stitches and wants to make something they will actually wear. Worked flat in simple rows and seamed up the back, they skip the scary parts of sock-making (no tiny circular needles, no heel turning, no working in the round) while still teaching you shaping, color changes, and a beautiful lacy texture. The finished socks are soft, breathable, and slightly stretchy, with horizontal teal ladder-lace bands separated by thin coral chain stripes for a fun retro 90s vibe. Slip them on for barre class, pilates, yoga, or a cozy afternoon on the couch — they grip your foot gently and let your toes breathe. If you can chain, single crochet, and double crochet, you can absolutely make these.
Materials Needed
- Yarn: DK weight (Category 3) yarn, approximately 120–140 yards total per pair — 80–90 yards teal (Color A) and 40–50 yards coral (Color B). A smooth cotton-blend DK works best for breathability and stitch definition.
- Crochet hook: 4.0 mm (US G/6), or the size needed to match gauge.
- Stitch markers: 2–4 (helpful for marking the heel opening and the first stitch of each row).
- Tapestry needle: a blunt-tipped yarn needle for seaming and weaving in ends.
- Scissors: sharp craft scissors for cutting yarn.
- Measuring tape: for checking gauge and finished size.
- Blocking supplies: a spray bottle of water and a towel or blocking mat (optional but recommended).
- Finished size: approximately 20 cm (8 in) circumference x 29 cm (11.5 in) length, unstretched. The openwork stretches to fit a 22–25 cm (8.5–10 in) foot circumference, fitting women's shoe sizes 6–9.
Abbreviations and Beginner Glossary
- ch — chain. Make a loop with the yarn, then pull a new loop through it. Each loop you pull through is one chain. Chains form the foundation and the little gaps in this pattern.
- sc — single crochet. Insert your hook into the stitch, yarn over (wrap yarn around hook), pull up a loop (2 loops on hook), yarn over again, pull through both loops. One loop remains.
- dc — double crochet. Yarn over, insert hook into stitch, yarn over, pull up a loop (3 loops on hook), yarn over, pull through 2 loops, yarn over, pull through remaining 2 loops.
- sl st — slip stitch. Insert hook into stitch, yarn over, pull the loop straight through the loop on your hook. Creates an almost invisible join.
- sk — skip. Do not work into the next stitch; leave it empty. This is what creates the open "ladder" holes.
- sp — space. The gap created by a chain (for example, a "ch-3 sp" is the hole made by three chains).
- st(s) — stitch(es). One completed unit of crochet work.
- YO — yarn over. Wrap the working yarn over your hook from back to front.
- RS — right side. The "public" side of the fabric that faces out when worn.
- rep — repeat. Do the instruction again the stated number of times.
- inc / increasing — adding stitches so the piece gets wider. Here, work two stitches into the same stitch or space.
- dec / decreasing — removing stitches so the piece gets narrower. Here, work two stitches together as one.
- fasten off — cut the yarn a few inches from the work, pull the tail all the way through the last loop, and tug gently to secure.
- turn — flip your work over so you can crochet back across the row you just finished.
Gauge
Gauge: 18 sts and 9 rows = 4 inches (10 cm) in ladder-lace pattern. Each ladder repeat (6 sts) measures approximately 1.3 inches wide.
Why gauge matters: Gauge is simply how big your stitches come out. If your stitches are bigger than the pattern's, the sock will be too loose and slide off; if smaller, it will be too tight to pull on. Always make a swatch first.
How to make a gauge swatch: Chain 25. Work the ladder-lace pattern (Rows 1–4 of the special stitch, below) until your swatch is about 5 inches tall. Lay it flat without stretching. Place a ruler across the middle and count how many stitches fit in 4 inches, then how many rows fit in 4 inches. If you have more stitches than 18, try a larger hook; if fewer, try a smaller hook. Repeat until it matches.
Beginner Tips Before You Start
- Count every row. The ladder-lace pattern alternates a solid double-crochet row with an open chain row. Say the row number out loud as you finish it, or keep a tally on paper — it is the easiest way to stay on track.
- Use stitch markers. Place one marker in the first stitch of each row so you never lose your place, and place two markers where the heel opening will be (about 5 cm / 2 in above the toe shaping) so you remember not to seam that section.
- Do not pull your yarn too tight. The chain spaces need to stay open and airy. Keep your tension relaxed and even; if your chains look pinched, loosen up.
- Work the coral stripes last. The coral chain stripes are surface-crocheted over the finished body, so don't panic if the sock looks plain teal at first — the color pops in at the very end.
- Try it on as you go. Because the sock is worked flat, you can wrap it around your foot at any point to check the fit before you commit to seaming.
- Keep your turning chains consistent. The ch 1 or ch 3 at the start of each row is not a stitch — don't work into it on the way back, or your stitch count will creep up.
Step-by-Step Instructions
Special Stitches (read once before you begin)
Ladder-Lace Stitch (multiple of 6 sts + 1):
- Row 1 (RS): Ch 3 (counts as first dc), dc in each st across. Turn.
- Row 2: Ch 1, sc in first st, *ch 3, sk 3 sts, sc in next st; rep from * to end. Turn.
- Row 3: Ch 3, *3 dc in next ch-3 sp, dc in next sc; rep from * to end, ending with dc in last sc. Turn.
- Row 4: Ch 1, sc in first st, *ch 3, sk 3 dc, sc in next dc; rep from * to end. Turn.
- Repeat Rows 3–4 for the pattern.
Coral Chain Stripe (surface chain): With Color B, join yarn at one edge, *ch 1, sl st around the post of the next dc; rep from * across. Fasten off.
Note: The sock is worked flat in rows from cuff to toe, then seamed along the back. The heel opening is created by leaving a gap in the back seam.
Cuff (Color A)
- Ch 31.
- Row 1: Sc in 2nd ch from hook and in each ch across. Turn. (30 sc)
- Rows 2–4: Ch 1, sc in each st across. Turn. (30 sc)
- Row 5: Ch 1, sc in each st across, increasing 1 st at each end. Turn. (32 sc)
Body (Ladder-Lace Pattern)
- Row 6 (RS): Ch 3 (counts as first dc), dc in each st across. Turn. (32 dc)
- Row 7: Ch 1, sc in first st, *ch 3, sk 3 sts, sc in next st; rep from * to end. Turn. (8 ch-3 sps)
- Row 8: Ch 3, *3 dc in next ch-3 sp, dc in next sc; rep from * to end, ending with dc in last sc. Turn. (32 dc)
- Row 9: Ch 1, sc in first st, *ch 3, sk 3 dc, sc in next dc; rep from * to end. Turn. (8 ch-3 sps)
- Rows 10–25: Rep Rows 8–9 eight times more, then work Row 8 once more. (32 dc on final row)
Coral Chain Stripes (Color B)
Work these after the body is complete. With Color B, join yarn at the right edge of Row 6 (the first solid dc row). Work one Coral Chain Stripe across Row 6. Fasten off. Repeat for Rows 8, 10, 12, 14, 16, 18, 20, 22, 24, and 26 (every solid dc row). (11 coral stripes total)
Heel Opening (Color A)
- Row 26: Ch 1, sc in each st across. Turn. (32 sc)
- Rows 27–30: Ch 1, sc in each st across. Turn. (32 sc)
Toe (Color A)
The toe is shaped with even decreases every other row. Each decrease row removes 2 stitches.
- Row 31: Ch 1, sc in each st across, decreasing 2 sts evenly. Turn. (30 sc)
- Row 32: Ch 1, sc in each st across. Turn. (30 sc)
- Row 33: Ch 1, sc in each st across, decreasing 2 sts evenly. Turn. (28 sc)
- Row 34: Ch 1, sc in each st across. Turn. (28 sc)
- Row 35: Ch 1, sc in each st across, decreasing 2 sts evenly. Turn. (26 sc)
- Row 36: Ch 1, sc in each st across. Turn. (26 sc)
- Row 37: Ch 1, sc in each st across, decreasing 2 sts evenly. Turn. (24 sc)
- Row 38: Ch 1, sc in each st across. Turn. (24 sc)
- Row 39: Ch 1, sc in each st across, decreasing 2 sts evenly. Turn. (22 sc)
- Row 40: Ch 1, sc in each st across. Turn. (22 sc)
- Row 41: Ch 1, sc in each st across, decreasing 2 sts evenly. Turn. (20 sc)
- Row 42: Ch 1, sc in each st across. Turn. (20 sc)
- Row 43: Ch 1, sc in each st across, decreasing 2 sts evenly. Turn. (18 sc)
- Row 44: Ch 1, sc in each st across. Turn. (18 sc)
- Row 45: Ch 1, sc in each st across, decreasing 2 sts evenly. Turn. (16 sc)
- Row 46: Ch 1, sc in each st across. Turn. (16 sc)
- Row 47: Ch 1, sc in each st across, decreasing 2 sts evenly. Turn. (14 sc)
- Row 48: Ch 1, sc in each st across. Turn. (14 sc)
- Row 49: Ch 1, sc in each st across, decreasing 2 sts evenly. Turn. (12 sc)
- Row 50: Ch 1, sc in each st across. Turn. (12 sc)
- Row 51: Ch 1, sc in each st across, decreasing 2 sts evenly. Turn. (10 sc)
- Row 52: Ch 1, sc in each st across. Turn. (10 sc)
- Row 53: Ch 1, sc in each st across, decreasing 2 sts evenly. Turn. (8 sc)
- Row 54: Ch 1, sc in each st across. Turn. (8 sc)
- Row 55: Ch 1, sc in each st across, decreasing 2 sts evenly. Turn. (6 sc)
- Row 56: Ch 1, sc in each st across. Turn. (6 sc)
- Row 57: Ch 1, sc in each st across, decreasing 2 sts evenly. Turn. (4 sc)
- Row 58: Ch 1, sc in each st across. Turn. (4 sc)
- Row 59: Ch 1, sc in each st across, decreasing 2 sts evenly. Turn. (2 sc)
- Row 60: Ch 1, sc in each st across. Turn. (2 sc)
- Row 61: Ch 1, sc in each st across, decreasing 2 sts evenly. Turn. (0 sc) Fasten off.
Assembly and Finishing
- Fold and seam: Fold the sock in half lengthwise with the right side facing in. Thread your tapestry needle with Color A. Starting at the cuff, sew a seam along the back edge from cuff to toe using a whipstitch (bring the needle through both layers, over the edge, and back through) or a slip-stitch seam with your hook. Leave a 5 cm (2 in) opening unseamed in the heel area — approximately 5 cm above where the toe shaping begins — so the heel can poke through. Fasten off.
- Turn right side out: Gently turn the sock right side out so the seam is hidden inside.
- Weave in ends: Thread each yarn tail onto the tapestry needle and weave it back and forth through the inside of the fabric for about 2 inches, then trim close to the work. Never knot your ends — knots create bumps that rub.
- Block: Lightly mist the sock with water and pat it into shape to measure 20 cm circumference x 29 cm length. Lay flat on a towel or blocking mat and let it dry completely. This opens up the ladder-lace holes and evens out your stitches.
- Repeat all steps for the second sock.
Optional Cuff Edging (Color B): Join Color B at the cuff edge, ch 1, sc evenly around the cuff opening, and sl st to the first sc. Fasten off. Repeat for the second sock.
Pro Tips and Variations
- Change the colorway: Swap the teal and coral for any two colors you love — mustard and cream, lavender and mint, or classic black and white. Just keep one color for the main body and one for the chain stripes so the ladder pattern stays readable.
- Adjust the size: To make the sock wider or narrower, add or remove 6 stitches (one full ladder repeat) from your starting chain. To make it longer or shorter, add or remove rows in the straight body section (Rows 10–25) before you begin the heel opening.
- Substitute yarn: Any DK weight yarn works, but a cotton or cotton-blend gives the best grip and breathability for yoga. Avoid fuzzy or halo-heavy yarns — they hide the openwork ladders.
- Add grip: For extra safety on smooth studio floors, dot a little fabric puff paint or apply stick-on grip pads to the sole of each finished sock.



