Sunlit Solstice Wall Hanging Free Pattern – Knit a Bohemian Sunburst Tapestry
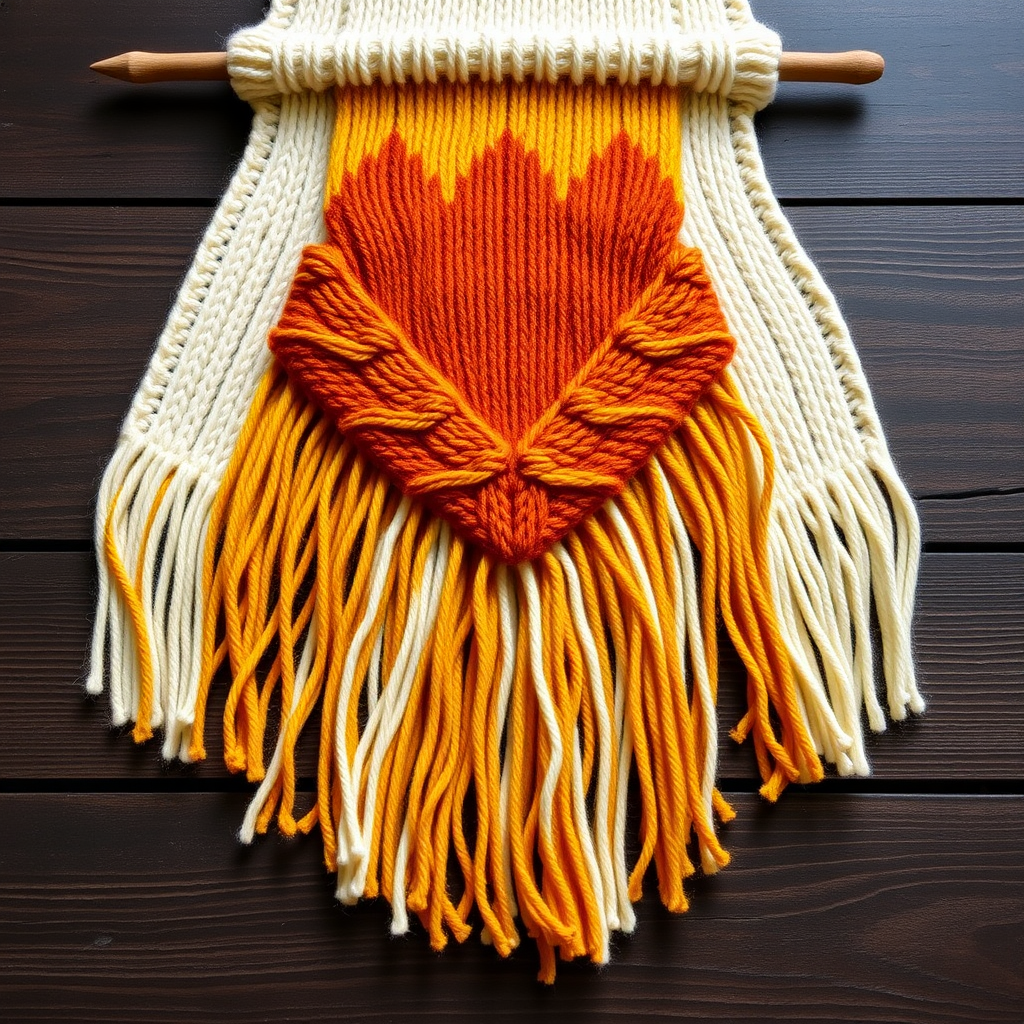
Sunlit Solstice Wall Hanging Free Pattern – Knit a Bohemian Sunburst Tapestry
Bring the warmth of a golden sunset into your home with this textured knitted wall hanging, featuring a radiant sunburst motif and cascading fringe. This bohemian statement piece is a cozy, yarn-based alternative to traditional wall art. Whether you're looking to add a handcrafted touch to your living room, bedroom, or entryway, this pattern is perfect for knitters who want to create something unique and visually striking. The combination of warm gold, burnt orange, and cream evokes the feeling of a summer solstice, making it a beautiful year-round addition to your decor.
Materials Needed
Before you begin, gather the following materials to ensure a smooth knitting experience:
- Yarn: Worsted weight cotton or cotton-blend yarn in three shades:
- Warm gold (A) – approximately 250 yards
- Burnt orange (B) – approximately 150 yards
- Cream (C) – approximately 100 yards
- Needles: US 8 (5.0 mm) knitting needles
- Notions: Tapestry needle for weaving in ends, scissors, and a wooden dowel or branch (12-14 inches long) for hanging
- Optional: Crochet hook (for fringe attachment) and hanging cord or loop
Gauge
18 stitches and 24 rows = 4 inches in stockinette stitch. Gauge is not critical for this project, but consistent tension will ensure a balanced drape and even shaping.
Step-by-Step Instructions
This wall hanging is knitted flat in one piece from the bottom up, then finished with a fringe and mounted on a dowel. Follow along carefully, and you'll have a stunning piece of art in no time.
Abbreviations
- K = knit
- P = purl
- K2tog = knit two stitches together (decrease)
- Kfb = knit into the front and back of the same stitch (increase)
- St(s) = stitch(es)
- RS = right side
- WS = wrong side
Foundation
Using yarn A (gold), cast on 40 stitches. Leave a long tail (about 12 inches) for later fringe attachment. This tail will be used to secure the fringe at the bottom edge, so don't cut it short.
Rows 1-10 (Bottom Border)
Work in garter stitch (knit every row) for 10 rows. This creates a sturdy, flat base that will anchor the fringe and provide a clean starting point for the pattern.
Rows 11-20 (Lower Body – Stockinette with Seed Stitch Stripes)
This section combines smooth stockinette with textured seed stitch stripes to add visual interest to the lower portion of the hanging.
- Row 11 (RS): Knit all stitches.
- Row 12 (WS): Purl all stitches.
- Row 13 (RS): Knit all stitches.
- Row 14 (WS): *K1, P1; repeat from * to end. (Seed stitch row)
- Row 15 (RS): Knit all stitches.
- Row 16 (WS): Purl all stitches.
- Row 17 (RS): Knit all stitches.
- Row 18 (WS): *P1, K1; repeat from * to end. (Seed stitch row – note the offset from Row 14)
- Row 19 (RS): Knit all stitches.
- Row 20 (WS): Purl all stitches.
Rows 21-40 (Sunburst Motif – Increase Section)
Switch to yarn B (burnt orange). This section creates the expanding sunburst shape by increasing one stitch at each edge every other row. The increases are worked on RS rows only, keeping the WS rows as plain purl.
- Row 21 (RS): Kfb in first stitch, knit to last stitch, Kfb in last stitch. (42 sts)
- Row 22 (WS): Purl all stitches.
- Row 23 (RS): Kfb in first stitch, knit to last stitch, Kfb in last stitch. (44 sts)
- Row 24 (WS): Purl all stitches.
- Row 25 (RS): Kfb in first stitch, knit to last stitch, Kfb in last stitch. (46 sts)
- Row 26 (WS): Purl all stitches.
- Row 27 (RS): Kfb in first stitch, knit to last stitch, Kfb in last stitch. (48 sts)
- Row 28 (WS): Purl all stitches.
- Row 29 (RS): Kfb in first stitch, knit to last stitch, Kfb in last stitch. (50 sts)
- Row 30 (WS): Purl all stitches.
- Row 31 (RS): Kfb in first stitch, knit to last stitch, Kfb in last stitch. (52 sts)
- Row 32 (WS): Purl all stitches.
- Row 33 (RS): Kfb in first stitch, knit to last stitch, Kfb in last stitch. (54 sts)
- Row 34 (WS): Purl all stitches.
- Row 35 (RS): Kfb in first stitch, knit to last stitch, Kfb in last stitch. (56 sts)
- Row 36 (WS): Purl all stitches.
- Row 37 (RS): Kfb in first stitch, knit to last stitch, Kfb in last stitch. (58 sts)
- Row 38 (WS): Purl all stitches.
- Row 39 (RS): Kfb in first stitch, knit to last stitch, Kfb in last stitch. (60 sts)
- Row 40 (WS): Purl all stitches.
Rows 41-60 (Sunburst Motif – Decrease Section)
Switch to yarn C (cream). This section tapers the sunburst back down, creating the pointed top of the diamond shape. Decreases are worked on RS rows only, keeping the WS rows as plain purl.
- Row 41 (RS): K2tog at beginning, knit to last 2 stitches, K2tog. (58 sts)
- Row 42 (WS): Purl all stitches.
- Row 43 (RS): K2tog at beginning, knit to last 2 stitches, K2tog. (56 sts)
- Row 44 (WS): Purl all stitches.
- Row 45 (RS): K2tog at beginning, knit to last 2 stitches, K2tog. (54 sts)
- Row 46 (WS): Purl all stitches.
- Row 47 (RS): K2tog at beginning, knit to last 2 stitches, K2tog. (52 sts)
- Row 48 (WS): Purl all stitches.
- Row 49 (RS): K2tog at beginning, knit to last 2 stitches, K2tog. (50 sts)
- Row 50 (WS): Purl all stitches.
- Row 51 (RS): K2tog at beginning, knit to last 2 stitches, K2tog. (48 sts)
- Row 52 (WS): Purl all stitches.
- Row 53 (RS): K2tog at beginning, knit to last 2 stitches, K2tog. (46 sts)
- Row 54 (WS): Purl all stitches.
- Row 55 (RS): K2tog at beginning, knit to last 2 stitches, K2tog. (44 sts)
- Row 56 (WS): Purl all stitches.
- Row 57 (RS): K2tog at beginning, knit to last 2 stitches, K2tog. (42 sts)
- Row 58 (WS): Purl all stitches.
- Row 59 (RS): K2tog at beginning, knit to last 2 stitches, K2tog. (40 sts)
- Row 60 (WS): Purl all stitches.
Rows 61-70 (Top Border)
Switch back to yarn A (gold). Work in garter stitch (knit every row) for 10 rows. This mirrors the bottom border and completes the design symmetrically.
Bind Off
Bind off all stitches loosely on the next RS row. Cut yarn, leaving a long tail (about 12 inches) for fringe attachment. A loose bind-off is important to prevent the top edge from pulling in and to make it easier to attach to the dowel.
Finishing
Now that your knitting is complete, it's time to assemble and finish your wall hanging.
Step 1: Weave in Ends
Weave in all loose ends except the two long tails at the cast-on and bind-off edges. These tails will be used for the fringe and dowel attachment, so leave them exposed.
Step 2: Attach the Dowel
Fold the top edge over the wooden dowel, and use the long tail to sew the bound-off edge to the back of the knitting, creating a casing for the dowel. Alternatively, you can simply sew the top edge directly to the dowel for a more rustic look. Make sure the dowel is centered and the knitting is evenly distributed.
Step 3: Create the Fringe
Cut strands of yarn A, B, and C, each about 12 inches long. Using a crochet hook or your fingers, fold each strand in half and pull the loop through the bottom edge stitches, then pull the ends through the loop to secure. Space the fringe evenly across the bottom edge, alternating colors as desired. For a more dynamic look, you can group multiple strands together or vary the lengths slightly.
Step 4: Trim and Finish
Trim the fringe ends to an even length. This will give your wall hanging a polished, professional appearance. You can also gently steam or block the piece to smooth out any uneven tension.
Step 5: Hang It Up
Attach a hanging cord or loop to the ends of the dowel for easy wall mounting. Use a sturdy cord or twine that complements the bohemian aesthetic. Find the perfect spot in your home and enjoy your handcrafted sunburst tapestry!
This pattern is a wonderful way to practice increases and decreases while creating a beautiful piece of art. The textured seed stitch stripes and the gradual color transitions make it a visually engaging project that's still approachable for beginners. Happy knitting!


