Starfield Chestband Bralette Free Crochet Pattern
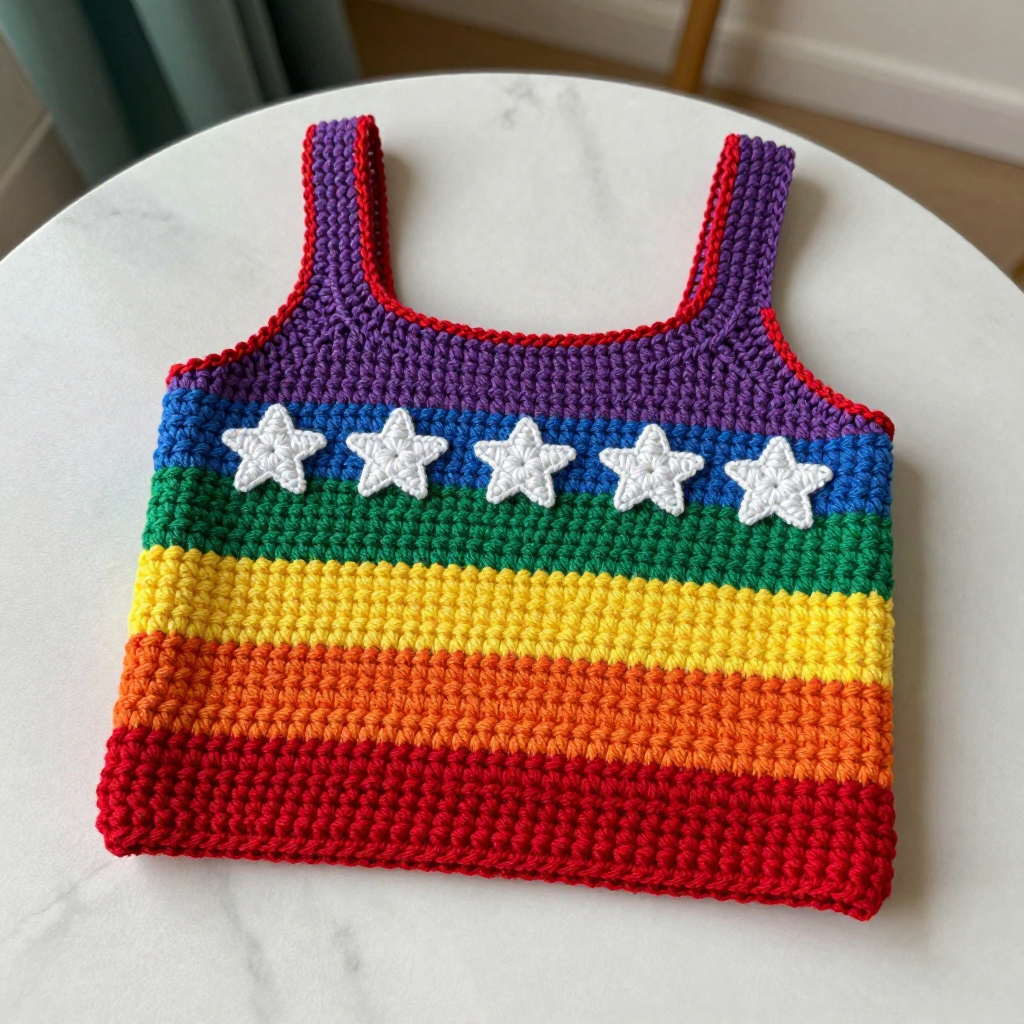
Starfield Chestband Bralette: A Free Beginner Crochet Pattern
Introduction
If you have ever looked at a crocheted top and thought "I could never make that," this is the pattern that will prove you wrong. The Starfield Chestband Bralette is made from one simple flat rectangle, worked in plain single crochet, then seamed into a tube. That is the whole body. The magic comes from seven bright rainbow stripes and five tiny white stars sewn across the front, giving you a fairycore piece that looks far more complicated than it is. The finished band is soft, slightly structured, and has a lovely linen-blend sheen that feels cool against the skin. It is perfect for a first garment project, a festival layer, or a handmade gift for a friend who loves color.
Materials Needed
- Yarn: DK weight linen blend (approximately 50% linen / 50% cotton). Total approximately 220 yards: 30 yards each of red, orange, yellow, green, blue, indigo, and violet, plus 10 yards of white for the stars.
- Crochet hook: 4.0 mm (US G-6).
- Stitch markers: at least 6, for marking the seam, the center front, and star placement.
- Tapestry needle: a blunt-tipped needle with a large eye for seaming and weaving in ends.
- Scissors.
- Finished size: One size. The band measures approximately 34 in (86 cm) around x 6 in (15 cm) tall, with about 2 in (5 cm) of negative ease for a snug chestband fit. The flat rectangle before seaming measures approximately 20 in (51 cm) long x 6 in (15 cm) tall.
Abbreviations and Beginner Glossary
- ch - chain. Make a loop of yarn over the hook and pull it through the loop already on your hook. This creates a small "V" of yarn and is how you start almost every project.
- sc - single crochet. Insert your hook into the next stitch, yarn over (wrap the yarn around the hook), pull up a loop (you now have 2 loops on the hook), yarn over again, and pull through both loops. One single crochet made.
- sl st - slip stitch. Insert your hook into the stitch, yarn over, and pull that loop straight through the loop on your hook and through the stitch. It makes a flat, nearly invisible join.
- st / sts - stitch / stitches. One completed unit of crochet work.
- RS - right side. The "public" side of your work, the side that faces out when worn.
- WS - wrong side. The back side of your work.
- turn - flip your work over so you can crochet back along the row you just finished.
- fasten off - cut the yarn a few inches from your work, then pull the tail all the way through the last loop on your hook to lock it.
- join - attach a new color or reattach yarn to your work.
- magic ring - an adjustable loop of yarn that you crochet into, then pull closed so there is no hole in the center. If you have never made one, you can substitute: ch 4 and join with a sl st into a ring, then work into the ring.
- tapestry crochet - a colorwork technique where you carry the unused color along the top of the previous row and crochet over it, so no floats show on the back. You change color on the last yarn-over of the final stitch of the old color.
- whipstitch - a simple seaming stitch: bring the needle up through both layers, over the edge, and back down, repeating in small even stitches.
- block - gently wet and pin your finished piece to the measurements so it dries flat and even.
Gauge
18 single crochet x 20 rows = 4 in (10 cm) in single crochet tapestry colorwork.
Gauge matters because it is how we guarantee the band actually fits around your chest. If your stitches are bigger than the gauge, the band will be too loose; if they are smaller, it will be too tight. To check, crochet a small swatch: ch 22, then work 22 rows of single crochet, changing color every 4 rows just like the real band. Lay the swatch flat and measure a 4 in (10 cm) section in the middle. Count your stitches and rows. If you have more than 18 stitches in 4 in, your tension is tight, so try a larger hook. If you have fewer, try a smaller hook. Wash and dry your swatch the way you plan to wash the finished bralette, because linen blend can relax slightly.
Beginner Tips Before You Start
- Count every row. The band must stay exactly 90 stitches wide. Count at the end of each row before you turn. It takes ten seconds and saves hours.
- Do not pull the carried yarn tight. When you carry the next color along the top of the row, keep it loose. If it is tight, the band will pucker and pull in at the color changes.
- Use stitch markers. Place one in the first stitch of each row so you never lose your place, and use others to mark the center front and the star positions later.
- Change color on the last yarn-over. When you finish the final stitch of a color block, pull the new color through on that last yarn-over. This keeps the color change crisp and clean.
- Keep your tension even, not tight. Single crochet in a linen blend wants to be relaxed. If your hand aches, you are gripping too hard.
- Work the stars after the band is seamed. That way you can see exactly where the center front sits and space the stars evenly.
Step-by-Step Instructions
Body (worked flat in rows)
Foundation: With red, ch 91.
Row 1 (RS): sc in the 2nd ch from hook and in each ch across, turn. (90 sc)
Rows 2-4: ch 1, sc in each st across, turn. (90 sc) Fasten off red.
Rows 5-8: Join orange, ch 1, sc in each st across, turn. (90 sc) Fasten off orange.
Rows 9-12: Join yellow, ch 1, sc in each st across, turn. (90 sc) Fasten off yellow.
Rows 13-16: Join green, ch 1, sc in each st across, turn. (90 sc) Fasten off green.
Rows 17-20: Join blue, ch 1, sc in each st across, turn. (90 sc) Fasten off blue.
Rows 21-24: Join indigo, ch 1, sc in each st across, turn. (90 sc) Fasten off indigo.
Rows 25-28: Join violet, ch 1, sc in each st across, turn. (90 sc) Do not fasten off.
The band should now measure approximately 20 in (51 cm) long x 6 in (15 cm) tall before seaming. If you would like a taller band, work 2 more rows in violet before fastening off. Fasten off violet.
Stars (make 5, white)
Star 1: Make a magic ring. Ch 1. Into the ring work (sc, ch 2, sc) 5 times. Pull the ring closed, join with a sl st to the first sc. Fasten off, leaving a 6 in tail. (5 points)
Stars 2-5: Repeat Star 1 four more times, for 5 stars total.
Assembly
Fold the band in half with right sides together so the short ends meet. Using your tapestry needle, whipstitch the short ends together to form a tube. Alternatively, sl st the short ends together with your hook. Turn the tube right side out. This seam becomes the center back.
Star Placement and Attachment
Mark the center front of the band with a stitch marker. Arrange the 5 stars in a single horizontal row across the front, centered vertically on the band, spacing them approximately 1 in (2.5 cm) apart. Pin each star in place. Sew each star down with its matching white tail, catching only the back loops of the band so the front stays smooth.
Optional Edging
If you would like a clean finish, join violet at the top edge. Work one round of sc evenly around the top edge, then fasten off. Repeat around the bottom edge. Weave in all ends.
Assembly and Finishing
Once the band is seamed and the stars are attached, weave in every loose end on the wrong side of the work. Thread each tail onto your tapestry needle and run it through several stitches in one direction, then back through a few stitches in the other direction to lock it, and trim close to the fabric. To block, fill a basin with cool water and a drop of gentle soap, submerge the bralette for a few minutes, then gently squeeze (never wring) out the water. Roll it in a towel to remove excess moisture, then lay it flat and pin it to the finished measurements: approximately 34 in (86 cm) around and 6 in (15 cm) tall. Let it dry completely flat before wearing. Blocking evens out the color changes and gives the linen blend a soft, smooth drape.
Pro Tips and Variations
- Change the colors. Swap the rainbow for a single color with a contrasting star, or use a gradient of three colors repeated. Keep the same 4-row block rhythm so the finished height stays the same.
- Adjust the size. The band is worked in multiples of 6 stitches. To make it larger or smaller, add or remove 6 stitches from the foundation chain (for example, ch 97 for a slightly larger band) and keep every row at that new stitch count.
- Substitute the yarn. Any DK weight yarn will work, but a cotton or linen blend holds the band's shape best. Avoid fuzzy or slippery yarns, which make the color changes harder to see.
- Make it taller or shorter. Add or remove 2-row sections in any color to change the band height. Just remember that every 2 rows adds about 0.4 in (1 cm) of height.


