Meadow Loom Wall Hanging Free Pattern
Meadow Loom Wall Hanging: A Free Beginner Crochet Pattern
Introduction
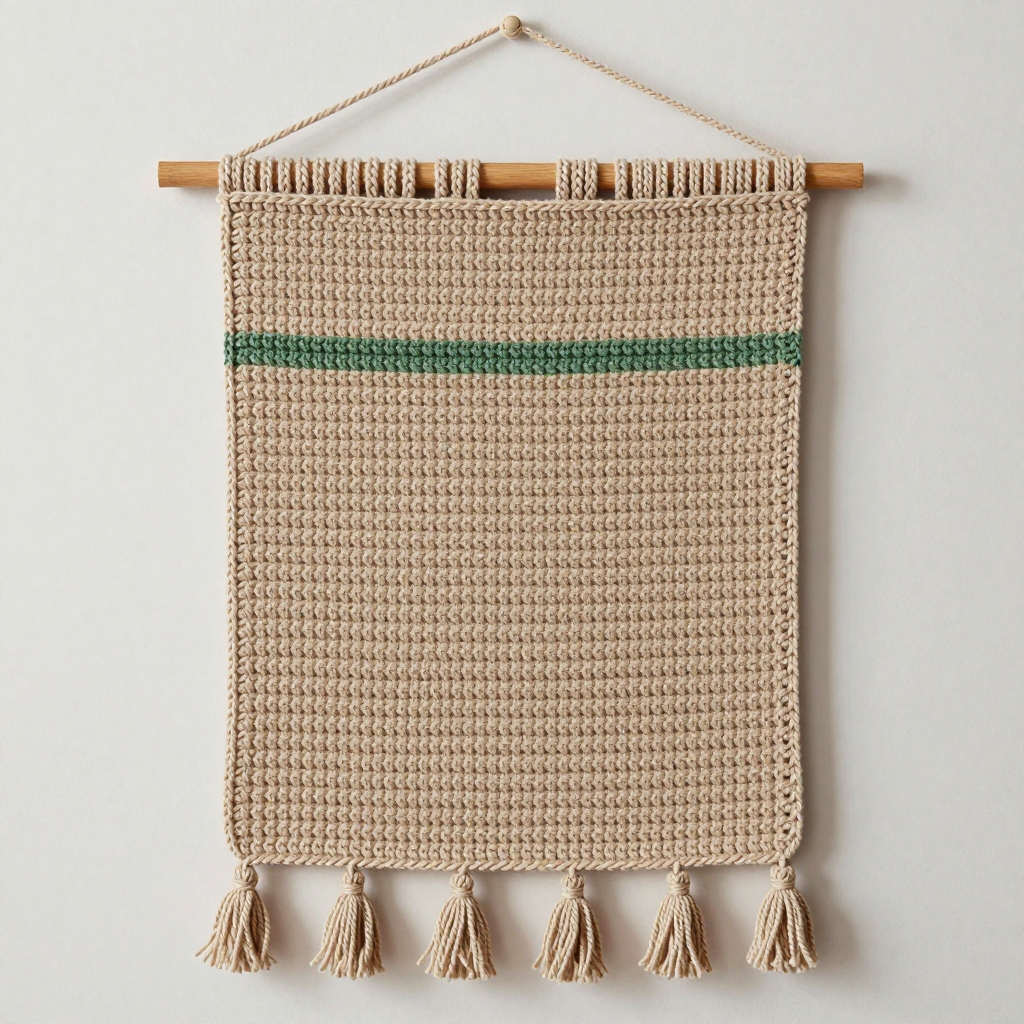
Welcome to your very first crochet project! The Meadow Loom Wall Hanging is the perfect place to begin because it is worked flat in simple rows of one easy stitch, so you never have to worry about shaping, counting in circles, or complicated techniques. What makes this piece so special is its quiet texture: by working into the back loop on one row and the front loop on the next, you create a soft horizontal ribbing that looks far more intricate than the skills required to make it. The finished hanging is a warm oatmeal rectangle about 12 inches wide by 15 inches tall, with a single thin sage green stripe near the top, a smooth wooden dowel tucked into a folded casing, a braided cord for hanging, and four little tassels swaying along the bottom edge. It feels thick, soft, and earthy in the hand, and it brings instant handmade warmth to any blank wall in your home.
Materials Needed
- Yarn: Worsted weight (category 4) cotton or cotton-blend yarn, approximately 180–200 yards total. The sample uses warm oatmeal as the main color plus a small amount (about 15–20 yards) of sage green for the accent stripe.
- Crochet hook: Size J/10 (6.0 mm). (The "J/10" is the US size; "6.0 mm" is the metric size. They are the same hook.)
- Stitch markers: At least 2, to help you keep track of rows and stitch counts.
- Tapestry needle: A large, blunt-tipped needle with an eye big enough for worsted yarn, used for weaving in ends and sewing the casing.
- Scissors: Any sharp pair for cutting yarn.
- Wooden dowel: 12 inches long, 3/8 inch diameter, for hanging the piece.
- Optional: Rust-proof pins and a towel or blocking mat for blocking the finished piece.
- Finished size: Approximately 12 inches wide x 15 inches tall (not including the hanging cord or tassels).
Abbreviations and Beginner Glossary
Every abbreviation used in this pattern is listed below and explained in plain English. If you have never crocheted before, read this section twice before you begin.
- ch – chain. Make a slip knot on your hook, then wrap the yarn over the hook and pull it through the loop on your hook. That is one chain. A row of chains is your foundation, the base your first stitches sit on.
- sc – single crochet. Insert your hook into the stitch, wrap the yarn over the hook, pull up a loop (you now have 2 loops on the hook), wrap the yarn over again, and pull it through both loops on the hook. One single crochet made.
- BLO – back loop only. Every single crochet stitch has two loops at its top, a front loop (closer to you) and a back loop (farther from you). "In BLO" means you insert your hook under only the back loop, leaving the front loop untouched. This pushes the front loop forward and creates a ridge.
- FLO – front loop only. The same idea, but you insert your hook under only the front loop (the one closer to you), leaving the back loop untouched.
- st / sts – stitch / stitches. One completed single crochet is one stitch.
- Turn – at the end of a row, flip your work over (like turning a page) so you can work back across the row you just made.
- Fasten off – cut the yarn a few inches from your work, then pull the tail all the way through the last loop on your hook to lock it. This secures your work so it will not unravel.
- Weave in ends – thread a yarn tail onto a tapestry needle and run it back and forth through the fabric so it is hidden and secure.
- Whipstitch – a simple sewing stitch: bring the needle up through both layers, over the edge, and back down, repeating in small even stitches. Used here to close the dowel casing.
- Lark's head knot – fold a strand of yarn in half to make a loop, pass the loop through or around your anchor point, then pull the two loose ends through the loop and tighten. Used here for the tassels and cord.
- Gauge – how many stitches and rows fit in a set measurement (see the next section).
Gauge
Gauge: 14 stitches x 13 rows = 4 inches in the alternating single crochet pattern (sc in BLO and sc in FLO).
Why gauge matters: Gauge is simply how tightly or loosely you crochet. If your stitches are bigger than the pattern assumes, your wall hanging will come out wider and taller than 12 x 15 inches; if they are smaller, it will come out narrower and shorter. Checking gauge first means your finished piece matches the size and look shown.
How to make a gauge swatch: Chain 22. Work single crochet in each chain across (21 stitches). Then work 15 rows, alternating a BLO row and a FLO row exactly as described in the pattern below. Lay the swatch flat without stretching it and measure a 4-inch section in the middle. Count how many stitches fit across those 4 inches and how many rows fit in 4 inches vertically. If you have more than 14 stitches, your tension is tight — try a larger hook. If you have fewer than 14, your tension is loose — try a smaller hook. The row count matters less for this project than the stitch count, because the length is measured as you go.
Beginner Tips Before You Start
- Count your stitches at the end of every row. You should always have 42 stitches. If you come up short, you probably skipped the very first stitch of the row (the one right next to your turning chain). If you have extra, you likely worked into the turning chain by mistake. Counting every row now saves you from ripping out later.
- Use stitch markers. Place one marker in the first stitch of each row and one in the last stitch. These two stitches are the easiest to lose, and the markers tell you exactly where to work.
- Do not pull your yarn too tight. Beginners often tug each stitch snug, which makes the fabric stiff and curls the edges. Let the yarn relax so the stitches sit softly against the hook.
- Know which loop is which. Before you start Row 2, look closely at the top of your foundation row. The loop nearest you is the front loop; the one behind it is the back loop. Practicing this on the first row will make every following row easy.
- The turning chain does not count as a stitch. The "ch 1" at the start of each row just lifts your yarn to the right height. Do not work a stitch into it, and do not count it in your 42.
- Keep your work flat and untwisted. Because this piece is worked in rows (not in a circle), simply lay it flat after each row and smooth the edges before turning.
Step-by-Step Instructions
Panel
Row 1: Ch 43. Sc in the 2nd ch from your hook and in each ch across. (42 sc) Turn. Note: you skip the first chain because the turning chain takes its place, which is why 43 chains become 42 stitches.
Row 2 (BLO row): Ch 1, sc in the BLO of each st across. (42 sc) Turn.
Row 3 (FLO row): Ch 1, sc in the FLO of each st across. (42 sc) Turn.
Row 4 (BLO row): Ch 1, sc in the BLO of each st across. (42 sc) Turn.
Row 5 (FLO row): Ch 1, sc in the FLO of each st across. (42 sc) Turn.
Row 6 (BLO row): Ch 1, sc in the BLO of each st across. (42 sc) Turn.
Accent Stripe
Row 7 (BLO row): Change to sage green (see the note below). Ch 1, sc in the BLO of each st across. (42 sc) Turn.
Row 8 (FLO row): Ch 1, sc in the FLO of each st across. (42 sc) Turn.
Row 9 (BLO row): Ch 1, sc in the BLO of each st across. (42 sc) Turn.
How to change color: On the last stitch of Row 6, before you pull the yarn through the final two loops, drop the oatmeal and lay the sage green tail over your hook, then pull the sage through to finish the stitch. Leave both tails hanging on the back; you will weave them in later.
Return to Main Color
Row 10 (FLO row): Change back to oatmeal (finish the last stitch of Row 9 with oatmeal, exactly as described above). Ch 1, sc in the FLO of each st across. (42 sc) Turn.
Row 11 (BLO row): Ch 1, sc in the BLO of each st across. (42 sc) Turn.
Row 12 (FLO row): Ch 1, sc in the FLO of each st across. (42 sc) Turn.
Continue Main Panel
From here you simply keep alternating: every odd-numbered row is a BLO row and every even-numbered row is a FLO row, always with 42 stitches. The rows are written out below so you never have to guess.
Row 13 (BLO row): Ch 1, sc in the BLO of each st across. (42 sc) Turn.
Row 14 (FLO row): Ch 1, sc in the FLO of each st across. (42 sc) Turn.
Row 15 (BLO row): Ch 1, sc in the BLO of each st across. (42 sc) Turn.
Row 16 (FLO row): Ch 1, sc in the FLO of each st across. (42 sc) Turn.
Row 17 (BLO row): Ch 1, sc in the BLO of each st across. (42 sc) Turn.
Row 18 (FLO row): Ch 1, sc in the FLO of each st across. (42 sc) Turn.
Row 19 (BLO row): Ch 1, sc in the BLO of each st across. (42 sc) Turn.
Row 20 (FLO row): Ch 1, sc in the FLO of each st across. (42 sc) Turn.
Row 21 (BLO row): Ch 1, sc in the BLO of each st across. (42 sc) Turn.
Row 22 (FLO row): Ch 1, sc in the FLO of each st across. (42 sc) Turn.
Row 23 (BLO row): Ch 1, sc in the BLO of each st across. (42 sc) Turn.
Row 24 (FLO row): Ch 1, sc in the FLO of each st across. (42 sc) Turn.
Row 25 (BLO row): Ch 1, sc in the BLO of each st across. (42 sc) Turn.
Row 26 (FLO row): Ch 1, sc in the FLO of each st across. (42 sc) Turn.
Row 27 (BLO row): Ch 1, sc in the BLO of each st across. (42 sc) Turn.
Row 28 (FLO row): Ch 1, sc in the FLO of each st across. (42 sc) Turn.
Row 29 (BLO row): Ch 1, sc in the BLO of each st across. (42 sc) Turn.
Row 30 (FLO row): Ch 1, sc in the FLO of each st across. (42 sc) Turn.
Row 31 (BLO row): Ch 1, sc in the BLO of each st across. (42 sc) Turn.
Row 32 (FLO row): Ch 1, sc in the FLO of each st across. (42 sc) Turn.
Row 33 (BLO row): Ch 1, sc in the BLO of each st across. (42 sc) Turn.
Row 34 (FLO row): Ch 1, sc in the FLO of each st across. (42 sc) Turn.
Row 35 (BLO row): Ch 1, sc in the BLO of each st across. (42 sc) Turn.
Row 36 (FLO row): Ch 1, sc in the FLO of each st across. (42 sc) Turn.
Row 37 (BLO row): Ch 1, sc in the BLO of each st across. (42 sc) Turn.
Row 38 (FLO row): Ch 1, sc in the FLO of each st across. (42 sc) Turn.
Row 39 (BLO row): Ch 1, sc in the BLO of each st across. (42 sc) Turn.
Row 40 (FLO row): Ch 1, sc in the FLO of each st across. (42 sc) Turn.
Row 41 (BLO row): Ch 1, sc in the BLO of each st across. (42 sc) Turn.
Row 42 (FLO row): Ch 1, sc in the FLO of each st across. (42 sc) Turn.
Row 43 (BLO row): Ch 1, sc in the BLO of each st across. (42 sc) Turn.
Row 44 (FLO row): Ch 1, sc in the FLO of each st across. (42 sc) Turn.
Row 45 (BLO row): Ch 1, sc in the BLO of each st across. (42 sc) Turn.
Row 46 (FLO row): Ch 1, sc in the FLO of each st across. (42 sc) Turn. At this point your panel should measure approximately 15 inches from the foundation chain. If it is a little short, simply keep alternating BLO and FLO rows until it reaches 15 inches, always ending on a FLO row. Do not fasten off.
Top Edge and Dowel Casing
These three rows are worked in plain single crochet (through both loops) to make a smooth, flat casing for the dowel.
Row 47: Ch 1, sc in each st across (insert your hook under both loops of each stitch). (42 sc) Turn.
Row 48: Ch 1, sc in each st across. (42 sc) Turn.
Row 49: Ch 1, sc in each st across. (42 sc) Fasten off, leaving a 24-inch tail for sewing the casing.
Assembly and Finishing
- Weave in the short ends. Thread each loose tail (except the long 24-inch tail) onto your tapestry needle. Run the needle back and forth through the back of the fabric for about 2 inches, changing direction once so the tail cannot work loose, then trim the yarn close to the fabric. Do this for the oatmeal beginning tail and both sage green tails.
- Form the dowel casing. Lay the panel flat with the right side facing you. Fold the top three rows (Rows 47–49) over toward the back of the work to create a tube, and slide the 12-inch wooden dowel inside that tube. The dowel should sit snugly with about equal amounts sticking out at each side.
- Whipstitch the casing closed. Thread the long 24-inch tail onto your tapestry needle. Working along the back of the piece, bring the needle up through the folded edge and down through the main fabric just below it, making small, even stitches about 1/4 inch apart all the way across. Pull each stitch gently snug — firm enough to hold the dowel, but not so tight that the fabric puckers. Fasten off by running the needle through a few stitches on the back and trimming.
- Block the hanging. Lightly wet the piece by spritzing it with water (or press it between damp towels). Lay it flat on a towel or blocking mat and pin the corners and edges to measure approximately 12 inches wide by 15 inches tall. Smooth the ribbed texture with your hands. Let it dry completely — several hours or overnight — before unpinning. Blocking relaxes the stitches, evens the edges, and makes the ribbing stand out.
- Make the hanging cord. Cut three strands of oatmeal yarn, each about 40 inches long. Knot all three together at one end (leave a 2-inch tail beyond the knot). Braid the strands together — cross the right strand over the middle, then the left over the middle, and repeat — until the braid is about 24 inches long. Knot the other end tightly. Trim the loose ends beyond each knot to about 1 inch.
- Attach the cord to the dowel. At each end of the dowel, use a lark's head knot: fold the end of the braid in half to make a small loop, pass the loop around the dowel, then pull the knotted end of the braid through the loop and tighten. Repeat on the other end. Alternatively, whipstitch each braid end firmly around the dowel with a tapestry needle. Check that both sides hang evenly.
- Add the optional tassels. Cut 12 strands of yarn, each 10 inches long. Divide them into 4 groups of 3 strands. Fold each group in half to make a loop, slip the loop through a stitch along the bottom edge of the panel, pull the loose ends through the loop, and tighten (a lark's head knot). Space the four tassels evenly across the bottom edge. Trim all tassel ends to approximately 4 inches so they hang evenly.
Pro Tips and Variations
- Change the color story. Swap the sage stripe for terracotta, mustard, or dusty blue to match your room. You can also add a second stripe lower down, or work the entire hanging in a single color for a minimalist look. Just remember to finish each color change on the last stitch of the previous row, as described in the accent stripe section.
- Adjust the size. To make a wider hanging, add or subtract chains in multiples of 2 (for example, chain 55 for a wider panel) and keep the same row structure — your stitch count will simply be the new number minus one. To make it longer or shorter, add or remove rows in the main panel section, always ending on a FLO row before starting the casing rows. Remember that a wider panel needs a longer dowel.
- Substitute the yarn. Any worsted weight (category 4) yarn works, but cotton and cotton blends hold the crisp ribbing and drape best. If you use an acrylic or wool yarn, the piece will feel softer and slightly fuzzier. Always check your gauge with the new yarn, since different fibers crochet up at different sizes.
- Try a different texture. For a chunkier, more rustic look, work every row in BLO only — the ridges become deeper and more pronounced. For a smoother, flatter fabric, work every row through both loops. Both variations use the same stitch count and row structure, so you can experiment freely.



