Marrakech Windowpane Knit Mitts Free Pattern: Eyelet Lace Fingerless Gloves
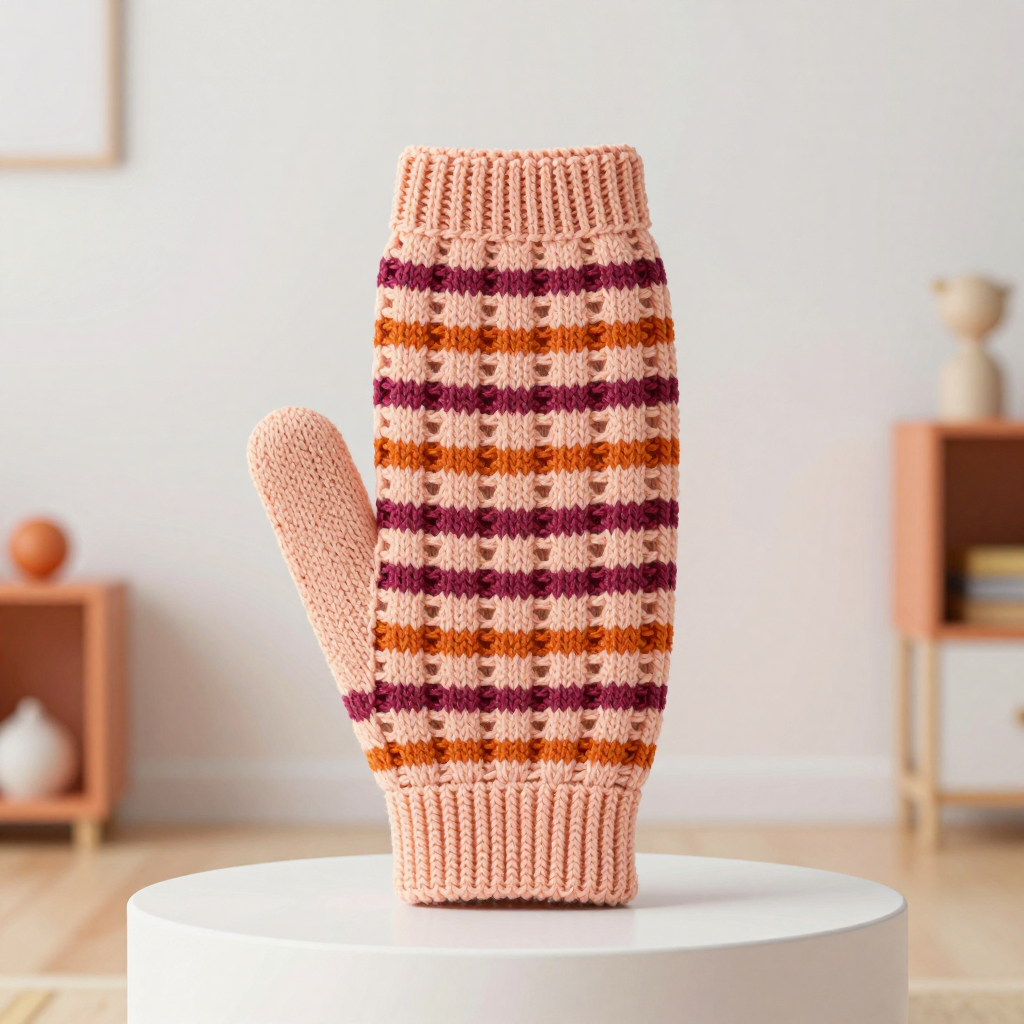
Marrakech Windowpane Knit Mitts: A Beginner-Friendly Eyelet Lace Adventure
These fingerless mitts are the perfect first lace project for anyone who has just learned to knit and purl in the round. Simple knitted tubes grow into something special: a bold windowpane grid of eyelet lines crosses the back of each hand, and self-striping yarn magically forms apricot bars inside peach frames, like sunlight through a Moroccan tile screen. The finished mitts are soft, light, and stretchy, measuring about 19 cm / 7.5 in around and 17 cm / 6.75 in long, with cozy ribbed edges at the wrist and fingers. Slip them on and you will feel warm without bulk, and the eyelet holes let a little desert breeze through. If you can knit, purl, and make a yarn over, you can make these.
Materials Needed
- Yarn: Self-striping sock yarn, light fingering/sock weight (approx. 400 m / 437 yd per 100 g skein), in a peach and apricot colorway. You need approx. 45–55 g (180–220 m / 197–240 yd) total for the pair.
- Needles: A set of 4 double-pointed needles (DPNs) in US 1.5 (2.5 mm), or the size you need to get the gauge below.
- Extra needle: One spare DPN or a stitch holder to hold the thumb stitches.
- Stitch markers: At least 3 removable or ring markers to mark the beginning of the round and the lace panel edges.
- Tapestry needle: A blunt needle with a large eye for weaving in ends.
- Scissors: Any small sharp pair.
- Finished size: Fits a men's average hand: palm circumference 20–21.5 cm / 8–8.5 in, length from wrist to base of fingers 17 cm / 6.75 in. Finished mitt circumference (unstretched) 19 cm / 7.5 in; it stretches to fit comfortably. Length 17 cm / 6.75 in. Make 2 alike.
Abbreviations and Beginner Glossary
- k – knit: insert the right needle into the front of the stitch from left to right, wrap yarn around, pull a loop through, and slide the old stitch off.
- p – purl: insert the right needle into the front of the stitch from right to left, wrap yarn around, pull a loop through toward you, and slide the old stitch off.
- yo – yarn over: wrap the yarn over the right needle to make an extra loop. On the next round you knit that loop, which leaves a small hole (an eyelet).
- k2tog – knit 2 together: insert the needle into the next 2 stitches at once and knit them as one. This leans the stitch to the right and removes one stitch.
- ssk – slip, slip, knit: slip 1 stitch knitwise (as if to knit) to the right needle, slip the next stitch knitwise, then knit both slipped stitches together through their back loops. This leans left and removes one stitch.
- M1L – make 1 left: lift the horizontal bar between two stitches from front to back with the left needle, then knit it through the back loop. Adds one stitch.
- M1R – make 1 right: lift the bar between two stitches from back to front, then knit it through the front loop. Adds one stitch.
- pm – place marker: slide a marker onto the right needle.
- sm – slip marker: move the marker from the left needle to the right needle without knitting it.
- sts – stitches.
- DPNs – double-pointed needles: short needles with points at both ends, used to knit small tubes in the round.
- Ribbing – alternating knit and purl stitches (here k1, p1) to make a stretchy edge.
- Stockinette stitch – when knitting in the round, knit every stitch on every round; the smooth side faces out.
- Cast on / bind off – casting on makes the first loops on your needle; binding off finishes the edge so it does not unravel.
Gauge
32 sts and 44 rounds = 10 cm / 4 in in stockinette stitch in the round, blocked. One pattern repeat (12 sts) = 3.75 cm / 1.5 in wide; one pattern repeat (8 rounds) = 1.8 cm / 0.7 in tall.
Why gauge matters: Gauge is how many stitches and rounds fit in a measured square. If your stitches are bigger than the pattern's, the mitts will come out too large; if smaller, too tight. How to swatch: cast on 40 sts, join in the round, knit 50 rounds in stockinette, bind off, wash and lay flat to dry, then count stitches over 10 cm / 4 in and rounds over 10 cm / 4 in. Change needle size if needed: bigger needles for more stitches per inch, smaller needles for fewer.
Beginner Tips Before You Start
- Use stitch markers to track the lace panel. Place one marker before and one after the 12 lace stitches so you always know where the pattern begins and ends.
- Do not pull your yarn too tight. Tension should be relaxed; tight stitches make the eyelets close up and the mitts hard to put on.
- Count your stitches at the end of every round. If a count is off, fix it right away rather than several rounds later.
- Check for twisted stitches after joining in the round. Lay the cast-on edge flat and make sure it does not spiral before knitting the first round.
- Yarn overs are just loops. On the next round, knit them normally; the hole is supposed to be there, so do not panic.
- Try the mitt on as you go. Slip the work onto scrap yarn or a spare needle to check the fit around your hand.
Step-by-Step Instructions
Windowpane Lace Panel (worked over 12 sts, 8-round repeat)
Rounds 1, 3, 5, 7: k2, yo, ssk, k4, k2tog, yo, k2. (12 sts)
Rounds 2, 4, 6, 8: Knit all stitches, knitting the yarn overs. (12 sts)
This makes a vertical eyelet line at each edge of the panel and a horizontal eyelet line every 8th round, forming the windowpane grid. The self-striping yarn naturally forms apricot bars inside peach frames as the color bands cross the grid.
Cuff (make 2 alike)
With US 1.5 (2.5 mm) DPNs, cast on 60 sts using the long-tail cast-on. Distribute the stitches evenly over 3 needles (20 sts per needle). Join to work in the round, being careful not to twist. Place a marker to mark the beginning of the round.
Rounds 1–12: Work in k1, p1 ribbing. (60 sts)
Cuff measures approx. 3 cm / 1.25 in.
Hand Setup
Next round: k30, pm, work Windowpane Lace Panel Round 1 over the next 12 sts, pm, k18. (60 sts total: 30 palm sts, 12 lace panel sts, 18 palm sts.) The lace panel sits centered on the back of the hand.
Hand
Work even, keeping the 48 palm stitches in stockinette (knit every round) and the 12 back-of-hand stitches in the Windowpane Lace Panel, repeating the 8-round panel repeat.
Work until the hand measures 6 cm / 2.4 in from the cast-on edge, ending after a panel Round 8.
Thumb Gusset
Round 1 (increase round): k1, M1R, knit to marker, sm, work panel Round 1, sm, knit to last stitch, M1L, k1. (62 sts)
Rounds 2–3: Knit to marker, sm, work panel as established, sm, knit to end. (62 sts)
Repeat Rounds 1–3 four more times, then work Round 1 once more. (72 sts; 12 gusset sts between the two increases on the palm side)
Divide for Thumb
Next round: k1, slip the next 12 gusset sts onto a spare DPN or stitch holder, cast on 2 sts using the backward-loop cast-on, knit to marker, sm, work panel as established, sm, knit to end. (62 sts on the needles)
Hand Continued
Work even, keeping the palm stitches in stockinette and the back-of-hand stitches in the Windowpane Lace Panel, until the hand measures 15 cm / 6 in from the cast-on edge, ending after a panel Round 8.
Top Edging
Rounds 1–4: Work in k1, p1 ribbing across all 62 sts. (62 sts)
Bind off all stitches loosely in the ribbing pattern.
Thumb
Slip the 12 held gusset stitches onto 3 DPNs. Join yarn at the right side of the thumb opening. Pick up and knit 2 sts from the cast-on edge, then knit the 12 held sts. (14 sts)
Rounds 1–4: Work in k1, p1 ribbing. (14 sts)
Bind off loosely in the ribbing pattern.
Assembly and Finishing
Weave in ends: Thread each yarn tail onto the tapestry needle and run it along the inside of the work for about 5 cm / 2 in, going back and forth through the backs of stitches so it cannot pull out, then trim close to the fabric.
Blocking: Mist the mitts lightly with water and smooth them flat on a towel, shaping them to 19 cm / 7.5 in around and 17 cm / 6.75 in long. Do not stretch the lace aggressively. Let them dry completely; the eyelet holes will open up and the windowpane grid will become crisp.
Make the second mitt identically. Check that both thumbs sit on the same side of each mitt so they mirror each other when worn.
Pro Tips and Variations
- Color changes: Use a solid peach yarn for a subtle, tonal look, or a contrasting solid for the lace panel to make the windowpane grid pop.
- Size adjustments: For a smaller hand (circumference 18–19 cm / 7–7.5 in), cast on 56 sts and work the lace panel over 12 sts with 22 sts on each side of the panel. For a larger hand (circumference 22–23 cm / 8.5–9 in), cast on 64 sts with 26 sts on each side of the panel. Gusset increases remain the same.
- Yarn substitution: Any light fingering or sock-weight yarn works; choose one with a little stretch (wool or a wool blend) so the mitts hug the hand.
- Longer cuffs: Add extra ribbing rounds before the hand setup for a cozy, slouchy wrist, or work the top edging in a contrast color for a boho accent.