Grit Grid Mosaic Knit Baby Cardigan Romper Free Pattern
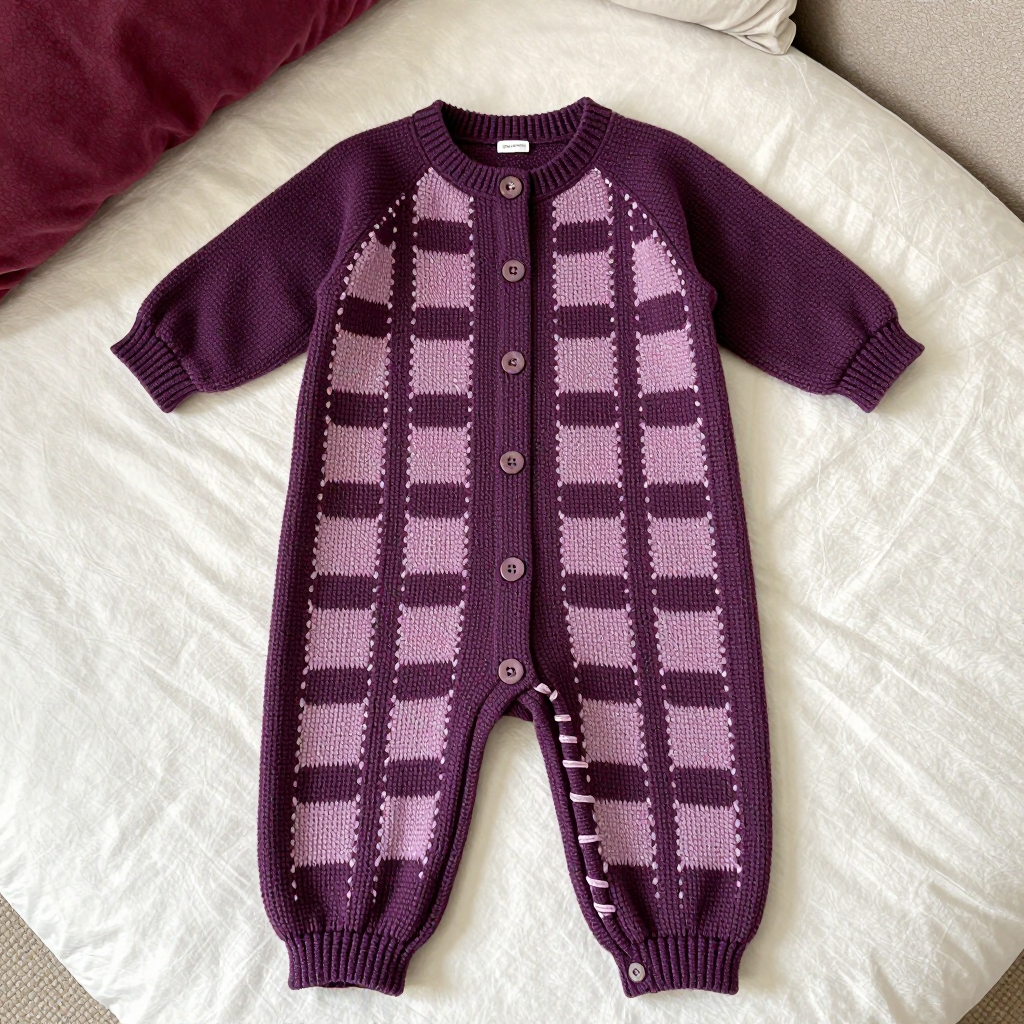
Grit Grid Mosaic Knit Baby Cardigan Romper
Introduction
Welcome to your very first mosaic knitting adventure! This little baby romper is the perfect project for someone who has just learned to knit and purl and is ready to try something a bit more exciting. Mosaic knitting is a magical technique where you only ever use one color per row, yet the finished fabric looks like you spent hours juggling two strands of yarn. The result is a soft, boxy, plum-and-mauve romper with a bold grid of squares across the front and back, ribbed edges, and sweet yarn-stitched button loops down one side. It is worked flat in simple pieces and seamed together, so you never have to wrestle with double-pointed needles or complicated shaping. The finished romper is cozy, modern, and just a little bit grunge, perfect for a newborn photo shoot or everyday snuggling.
Materials Needed
- Yarn: Worsted weight (CYC 4) cotton yarn, approximately 420 yds (384 m) total. You will need 260 yds (238 m) of plum (Color A) and 160 yds (146 m) of mauve (Color B). The sample used a smooth worsted cotton at 200 yds (183 m) per 100 g skein.
- Main needles: US 7 (4.5 mm) straight knitting needles.
- Ribbing needles: US 6 (4.0 mm) straight knitting needles.
- Tapestry needle: A blunt-tipped needle with a large eye for seaming and for making the yarn-stitched button loops.
- Stitch markers: At least 4, to mark the beginning of pattern repeats and the armhole shaping.
- Stitch holders or waste yarn: For holding the shoulder stitches while you work the other side.
- Scissors: Sharp small scissors for cutting yarn.
- Buttons: 5 small buttons, 3/8 in (10 mm) in diameter.
Finished size: Newborn, to fit 0–3 months. Finished chest circumference: 18 in (46 cm). Finished body length from shoulder to crotch: 14 in (35.5 cm). Finished sleeve length from underarm: 6 in (15 cm). Finished leg opening circumference: 8 in (20 cm). All measurements include approximately 1 in (2.5 cm) of positive ease.
Abbreviations and Beginner Glossary
Do not panic if these look like a secret code. Here is every abbreviation used in this pattern, explained in plain English.
- st / sts – stitch / stitches. One loop of yarn on your needle is a stitch.
- k – knit. Put the right needle into the front of the stitch from left to right, wrap the yarn around, and pull it through.
- p – purl. Put the right needle into the front of the stitch from right to left, wrap the yarn around, and pull it through.
- RS – right side. The side of the fabric that will face outward when the romper is worn.
- WS – wrong side. The inside of the fabric.
- sl 1 – slip one stitch. Move one stitch from the left needle to the right needle without knitting or purling it. Unless the pattern says otherwise, slip it purlwise (as if to purl) with the yarn held at the back of the work.
- k2tog – knit two stitches together. This turns two stitches into one and makes a decrease that leans to the right.
- ssk – slip, slip, knit. Slip one stitch knitwise, slip the next stitch knitwise, then knit both together through the back loops. This makes a decrease that leans to the left.
- rep – repeat. Do the instruction again.
- beg – beginning.
- selvedge st – edge stitch. The first and last stitch of a row, worked in stockinette (knit on RS, purl on WS) to make seaming easier.
- stockinette stitch – knit on the right side, purl on the wrong side. The smooth fabric with little V shapes.
- k1, p1 rib – knit one, purl one, repeated across the row. This makes a stretchy, textured band.
- bind off – also called cast off. Finish the stitches so they do not unravel, by knitting two stitches and lifting the first over the second, repeating across.
- cast on – create the first row of loops on your needle.
- pick up and knit – insert your needle into the edge of the fabric, wrap yarn, and pull up a new stitch.
- mosaic slip-stitch – a colorwork technique where you use only one color per row and slip stitches of the other color to create a pattern.
Gauge
18 sts and 26 rows = 4 in (10 cm) over the mosaic slip-stitch pattern on US 7 (4.5 mm) needles, blocked.
20 sts and 28 rows = 4 in (10 cm) over k1, p1 rib on US 6 (4.0 mm) needles.
Gauge matters because it is the bridge between the pattern and the finished size. If your stitches are bigger than the pattern expects, the romper will come out too large; if they are smaller, it will be too small. To check your gauge, cast on about 30 stitches with your US 7 needles and work in the mosaic pattern for about 5 inches. Bind off, lay the swatch flat, and measure a 4-inch section in the middle. Count the stitches and rows. If you have more than 18 stitches, go up a needle size; if you have fewer, go down. Wash and dry your swatch the way you will wash the romper, because cotton can change size after blocking.
Beginner Tips Before You Start
- Use stitch markers to track your repeats. Place a marker every 8 stitches on the mosaic rows so you always know where the pattern repeat begins and ends. It is much easier to fix a mistake when you catch it right away.
- Do not pull the yarn too tight when slipping stitches. The slipped stitches need to lie flat. Keep the carried yarn relaxed so the fabric does not pucker.
- Catch your floats every 3 to 4 stitches. When you carry Color B across the back, weave it under Color A every few stitches so the floats (the strands of yarn across the back) never exceed 1/2 in (1.3 cm). Long floats can catch on tiny fingers.
- Count your stitches at the end of every shaping row. The stitch counts in parentheses are your safety net. If the number does not match, rip back that row and try again.
- Work your selvedge stitches consistently. Always knit the first and last stitch on the right side and purl them on the wrong side. This gives you a neat edge to seam into later.
- Keep your tension even rather than tight. Beginners often grip the yarn too hard. Relax your hands and let the needles do the work.
Step-by-Step Instructions
Stitch Guide: Mosaic Slip-Stitch Grid
This pattern is worked flat in an 8-row repeat. You use only one color per row, changing colors every two rows. Slip stitches purlwise with the yarn held to the wrong side (back) of the work unless stated.
Row 1 (RS, Color A): Knit. (All sts)
Row 2 (WS, Color A): Purl. (All sts)
Row 3 (RS, Color B): K1, *sl 1, k3, sl 1, k3; rep from * to last st, k1. (All sts)
Row 4 (WS, Color B): P1, *sl 1, p3, sl 1, p3; rep from * to last st, p1. (All sts)
Row 5 (RS, Color A): Knit. (All sts)
Row 6 (WS, Color A): Purl. (All sts)
Row 7 (RS, Color B): K1, *k3, sl 1, k3, sl 1; rep from * to last st, k1. (All sts)
Row 8 (WS, Color B): P1, *p3, sl 1, p3, sl 1; rep from * to last st, p1. (All sts)
Repeat Rows 1–8 for the mosaic grid. The slipped stitches of Color B form a boxy plum-and-mauve grid over the plum ground.
Back
With US 6 (4.0 mm) needles and Color A, cast on 82 sts.
Rows 1–6: Work k1, p1 rib. (82 sts) This makes a 1 in (2.5 cm) band.
Change to US 7 (4.5 mm) needles.
Work in the mosaic grid pattern, keeping 1 st at each edge in stockinette as a selvedge.
Rows 1–2: Color A. (82 sts)
Rows 3–8: Work mosaic grid Rows 3–8. (82 sts)
Rows 9–52: Continue repeating Rows 1–8 of the mosaic grid until the piece measures 8 in (20 cm) from the cast-on edge, ending after a WS row. (82 sts) You will have worked approximately 52 rows total.
Shape Armholes
Next row (RS): Bind off 4 sts, work in pattern to end. (78 sts)
Next row (WS): Bind off 4 sts, work in pattern to end. (74 sts)
Next row (RS): K1, k2tog, work in pattern to last 3 sts, ssk, k1. (72 sts)
Next row (WS): Work in pattern without decreasing. (72 sts)
Repeat the last 2 rows 2 more times. (68 sts)
Work even in the mosaic grid pattern until the armhole measures 4 in (10 cm), ending after a WS row. (68 sts)
Shape Shoulders and Back Neck
Next row (RS): Work 22 sts in pattern, bind off center 24 sts, work in pattern to end. (22 sts each side)
Place the left shoulder sts on a stitch holder. Work the right shoulder sts even for 2 rows, then bind off all 22 sts. (22 sts bound off)
Return the left shoulder sts to the needle and work even for 2 rows, then bind off all 22 sts. (22 sts bound off)
Left Front Panel
Worked from the side edge to the center front.
With US 6 (4.0 mm) needles and Color A, cast on 42 sts.
Rows 1–6: Work k1, p1 rib. (42 sts)
Change to US 7 (4.5 mm) needles.
Work in the mosaic grid pattern, keeping 1 selvedge st at each edge, until the piece measures 8 in (20 cm) from the cast-on edge, ending after a WS row. (42 sts)
Shape Armhole
Next row (RS): Bind off 4 sts, work in pattern to end. (38 sts)
Next row (WS): Work in pattern. (38 sts)
Next row (RS): K1, k2tog, work in pattern to end. (37 sts)
Next row (WS): Work in pattern. (37 sts)
Repeat the last 2 rows 2 more times. (35 sts)
Work even until the armhole measures 4 in (10 cm), ending after a WS row. (35 sts)
Shape Front Neck
Next row (RS): Bind off 9 sts at the center-front edge, work in pattern to end. (26 sts)
Next row (WS): Work in pattern. (26 sts)
Next row (RS): Bind off 2 sts, work in pattern to end. (24 sts)
Next row (WS): Work in pattern. (24 sts)
Next row (RS): Bind off 2 sts, work in pattern to end. (22 sts)
Work even until the armhole measures 4 in (10 cm), ending after a WS row. Bind off all 22 sts. (22 sts bound off)
Right Front Panel
Work as for the Left Front Panel, reversing all shaping: work the bind offs and decreases at the beginning of WS rows, and work the neck shaping at the beginning of RS rows. (Ends with 22 sts bound off)
Sleeves (Make 2)
With US 6 (4.0 mm) needles and Color A, cast on 38 sts.
Rows 1–6: Work k1, p1 rib. (38 sts)
Change to US 7 (4.5 mm) needles.
Work in the mosaic grid pattern, increasing 1 st at each edge every 6th row 4 times. (46 sts)
Work even until the sleeve measures 6 in (15 cm) from the cast-on edge, ending after a WS row. (46 sts)
Shape Sleeve Cap
Next row (RS): Bind off 4 sts, work in pattern to end. (42 sts)
Next row (WS): Bind off 4 sts, work in pattern to end. (38 sts)
Next row (RS): K1, k2tog, work in pattern to last 3 sts, ssk, k1. (36 sts)
Next row (WS): Work in pattern. (36 sts)
Repeat the last 2 rows 5 more times. (26 sts)
Next row (RS): K1, k2tog, work in pattern to last 3 sts, ssk, k1. (24 sts)
Next row (WS): Work in pattern. (24 sts)
Bind off all 24 sts. (24 sts bound off)
Leg Openings
With US 6 (4.0 mm) needles and Color A, pick up and knit 44 sts evenly around each leg opening. (44 sts per leg)
Rows 1–6: Work k1, p1 rib. (44 sts)
Bind off in rib. (44 sts bound off)
Repeat for the second leg opening.
Assembly and Finishing
Block all pieces to measurements. Pin each piece flat on a towel or blocking mat, mist with water, and let it dry completely. This opens up the mosaic grid and evens out your stitches.
Sew the shoulder seams. With the right sides facing you, use the tapestry needle and a length of Color A to sew the 22 bound-off stitches of the back shoulders to the 22 bound-off stitches of the front shoulders, using a flat seam (also called mattress stitch). To do this, bring the needle under one bar of yarn on each edge, alternating sides, and pull gently. The seam should be invisible from the right side.
Set in the sleeves. Match the center of the sleeve cap to the shoulder seam and pin the sleeve into the armhole, right sides together. Sew around the armhole with a flat seam, easing in any extra fabric at the top of the cap. Repeat for the second sleeve.
Sew the side and sleeve seams. Fold the romper in half with right sides together. Sew from the underarm down to the crotch on each side, then continue sewing the sleeve seams from the underarm to the cuff. Use the same flat seam.
Sew the crotch seam. Join the front and back lower edges with a flat seam, matching the center points. This closes the bottom of the romper.
Make the yarn-stitched button loops. Using Color B and the tapestry needle, work 5 loops along the right front panel edge, spaced approximately 2 in (5 cm) apart, beginning 1 in (2.5 cm) below the neck edge. For each loop: bring the needle up through the fabric, form a loop of yarn approximately 3/4 in (2 cm) long, and secure it with 3 small whip stitches over the loop base. Whip stitches are made by wrapping the yarn over the loop base and pulling through, working around the base to hold it firmly.
Sew on the buttons. Sew 5 buttons to the left front panel edge, opposite the loops, using Color A thread or matching sewing thread.
Weave in all ends. Turn the romper inside out and use the tapestry needle to weave each yarn tail through the back of several stitches, then trim. Do not knot the ends, as knots can rub against delicate skin.
Steam-block the mosaic panels. Gently hold a steam iron just above the fabric (do not press down) to open the grid pattern. Be careful not to flatten the slipped stitches.
Pro Tips and Variations
- Change the colors. Try a soft sage green with cream, or a mustard yellow with charcoal, for a completely different look. Just keep one color as the main ground and one as the contrast.
- Adjust the size. To make a larger size, add 8 stitches (one full pattern repeat) to the back and 4 stitches to each front panel for every size up. Remember to buy extra yarn and check your gauge again.
- Substitute the yarn. A smooth worsted weight cotton or cotton-blend works best because it shows the mosaic pattern clearly. Avoid fuzzy or textured yarns, which can hide the grid.
- Add a hood or collar. Pick up stitches around the neckline and work a few rows of k1, p1 rib for a cozy collar, or knit a simple square hood and seam it to the back neck for extra warmth.



