Free Pattern: The Orchard Lantern Pocket Wrap
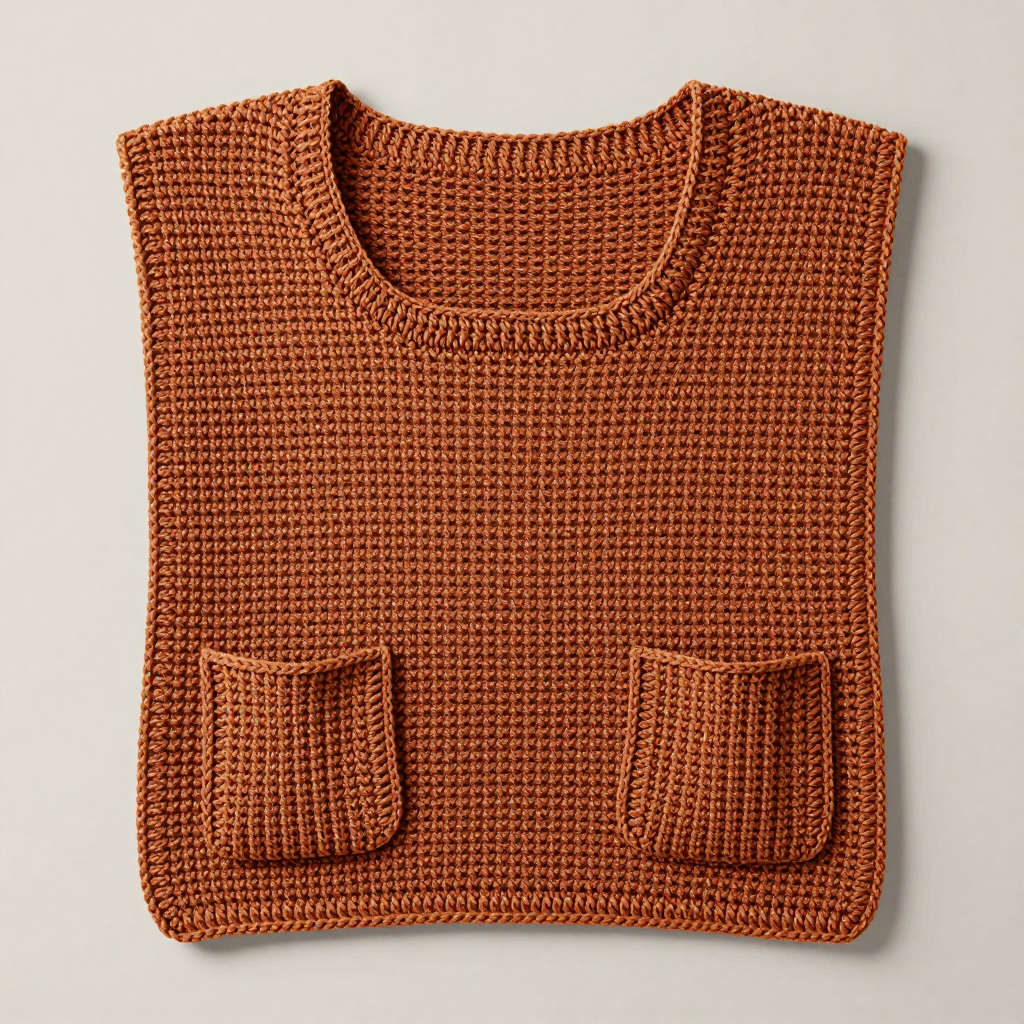
The Orchard Lantern Pocket Wrap: A Free, Beginner-Friendly Crochet Pattern
Introduction
If you have ever wanted to make something you would actually wear and show off, the Orchard Lantern Pocket Wrap is the perfect first big project for you. It is designed for complete beginners, using only the most basic crochet stitches in a simple two-row repeat that looks far more intricate than it really is. The finished wrap is a long, generous rectangle about 79 inches long and 21 inches wide, worked in a warm amber-rust worsted-weight yarn that feels soft, cozy, and gently drapey in your hands. Two deep patch pockets stitched onto the ends give it a practical, handmade charm, and the alternating single and double crochet rows create a subtle ridged texture that catches the light like little lanterns. Wrap it around your shoulders on a cool evening, and you will have made a piece that is as comforting to wear as it is satisfying to create.
Materials Needed
- Yarn: Worsted weight yarn (also called category 4 or medium weight), approximately 900–1000 yards. The sample is shown in a warm amber/rust tonal worsted, such as 3 skeins of a 100% acrylic or acrylic-wool blend worsted. Check your skein labels for yardage so you buy enough in one dye lot.
- Crochet hook: Size J/10 (6.0 mm), or whatever size you need to match the gauge below. If you are brand new, a 6.0 mm hook is a comfortable, easy-to-hold size for worsted yarn.
- Stitch markers: At least 4, to mark the corners and pocket placement. (A stitch marker is simply a small clip or ring you slide onto a stitch so you can find it again.)
- Tapestry needle: A large-eyed, blunt-tipped yarn needle for seaming the pockets and weaving in ends.
- Scissors: Any sharp pair for cutting yarn.
- Measuring tape: For checking gauge and finished dimensions.
- Pins (optional but helpful): For holding the pockets in place while you sew.
- Blocking supplies (optional): A spray bottle of water and a towel, or blocking mats and pins, for the finishing step.
Finished size: Approximately 79 inches long x 21 inches wide before the pockets are added. Each pocket measures about 7 inches wide x 7 inches tall.
Abbreviations and Beginner Glossary
Every abbreviation used in this pattern is listed below and explained in plain English. If you have never crocheted before, read this section twice before you begin. You do not need to memorize anything; just refer back as you go.
- ch – chain. Make a loop of yarn on your hook, then wrap the yarn over the hook and pull it through the loop on your hook. That is one chain. Chains form the foundation you build on.
- sc – single crochet. Insert your hook into the next stitch, wrap the yarn over the hook and pull up a loop (you now have 2 loops on your hook), then wrap the yarn over again and pull it through both loops on your hook. One single crochet made.
- dc – double crochet. Wrap the yarn over your hook first, insert the hook into the next stitch, wrap the yarn over and pull up a loop (3 loops on your hook), wrap the yarn over and pull through the first 2 loops (2 loops left), wrap the yarn over and pull through the last 2 loops. One double crochet made.
- sl st – slip stitch. Insert your hook into the next stitch, wrap the yarn over and pull it through both the stitch and the loop on your hook in one motion. This makes a very short, flat joining stitch.
- sc2tog – single crochet 2 together. This is a decrease, meaning it turns two stitches into one. Insert your hook into the next stitch, pull up a loop, insert your hook into the following stitch, pull up a loop (3 loops on your hook), then wrap the yarn over and pull through all 3 loops. (Note: this decrease is listed for reference and is not actually used in this particular pattern, but it is included so you recognize it.)
- st / sts – stitch / stitches. A "stitch" is one completed loop-and-pull motion; "stitches" is the plural.
- turn – flip your work over so you can work back across the row you just finished. You always turn at the end of a row.
- fasten off – cut the yarn a few inches from your work, then pull the cut tail all the way through the last loop on your hook to lock it. This finishes the piece.
- right side – the side of the fabric meant to face outward when worn. The "wrong side" is the back.
- whipstitch – a simple sewing stitch: bring the needle up through both layers, then over the edge and back down, making small diagonal stitches over the edge to join two pieces.
- gauge – how many stitches and rows fit into a set measurement (here, 4 inches). Explained fully in the next section.
Gauge
Gauge: 12 stitches x 8 rows = 4 inches in the main stitch pattern (alternating single crochet and double crochet rows), measured after lightly blocking.
Why gauge matters: Gauge is simply how tightly or loosely you crochet. If your stitches are bigger than the pattern expects, your wrap will come out longer and wider than 79 x 21 inches; if they are smaller, it will come out shorter and narrower. Matching gauge is the only way to be sure your finished wrap is the size you planned.
How to make a gauge swatch: With your 6.0 mm hook and your yarn, chain 20. Work Row 1 as single crochet across (19 sc). Then work Row 2 as double crochet across, and Row 3 as single crochet across, repeating those two rows until your swatch is about 5 inches tall. Lay it flat, gently smooth it (do not stretch it), and measure a 4-inch square in the middle. Count how many stitches across and how many rows tall fit in that 4 inches. If you have more than 12 stitches, your tension is tight; try a larger hook. If you have fewer than 12, your tension is loose; try a smaller hook. Change hook size and swatch again until you match.
Beginner Tips Before You Start
- Count your stitches at the end of every row. Every row in this pattern ends with a stated stitch count in parentheses, like (63 sc). Count before you turn. If you are off by one, it is much easier to fix right away than ten rows later.
- Use stitch markers to track your edges. Place a marker in the first and last stitch of each row so you never lose the edge stitch. Losing edge stitches is the number one reason beginners' rectangles turn into triangles.
- Do not pull your yarn too tight. Hold the yarn with a relaxed, even tension. Tight, clenched stitches make a stiff fabric that will not drape, and they make your hands ache. Loosen your grip and let the hook do the work.
- The turning chain counts as your first double crochet. On double crochet rows, the "ch 2" at the start counts as the first dc. That is why a row that begins with ch 2 and then works into every stitch still ends with the same stitch count as the row before.
- Work in good light and take breaks. This wrap is long, so pace yourself. Ten or fifteen rows a day will finish it in a couple of weeks without hand strain.
- Keep your long tail. When you fasten off the main body and the pockets, leave a tail at least 12 inches long. You will use those tails to sew the pockets on and to weave in the ends securely.
Step-by-Step Instructions
Read through the whole section once before you pick up your hook. Each row is written out individually, with the stitch count at the end in parentheses. Nothing is skipped and nothing is left to guesswork.
Main Body
Row 1: Ch 64. Sc in the 2nd ch from hook and in each ch across. (63 sc)
Row 2: Ch 2 (this counts as the first dc here and throughout), turn. Dc in each st across. (63 dc)
Row 3: Ch 1, turn. Sc in each st across. (63 sc)
Rows 4–158: Repeat Rows 2–3, ending on a sc row. In other words, every even-numbered row (4, 6, 8, and so on up to 158) is a double crochet row worked exactly like Row 2: ch 2, turn, dc in each st across (63 dc). Every odd-numbered row (5, 7, 9, and so on up to 157) is a single crochet row worked exactly like Row 3: ch 1, turn, sc in each st across (63 sc). Row 158 is your final row and is a double crochet row, so the piece ends with a dc row that is followed by the last sc row at Row 157. Piece should measure approximately 79 inches long. (63 sts on every row.)
Fasten off, leaving a long tail (at least 12 inches) for seaming.
Pockets (make 2)
Work the pocket instructions twice, once for each pocket.
Row 1: Ch 22. Sc in the 2nd ch from hook and in each ch across. (21 sc)
Row 2: Ch 2, turn. Dc in each st across. (21 dc)
Row 3: Ch 1, turn. Sc in each st across. (21 sc)
Rows 4–22: Repeat Rows 2–3, ending on a sc row. Just like the body: every even-numbered row (4, 6, 8, and so on up to 22) is a double crochet row worked exactly like Row 2 (ch 2, turn, dc in each st across, 21 dc). Every odd-numbered row (5, 7, 9, and so on up to 21) is a single crochet row worked exactly like Row 3 (ch 1, turn, sc in each st across, 21 sc). Row 22 is your final row and is a double crochet row. (21 sts; pocket measures about 7 inches wide x 7 inches tall.)
Fasten off, leaving a long tail for seaming. Repeat for the second pocket.
Assembly
Step 1: Lay the main body flat with the right side facing up.
Step 2: Fold the wrap in half widthwise so the two short ends meet, forming a long rectangle 21 inches wide. This creates a folded wrap with an open front.
Step 3: Place one pocket on each end of the wrap, positioned about 2 inches up from the bottom edge and centered horizontally on each end. Pin in place. (Use your stitch markers or pins to hold the corners so the pocket does not shift while you sew.)
Step 4: Using the long tails and a yarn needle, whipstitch around the bottom and two side edges of each pocket, leaving the top edge open. To whipstitch: thread the tail onto the needle, bring the needle up through both layers just inside the edge, then over the edge and back down, making small diagonal stitches about 1/4 inch apart all the way around. Weave in all ends.
Assembly and Finishing
Seaming the pockets: Work slowly and keep your stitches even. Sew along the bottom edge first, then up one side, then up the other side, always leaving the top edge open so the pocket can hold things. Do not pull the sewing yarn tight enough to pucker the fabric; snug is enough. When you reach the end, run the needle through a few stitches on the wrong side and trim the tail.
Weaving in ends: Thread each loose tail onto the tapestry needle and run it back and forth through several stitches on the wrong side of the fabric, changing direction once or twice so it cannot work loose. Trim the yarn close to the fabric. Do this for every tail: the body's start and finish, and both pockets' start and finish.
Blocking: Lightly block the wrap to open up the stitch texture and even out the edges. The simplest method is to mist the wrap with clean water until it is damp but not soaking, lay it flat on a towel or blocking mats, and gently pat it into a neat 79 x 21 inch rectangle. Let it dry completely overnight. Do not hang a damp wrap, as the weight of the water will stretch it out of shape.
Optional border: Add a single crochet border around the entire outer edge of the wrap for a clean finish. Join your yarn at one corner, ch 1, then sc evenly around the perimeter, working 3 sc in each corner so the corners lie flat. Join with a sl st to the first sc, fasten off, and weave in the ends.
Pro Tips and Variations
- Change colors for a striped look. Work a few rows in a contrasting color every so often, or change color at the start of a double crochet row for crisp stripes. Always change color on the last pull-through of the previous row so the join is invisible.
- Adjust the size. To make the wrap wider, add chains in multiples of 2 to your starting chain (each extra 2 chains adds about 2/3 inch of width). To make it longer or shorter, simply work more or fewer rows, always ending on a single crochet row so the edge matches the pattern.
- Substitute yarn. Any worsted weight (category 4) yarn will work, including cotton blends for a cooler, drapier wrap or a soft wool blend for extra warmth. Always swatch first, because a different fiber can change your gauge.
- Make the pockets bigger or smaller. Add or remove chains in multiples of 2 from the pocket starting chain to change the pocket width, and add or remove rows to change the height. Just keep the pocket roughly square for the classic patch-pocket look.



