Free Pattern: The Hearthstone Mosaic Floor Mat
Free Pattern: The Hearthstone Mosaic Floor Mat
Introduction
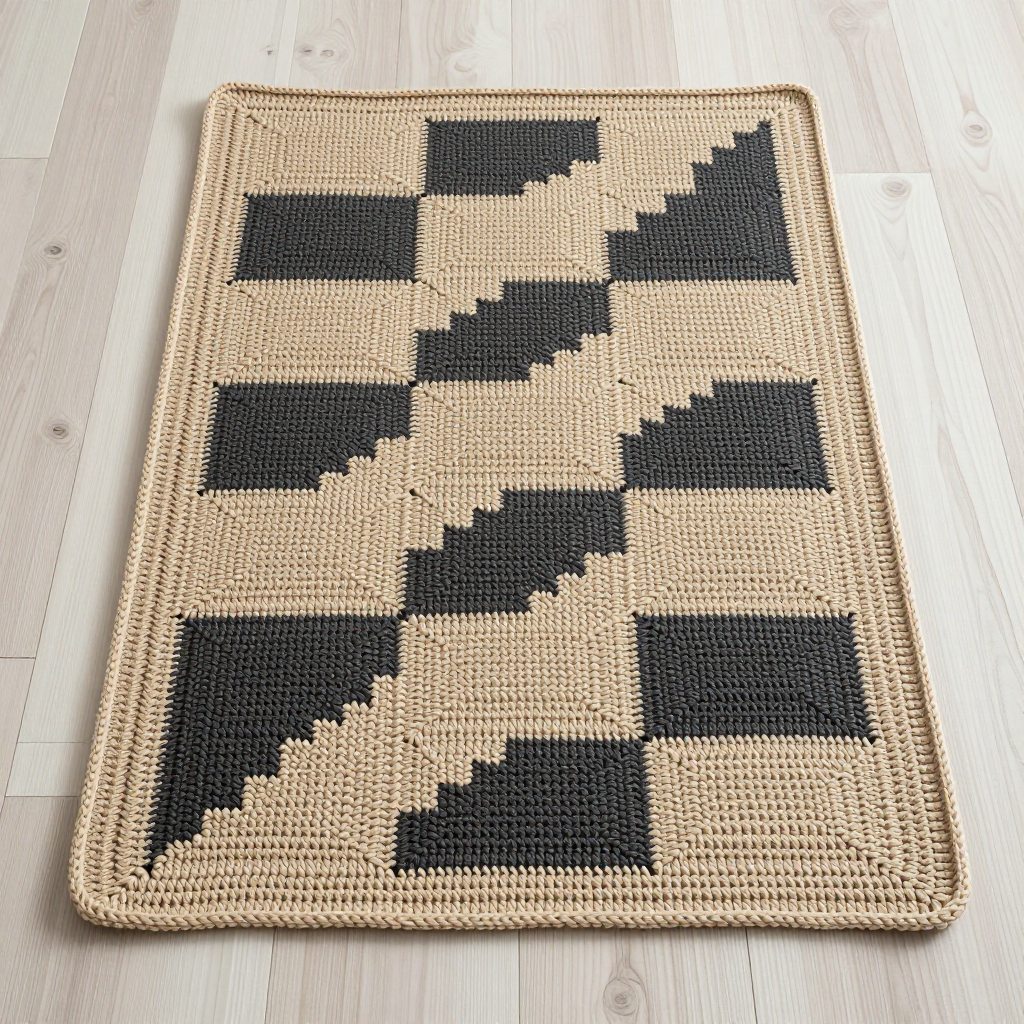
Welcome to the Hearthstone Mosaic Floor Mat — a cozy, geometric rug that looks impressively intricate but is built from just two simple stitches you can learn in minutes. This project is perfect for complete beginners who have never held a crochet hook before, because every stitch is either a single crochet or a double crochet, and the "mosaic" magic happens automatically as you alternate two colors. The finished mat is a thick, dense, textured rectangle in warm oatmeal beige and deep charcoal gray, with raised interlocking color blocks that give it a modern, handmade look. It feels sturdy and durable underfoot — ideal beside a bed, at an entryway, or in front of the bathroom sink. If you can make a chain and a single crochet, you can absolutely make this mat, and you will finish it proud of something beautiful you built with your own hands.
Materials Needed
- Yarn: Worsted weight (Category 4) cotton yarn, approximately 400 yards total — 200 yards in Color A (Warm Oatmeal) and 200 yards in Color B (Deep Charcoal). Cotton is recommended because it is absorbent, durable, and lies flat, which is ideal for a floor mat.
- Crochet hook: 5.5 mm (US size I/9).
- Stitch markers: At least 4 (helpful for marking the first stitch of each row and the corners of the border).
- Tapestry needle: A blunt-tipped needle with a large eye, for weaving in yarn ends.
- Scissors: Sharp craft scissors for cutting yarn.
- Measuring tape: For checking gauge and the 30-inch length.
- Finished size/dimensions: Approximately 17.5 inches wide x 30 inches long (about 44 cm x 76 cm), plus a small single crochet border around the edge. (Width is based on 61 stitches at the stated gauge of 14 stitches per 4 inches; length is based on working until the piece measures about 30 inches.)
Abbreviations and Beginner Glossary
Every abbreviation used in this pattern is listed below and explained in plain English. You do not need any prior knowledge — read this section once before you begin.
- ch — chain. Make a slip knot on your hook, then wrap the yarn over the hook and pull it through the loop on your hook. That is one chain. Repeat to make a series of chains (this is your foundation).
- sc — single crochet. Insert your hook into the stitch, wrap the yarn over the hook, pull up a loop (you now have 2 loops on the hook), wrap the yarn over again, and pull it through both loops on the hook. One single crochet made.
- dc — double crochet. Wrap the yarn over the hook first, insert the hook into the stitch, wrap the yarn over and pull up a loop (3 loops on hook), wrap the yarn over and pull through the first 2 loops (2 loops remain), wrap the yarn over and pull through the last 2 loops. One double crochet made.
- st / sts — stitch / stitches. A "stitch" is one completed unit of crochet work; "sts" is simply the plural.
- FLO — front loop only. Every stitch has two top loops: the one closer to you is the front loop, and the one farther away is the back loop. "Work in FLO" means you insert your hook only under the front loop, not under both loops.
- RS — right side. The "right side" is the front, public-facing side of your work — the side you want showing when the mat is finished.
- sk — skip. Do not work into that stitch; move past it to the next one.
- sl st — slip stitch. Insert your hook into the stitch, wrap the yarn over, and pull it through both the stitch and the loop on your hook in one motion. It creates almost no height and is used for joining.
- join with a slip stitch — attach the new yarn (or close a round) by making one slip stitch into the indicated stitch.
- fasten off — cut the yarn a few inches from your work, then pull the tail all the way through the last loop on your hook to lock it. This ends that color.
- repeat from * — go back to the asterisk (*) in the instruction and work the sequence again as many times as directed.
- two rows below — the row that is two rows beneath the row you are currently working. In mosaic crochet you reach down into that lower row to make the raised double crochet.
- round — a row that goes all the way around the outside edge of the piece (used in the border).
- 3 sc in each corner — work three single crochet stitches into the same corner space so the corner can turn smoothly without curling.
Gauge
Gauge: 14 single crochet stitches x 16 rows = 4 inches (10 cm) in the mosaic pattern.
Why gauge matters: Gauge is simply how big your stitches turn out. If your stitches are larger than the pattern's, your mat will come out wider and longer than planned; if smaller, it will be narrower and shorter. Because this mat is a home decor piece with a target size of about 17.5 x 30 inches, checking gauge helps you get a mat that fits your space and uses the right amount of yarn.
How to make a gauge swatch: With Color A, chain 22. Work single crochet in the second chain from the hook and in each chain across (21 stitches). Work 16 rows of single crochet, then measure the middle 14 stitches and 16 rows with your measuring tape. If 14 stitches and 16 rows measure 4 inches, you are on target. If your swatch is bigger than 4 inches, try a smaller hook (5.0 mm); if smaller than 4 inches, try a larger hook (6.0 mm). A slightly tighter gauge than the target is fine — it makes a denser, more durable mat.
Beginner Tips Before You Start
- Count every row. This pattern keeps a constant stitch count of 61 stitches on every row. Count at the end of each row before you fasten off — it takes 30 seconds and prevents almost every beginner mistake.
- Use a stitch marker in your first stitch of each row. The first stitch of a row is easy to lose. Place a marker in it so you always know where the row begins and ends.
- Do not pull your yarn too tight. Hold the yarn with gentle, even tension. If your stitches are tight and hard to insert the hook into, especially when reaching down two rows for a double crochet, relax your grip.
- Read "two rows below" carefully. The double crochet in this pattern is always worked into the front loop of the stitch two rows down — not into the row you are currently on. If a stitch feels like a stretch, you are probably in the right place.
- Keep your unused color tidy. Because you fasten off and rejoin each row, you will have many yarn tails. Lay them all along one side edge as you go so they do not tangle, and weave them in at the end.
- Do not turn your work. This pattern is always worked with the right side facing you. At the end of each row you fasten off and rejoin the new color at the beginning of the next row, on the same side. This is what creates the mosaic look.
Step-by-Step Instructions
Pattern Notes
This mat is worked flat in rows using the mosaic crochet technique. You work with one color at a time and fasten off at the end of each row. The pattern uses single crochet (sc) and double crochet (dc) stitches. All dc stitches are worked into the front loop of the stitch two rows below, which creates the raised mosaic effect. Do not turn your work at the end of each row. Instead, fasten off and rejoin the new color at the beginning of the next row, keeping the right side facing you at all times. Every row has 61 stitches.
Foundation and Row 1 (Color A)
Foundation: With Color A, ch 62.
Row 1 (RS): Sc in the 2nd ch from hook and in each ch across. (61 sc) Fasten off Color A.
Body — Mosaic Rows
Row 2 (Color B): Join Color B with a slip stitch in the first sc. Ch 1, sc in the same st. *Dc in the FLO of the next st two rows below (into the foundation chain), sc in the next sc; repeat from * across, ending with sc in the last st. (61 sts) Fasten off Color B.
Row 3 (Color A): Join Color A with a slip stitch in the first st. Ch 1, sc in the same st. Sc in each st across. (61 sc) Fasten off Color A.
Row 4 (Color B): Join Color B with a slip stitch in the first st. Ch 1, sc in the same st. *Sc in the next st, dc in the FLO of the next st two rows below; repeat from * across, ending with sc in the last st. (61 sts) Fasten off Color B.
Row 5 (Color A): Join Color A with a slip stitch in the first st. Ch 1, sc in the same st. Sc in each st across. (61 sc) Fasten off Color A.
Rows 6–125 (repeat the pattern): Repeat Rows 2–5 in order — Row 6 is the same as Row 2, Row 7 is the same as Row 3, Row 8 is the same as Row 4, Row 9 is the same as Row 5, and so on — until the piece measures approximately 30 inches from the foundation, ending with a Color A row (a row of all single crochet). Do not fasten off after the final row. Every row throughout the body keeps a stitch count of (61 sts).
Border
Border Round 1: With Color A (still attached from your final row), ch 1, then sc evenly around the entire perimeter of the mat, working 3 sc in each corner. Join with a slip stitch to the first sc. (Stitch count will vary depending on your exact row count — simply work one sc into the end of each row along the sides and one sc into each stitch along the top and bottom edges, with 3 sc in each of the four corners.)
Border Round 2: Ch 1, sc in each sc around, working 3 sc in each corner. Join with a slip stitch to the first sc. (Same stitch count as Round 1, plus 2 extra stitches at each corner.) Fasten off.
Assembly and Finishing
Weaving in ends: Thread each yarn tail onto your tapestry needle. Working on the wrong (back) side, run the needle through the backs of several stitches in one direction, then turn and run it back through a few stitches in the other direction. This locks the tail so it will not work loose in the wash. Trim the yarn close to the fabric. Weave in every tail — there will be one at the start and end of each row.
Blocking: Lightly dampen the mat with a spray bottle of cool water. Lay it flat on a towel or blocking mat and gently pat it into a neat rectangle, straightening the edges and squaring the corners. Pin the corners if needed. Let it dry completely flat, away from direct heat. Blocking relaxes the stitches, evens out the mosaic texture, and helps the mat lie flat on the floor.
Final check: Once dry, trim any remaining loose fibers and give the mat a gentle shake. Your Hearthstone Mosaic Floor Mat is ready to use as a bath mat, kitchen mat, or entryway rug.
Pro Tips and Variations
- Change the colors: Swap Warm Oatmeal and Deep Charcoal for any two high-contrast colors — cream and sage green, white and navy, or mustard and rust — so the mosaic pattern pops. Just keep one color light and one dark for the strongest effect.
- Adjust the size: To make a wider mat, add chains in multiples of 2 to your foundation (for example, ch 82 for a wider runner) and keep every row at that new stitch count. To make it longer or shorter, simply work more or fewer pattern repeats before the border, always ending on a Color A row.
- Substitute the yarn: Any worsted weight (Category 4) yarn works — acrylic is softer and machine washable, while cotton is more absorbent and durable. Avoid fuzzy or textured yarns, which hide the crisp mosaic pattern.
- Add a non-slip backing: For use on smooth floors, cut a piece of non-slip rug grip slightly smaller than the mat and stitch it to the back with a few tacking stitches at the corners and along the edges.



