Enchanted Acorn Sprite Free Crochet Pattern
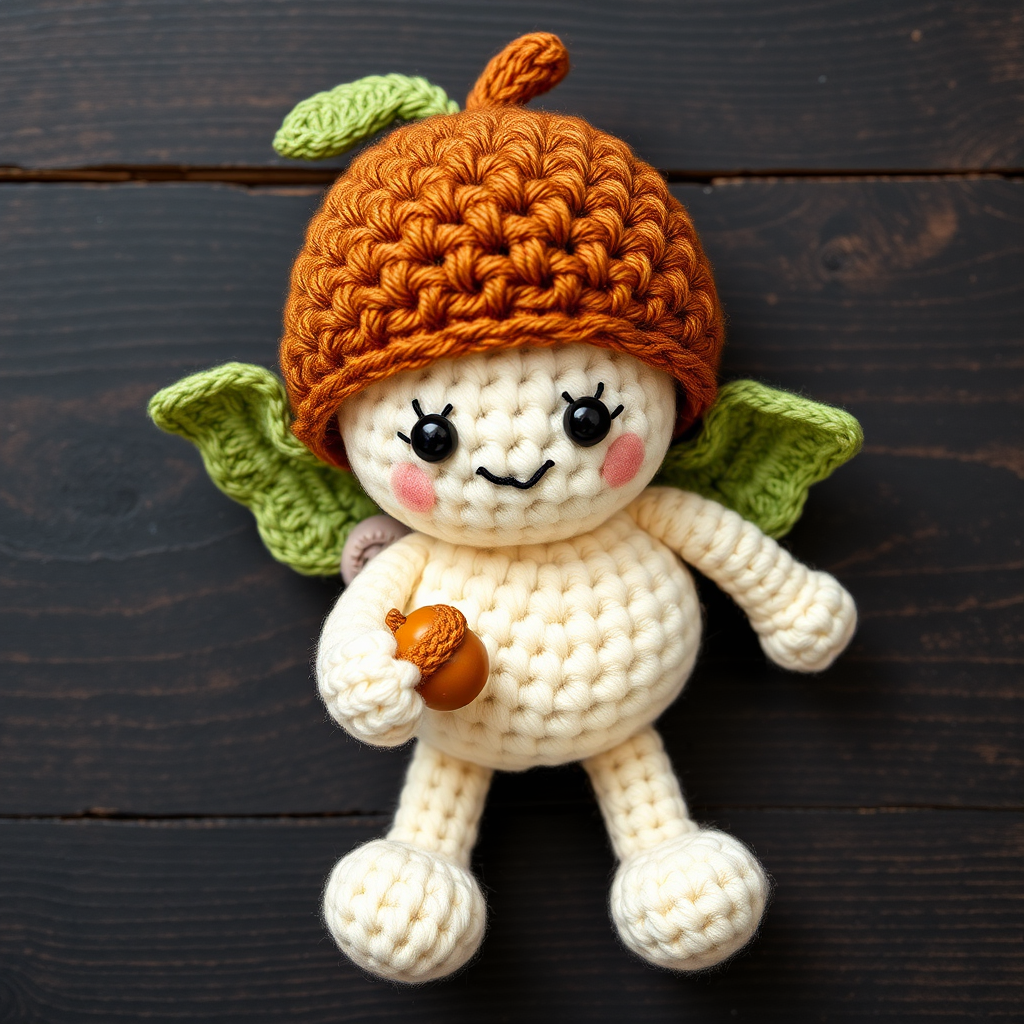
Bring a Touch of Woodland Magic to Your Shelf: The Enchanted Acorn Sprite
Are you ready to add a dash of whimsy to your crochet repertoire? Meet the Enchanted Acorn Sprite—a delightful amigurumi project that combines the charm of a woodland fairy with the cozy comfort of handmade craft. This detailed pattern is perfect for intermediate crocheters looking to create a unique keepsake that will spark joy and imagination. With its warm brown acorn cap, tiny leaf wings, and a sweet golden acorn clutched in its hand, this little sprite is sure to become a treasured companion on any shelf, desk, or nursery.
Whether you're an experienced amigurumi maker or a confident beginner ready for a new challenge, this pattern offers a rewarding project with clear, step-by-step instructions. The result is a soft, huggable sprite that brings a touch of forest enchantment into your home. Let's gather our materials and begin this magical crafting journey!
Materials Needed
Before we dive into the enchanting world of the Acorn Sprite, let's ensure you have everything you need. Here's a complete list of materials and tools:
- Yarn: Worsted weight cotton yarn in four colors:
- Brown (for the acorn cap)
- Cream (for the head, body, arms, and legs)
- Green (for the leaf wings)
- Gold (for the tiny acorn)
- Crochet Hook: 3.5 mm (E) crochet hook
- Safety Eyes: 6 mm (2 pieces)
- Polyester Fiberfill: For stuffing
- Yarn Needle: For sewing pieces together and weaving in ends
- Stitch Marker: To keep track of your rounds
- Scissors: For cutting yarn
Gauge: 4 sc = 1 inch, 4 rows = 1 inch (though for amigurumi, gauge is not critical as long as your stitches are tight enough to prevent stuffing from showing through).
Abbreviations
Familiarize yourself with these standard crochet abbreviations before you begin:
- MR: Magic ring
- sc: Single crochet
- inc: Increase (2 sc in one stitch)
- dec: Decrease (sc two stitches together)
- sl st: Slip stitch
- ch: Chain
Step-by-Step Instructions
Head (Cream Yarn)
Let's start with the sprite's adorable face. Work in continuous rounds, using a stitch marker to track your progress.
- Round 1: MR, 6 sc (6 stitches)
- Round 2: inc around (12 stitches)
- Round 3: (sc, inc) around (18 stitches)
- Round 4: (2 sc, inc) around (24 stitches)
- Round 5: (3 sc, inc) around (30 stitches)
- Rounds 6-10: sc around (30 stitches) – repeat for 5 rounds
- Round 11: (3 sc, dec) around (24 stitches)
- Round 12: (2 sc, dec) around (18 stitches)
- Round 13: (sc, dec) around (12 stitches)
- Round 14: dec around (6 stitches)
Fasten off, leaving a long tail for sewing. Important: Insert the safety eyes between rounds 7 and 8, spacing them about 6 stitches apart. Stuff the head firmly with fiberfill before closing the final decreases.
Body (Cream Yarn)
Now we'll create the sprite's plump little body.
- Round 1: MR, 6 sc (6 stitches)
- Round 2: inc around (12 stitches)
- Round 3: (sc, inc) around (18 stitches)
- Round 4: (2 sc, inc) around (24 stitches)
- Rounds 5-8: sc around (24 stitches) – repeat for 4 rounds
- Round 9: (2 sc, dec) around (18 stitches)
- Round 10: (sc, dec) around (12 stitches)
- Round 11: dec around (6 stitches)
Fasten off, leaving a long tail. Stuff the body firmly, then sew it securely to the bottom of the head.
Acorn Cap (Brown Yarn)
This is the sprite's signature feature—a cozy, textured cap that sits at a jaunty angle.
- Round 1: MR, 6 sc (6 stitches)
- Round 2: inc around (12 stitches)
- Round 3: (sc, inc) around (18 stitches)
- Round 4: (2 sc, inc) around (24 stitches)
- Round 5: (3 sc, inc) around (30 stitches)
- Rounds 6-8: sc around (30 stitches) – repeat for 3 rounds
- Round 9: (3 sc, dec) around (24 stitches)
- Round 10: sc around (24 stitches)
Fasten off, leaving a long tail. Place the cap on the sprite's head, positioning it slightly tilted for that charming, whimsical look. Sew it securely around the edge, making sure it covers the top of the head nicely.
Leaf Wings (Green Yarn, Make 2)
These delicate wings give your sprite its fairy-like appearance. They're worked in rows, not rounds.
- Row 1: Ch 6, sc in 2nd ch from hook, hdc in next, dc in next, hdc in next, sc in last, ch 1, turn (5 stitches)
- Row 2: sc in each stitch across (5 stitches), ch 1, turn
- Row 3: sc in first, dec, sc in last (3 stitches), ch 1, turn
- Row 4: dec, sc (2 stitches), ch 1, turn
- Row 5: dec (1 stitch)
Fasten off, leaving a long tail. Sew the wings to the back of the body, positioning them symmetrically on either side of the spine. For a more polished look, you can embroider a subtle central vein on each wing using a contrasting green thread.
Tiny Acorn (Gold Yarn, Make 1)
This little treasure is what the sprite holds in its hand—a perfect golden acorn.
- Round 1: MR, 6 sc (6 stitches)
- Round 2: inc around (12 stitches)
- Rounds 3-4: sc around (12 stitches) – repeat for 2 rounds
- Round 5: dec around (6 stitches)
Fasten off, leaving a tail. Stuff lightly with a small amount of fiberfill. Sew the tiny acorn to one of the sprite's hands, as if it's holding it proudly.
Arms (Cream Yarn, Make 2)
These simple little arms are quick to make and add so much character.
- Round 1: MR, 6 sc (6 stitches)
- Rounds 2-4: sc around (6 stitches) – repeat for 3 rounds
Fasten off, leaving a long tail. Sew the arms to the sides of the body, positioning them slightly below the neck. Make sure one arm is positioned so the hand can hold the tiny acorn.
Legs (Cream Yarn, Make 2)
Finally, let's give our sprite a sturdy base to stand on.
- Round 1: MR, 6 sc (6 stitches)
- Round 2: inc around (12 stitches)
- Rounds 3-4: sc around (12 stitches) – repeat for 2 rounds
- Round 5: dec around (6 stitches)
Fasten off, leaving a tail. Stuff lightly to give the legs a bit of shape. Sew them to the bottom of the body, spacing them evenly so the sprite can sit or stand.
Finishing Touches
Your Enchanted Acorn Sprite is almost complete! Here are the final steps to bring it to life:
- Embroider a Smile: Using a small piece of brown yarn and your yarn needle, embroider a simple, sweet smile on the face, just below the safety eyes. A simple backstitch or a few small stitches will do the trick.
- Weave in All Ends: Carefully weave in any remaining yarn tails using your yarn needle. Make sure all ends are securely hidden inside the amigurumi to give it a clean, professional finish.
- Final Adjustments: Gently shape the sprite by adjusting the stuffing and positioning the wings, cap, and limbs. Make sure the cap sits at that perfect jaunty angle and the wings are symmetrical.
Congratulations! You've just created your very own Enchanted Acorn Sprite. This whimsical little creature is perfect for gifting, decorating, or simply adding a touch of woodland magic to your day. The soft, natural colors and cozy handmade feel make it a truly special piece.
We'd love to see your creation! Share your finished Acorn Sprite on social media using the hashtag #EnchantedAcornSprite and tag us so we can admire your handiwork. Happy crocheting, and may your crafting always be filled with a little bit of magic!


