Charcoal Checker Treat Mat Free Crochet Pattern: Moroccan Tile Granny Squares for Medium Dogs
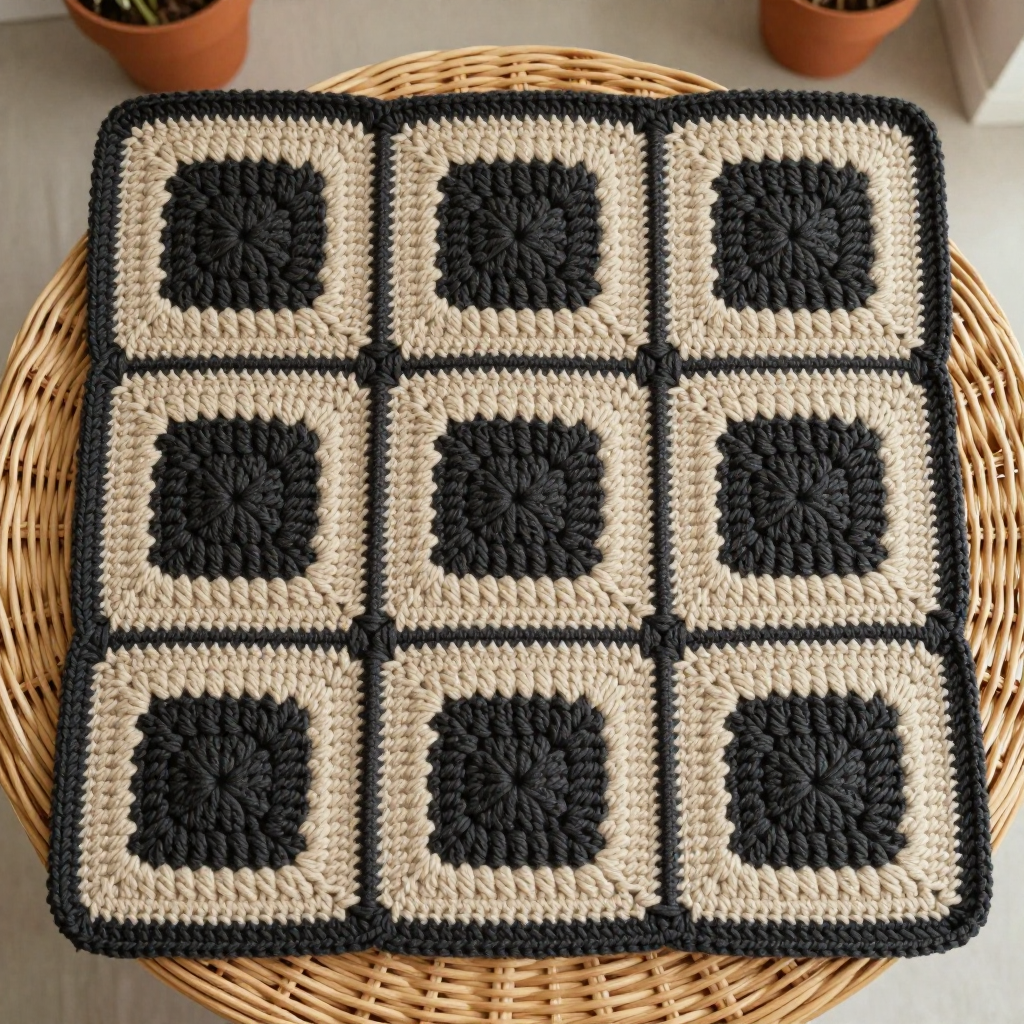
Charcoal Checker Treat Mat: A Free Beginner Crochet Pattern for Medium Dogs
Introduction
If you have never held a crochet hook before, this is the perfect first project to fall in love with. The Charcoal Checker Treat Mat is a flat, soft scatter mat made from twelve simple granny squares in warm oatmeal cream and deep charcoal, arranged in a calm checkerboard that looks like minimalist Moroccan tile. It is made from thick, velvety chenille yarn, so the finished mat feels plush and squishy under your dog's nose while staying sturdy enough for daily treat hunting. Because every square is identical and only four rounds tall, you get lots of satisfying practice without any complicated shaping. By the end you will have a beautiful 15 x 20 inch mat that slows down treat scattering, keeps your dog busy, and looks lovely on your floor.
Materials Needed
- Yarn: Chenille plush yarn, super bulky (weight category 6), approximately 130–150 yards per 100 g skein. You need about 220 yards of Oatmeal (roughly 2 skeins) and about 220 yards of Charcoal (roughly 2 skeins). Total approximately 440 yards.
- Crochet hook: Size 8.0 mm (US L-11), or whatever size you need to match the gauge below.
- Tapestry needle: A large-eye blunt needle for seaming, sewing the ridges, and weaving in ends.
- Stitch markers: At least 4, to mark corners and count rounds.
- Scissors: Sharp craft scissors for trimming yarn.
- Finished size: 15 x 20 inches (38 x 51 cm). Each square is 5 x 5 inches (12.7 x 12.7 cm), arranged 3 squares wide by 4 squares tall.
Abbreviations and Beginner Glossary
- ch – chain. Wrap the yarn over your hook and pull it through the loop on your hook. This makes one chain stitch.
- dc – double crochet. Yarn over, insert hook into the stitch or space, pull up a loop (3 loops on hook), yarn over and pull through 2 loops, yarn over and pull through the last 2 loops.
- sc – single crochet. Insert hook into stitch, pull up a loop (2 loops on hook), yarn over and pull through both loops.
- sl st – slip stitch. Insert hook into stitch, yarn over, and pull the yarn straight through both the stitch and the loop on your hook at once. It makes a nearly invisible joining stitch.
- st / sts – stitch / stitches.
- magic ring – an adjustable loop of yarn you make with your fingers, crocheted into, then pulled tight to close the center hole. If it feels tricky, you can instead chain 4 and join with a sl st to form a ring, then work Round 1 into that ring.
- ch-1 space – the small gap created by a chain stitch in the previous round. You work your next stitches into that gap, not into a stitch.
- ch-2 corner space – the larger gap at each corner made by two chain stitches. Corners are worked into this space.
- join with sl st – finish a round by making a slip stitch into the top of the first stitch of that round, closing the circle.
- fasten off – cut the yarn a few inches from your work and pull the tail all the way through the last loop to lock it.
- weave in ends – thread a yarn tail onto a tapestry needle and sew it back and forth through the back of your work so it disappears.
- block – gently dampen or steam a finished piece and pin it to the correct size so it dries flat and even.
- backstitch – a hand-sewing stitch where you bring the needle up, go back a short distance, and come up again ahead of your last stitch, creating a continuous line.
Gauge
Gauge: One finished granny square measures 5 x 5 inches (12.7 x 12.7 cm) after blocking. The square is 4 rounds. In granny square rounds, 2 rounds measure 2.5 inches (6.35 cm) across the square.
Why gauge matters: Gauge is simply how big your stitches turn out. If your square comes out at 4 inches instead of 5, your whole mat will be smaller than planned. If it comes out at 6 inches, the mat will be too big. How to check: Make one complete square exactly as written, block it gently, and measure across the middle from edge to edge. If it is too small, try a larger hook. If it is too large, try a smaller hook. One test square is all you need, and it becomes part of your mat.
Beginner Tips Before You Start
- Use stitch markers at every corner. Place a marker in each ch-2 corner space as you make it. When you come back around, you will always know exactly where the corner goes.
- Do not pull your yarn too tight. Chenille yarn is fluffy and easy to over-tighten. Keep your loops relaxed so the squares stay soft and measure 5 inches.
- Count your clusters out loud. Each side of a square should have the same number of double crochet clusters. Counting keeps your square from turning into a wobbly shape.
- Make all twelve squares before you sew anything. This lets you lay them out and check the checkerboard before joining.
- Keep your seams loose. Chenille stretches, so tight seams will pucker the mat. Loose, even seams keep it flat.
- Supervise your dog. This mat is a toy. Check it regularly and remove it if any seam or ridge comes loose.
Step-by-Step Instructions
Color Plan (Checkerboard)
Arrange your twelve squares right side up like this, from top to bottom:
- Row 1 (top): Oatmeal, Charcoal, Oatmeal
- Row 2: Charcoal, Oatmeal, Charcoal
- Row 3: Oatmeal, Charcoal, Oatmeal
- Row 4 (bottom): Charcoal, Oatmeal, Charcoal
Make 6 Oatmeal squares and 6 Charcoal squares. Each square uses one color throughout.
The Granny Square (make 12; 6 in each color)
Round 1: With your chosen color, make a magic ring. Ch 3 (this counts as your first dc). Work 2 dc into the ring. [Ch 2, 3 dc into the ring] 3 times. Ch 2, join with sl st to the top of the beginning ch-3. (12 dc, 4 ch-2 corner spaces)
Round 2: Sl st into the next 2 dc and into the first ch-2 corner space. Ch 3 (counts as first dc). Work (2 dc, ch 2, 3 dc) into the same corner space. *Ch 1, work (3 dc, ch 2, 3 dc) into the next ch-2 corner space; repeat from * around. Ch 1, join with sl st to the top of the beginning ch-3. (24 dc, 4 ch-2 corners, 4 ch-1 side spaces)
Round 3: Sl st into the next 2 dc and into the first ch-2 corner space. Ch 3. Work (2 dc, ch 2, 3 dc) into the same corner space. *Ch 1, 3 dc into the next ch-1 space, ch 1, work (3 dc, ch 2, 3 dc) into the next corner space; repeat from * around, ending with ch 1, join with sl st to the top of the beginning ch-3. (36 dc, 4 corners, 8 ch-1 spaces)
Round 4: Sl st into the next 2 dc and into the first ch-2 corner space. Ch 3. Work (2 dc, ch 2, 3 dc) into the same corner space. *[Ch 1, 3 dc into the next ch-1 space] twice, ch 1, work (3 dc, ch 2, 3 dc) into the next corner space; repeat from * around, ending with ch 1, join with sl st to the top of the beginning ch-3. Fasten off and weave in ends. (48 dc, 4 corners, 12 ch-1 spaces)
Block each square to 5 x 5 inches (12.7 x 12.7 cm) and let it dry fully. Chenille likes gentle steam blocking without pressing it flat.
Assembly — Checkerboard Joining
Lay the twelve squares right side up following the color plan above. Join all squares with a flat slip-stitch seam (or whipstitch) using Charcoal yarn for every seam, so the grid lines look crisp.
Step 1: Join squares into 4 horizontal strips of 3 squares each, matching corner to corner and side to side. (4 strips of 3 squares)
Step 2: Join the 4 strips together vertically to form the 15 x 20 inch mat. (1 mat, 12 squares)
Keep your seam tension loose so the mat stays flat. Chenille stretches, so do not pull the seams tight.
Sewn Ridges Between Rows (treat scatter control)
The mat has 3 horizontal ridge lines, one between each pair of square rows. Each ridge is a shallow raised cord sewn on the right side directly over the horizontal seam.
Step 1: Cut a 24 inch (61 cm) length of Charcoal yarn and thread your tapestry needle.
Step 2: Working along the seam between Row 1 and Row 2, bring the needle up through the seam at the left edge. Make a small backstitch (about 1/4 inch / 6 mm long) directly on the seam line, then repeat backstitches across the full 15 inch width, keeping stitches shallow and even so the ridge sits about 1/8 inch (3 mm) high. (1 ridge)
Step 3: Repeat for the seams between Rows 2–3 and Rows 3–4. (3 ridges total) Bury the yarn tails inside the mat.
Edging
With Charcoal yarn, work 1 round of sc evenly around the entire outer edge of the mat, working 3 sc into each corner to keep the corners square. Join with sl st. Fasten off and weave in ends. (1 round of sc edging)
Assembly and Finishing
Seaming: Hold two squares with right sides facing up and edges lined up. Thread Charcoal yarn on your tapestry needle. Bring the needle up through both layers at the corner, then take small, even stitches through the edge stitches of both squares, working from one end to the other. Keep the yarn relaxed so the seam lies flat. Repeat for every seam in the grid.
Weaving in ends: Thread each yarn tail onto the tapestry needle and sew it back and forth through the back of the stitches for about 2 inches, changing direction once so it locks in place. Trim the tail close to the work.
Blocking: Lightly steam the seams and edging with an iron held a few inches above the mat (never touch the iron to chenille). Pat the mat flat to 15 x 20 inches, then lay it flat to dry completely away from direct heat.
Final check: Trim any fuzz from the chenille. Gently tug each seam and ridge to confirm everything is secure. Care: Hand wash cold, reshape, and dry flat away from heat. Supervise pet use and remove the mat if any seam or ridge loosens.
Pro Tips and Variations
- Change the colors: Swap Oatmeal and Charcoal for any two contrasting super bulky chenille colors. A soft sage and cream, or dusty rose and gray, gives the same Moroccan tile feel with a different mood.
- Resize the mat: Add or remove squares to fit your dog. Each square is 5 inches, so a 4 x 5 grid makes a 20 x 25 inch mat for a larger dog, and a 2 x 3 grid makes a 10 x 15 inch mat for a small dog. Just keep the checkerboard alternating.
- Substitute yarn: Any super bulky (category 6) plush or velvet yarn works, as long as your square measures 5 inches. Always make one test square first, because plush yarns vary a lot in thickness.
- More treat channels: Add extra sewn ridges in the opposite direction, or make the backstitches slightly taller, to create deeper channels that slow down rolling treats even more.



