Amalfi Ribbed Sweater Free Pattern – Coastal Knit Pullover with Textured Waves
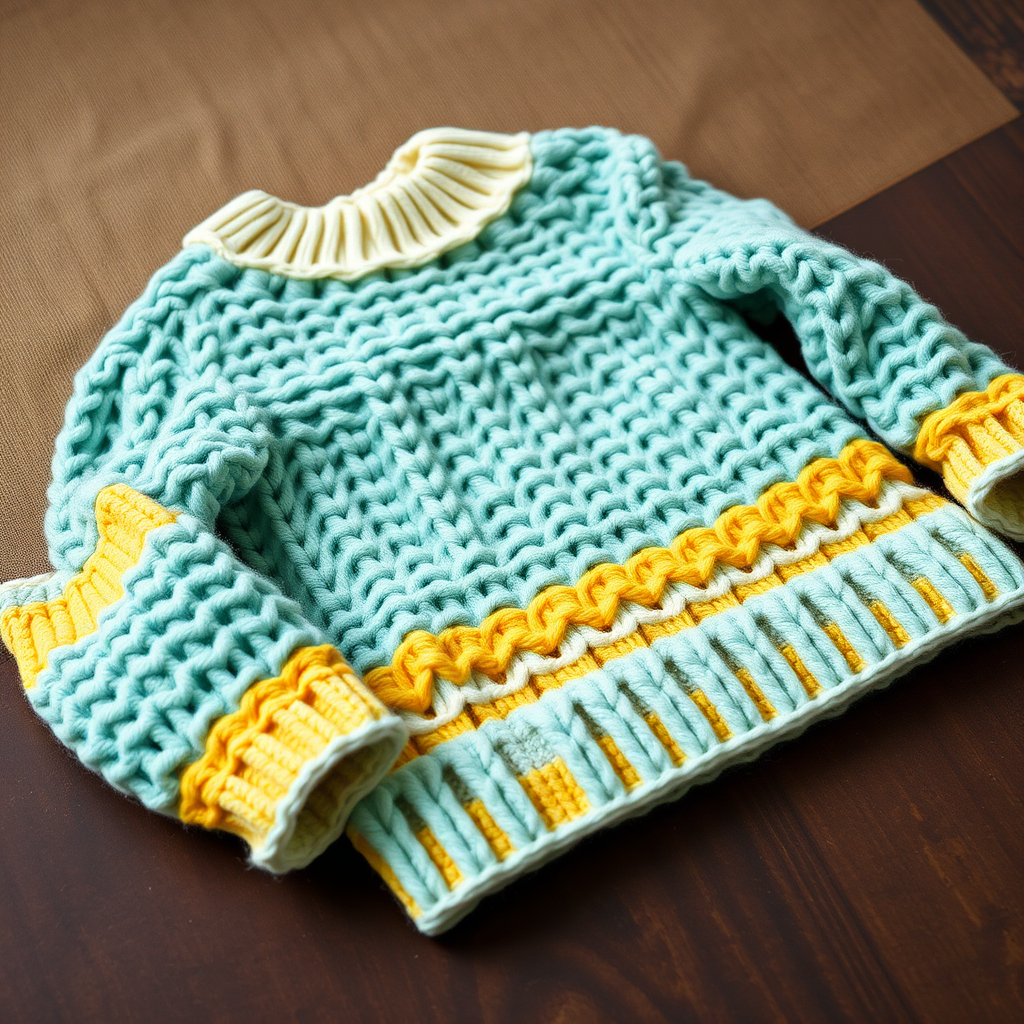
Amalfi Ribbed Sweater Free Pattern – Coastal Knit Pullover with Textured Waves
Channel the sun-drenched cliffs of the Amalfi Coast with this cozy, ribbed knit sweater featuring a unique wave-stitch texture. The relaxed fit and soft, breathable yarn make it a year-round layering essential. This free pattern is perfect for intermediate knitters looking to expand their skills with a stunning, wearable piece that evokes the Mediterranean coastline.
The Amalfi Ribbed Sweater combines a gentle wave rib pattern with a classic pullover silhouette, creating subtle undulating ridges across the fabric that mimic the movement of ocean waves. The soft sea glass teal body is accented with sunny yellow stripes at the cuffs, hem, and neckline, finished with a cream ribbed collar for a fresh, airy aesthetic. Whether you're a seasoned knitter or a confident beginner ready for a challenge, this pattern will guide you through creating a beautiful, handcrafted garment you'll treasure for years.
Materials Needed
Before you begin, gather the following materials to ensure a smooth knitting experience:
Yarn
- Main Color (MC) – Sea Glass (soft teal): Worsted weight cotton blend yarn (e.g., Lion Brand 24/7 Cotton) – approximately 1,200 (1,350, 1,500, 1,650) yards
- Contrast Color (CC) – Limoncello (sunny yellow): Worsted weight cotton blend yarn – approximately 150 (170, 190, 210) yards
- Accent Color (AC) – Cream: Worsted weight cotton blend yarn – approximately 50 (55, 60, 65) yards
Needles & Notions
- US Size 7 (4.5 mm) circular knitting needles, 24-inch length (for body)
- US Size 7 (4.5 mm) circular knitting needles, 16-inch length (for sleeves and neckline)
- Stitch markers (at least 4)
- Stitch holders or waste yarn
- Tapestry needle for weaving in ends
- Scissors
Gauge
20 stitches and 26 rows = 4 inches in stockinette stitch (blocked). Always knit a gauge swatch before starting to ensure your finished sweater matches the intended measurements. Adjust needle size if necessary to achieve the correct gauge.
Step-by-Step Instructions
This pattern is worked in the round for the body and sleeves, then joined at the armholes. Follow each step carefully, and refer to the abbreviations and special stitch pattern below as needed.
Sizes & Measurements
Sizes: S (M, L, XL)
Finished chest: 36 (40, 44, 48) inches
Abbreviations
- CO – cast on
- K – knit
- P – purl
- K2tog – knit two together (decrease)
- P2tog – purl two together (decrease)
- M1 – make one (increase)
- St st – stockinette stitch (knit every round when working in the round; knit on RS, purl on WS when working flat)
- MC – main color (Sea Glass)
- CC – contrast color (Limoncello)
- AC – accent color (Cream)
- RS – right side
- WS – wrong side
Special Stitch – Wave Rib Pattern (multiple of 6 + 2)
This pattern creates the beautiful textured waves that define the sweater. Work the following 4 rows repeatedly:
- Row 1 (RS): *K2, P4; repeat from * to last 2 sts, K2.
- Row 2 (WS): *P2, K4; repeat from * to last 2 sts, P2.
- Row 3: *K2, P1, K1, P2; repeat from * to last 2 sts, K2.
- Row 4: *P2, K1, P1, K2; repeat from * to last 2 sts, P2.
Repeat rows 1-4 for the pattern. When working in the round, all rows are worked on the RS, so follow the pattern as written, treating each round as Row 1, 2, 3, or 4 in sequence.
Body (Worked in One Piece to Armholes)
Step 1: With MC and the 24-inch circular needle, CO 180 (200, 220, 240) sts. Place a stitch marker for the beginning of the round and join in the round, being careful not to twist the stitches.
Step 2: Work in Wave Rib Pattern for 2 inches. The ribbing will create a stretchy, textured hem that echoes the coastal waves.
Step 3: After completing 2 inches of the Wave Rib Pattern, switch to stockinette stitch (knit every round) and continue until the piece measures 12 (12, 13, 13) inches from the cast-on edge. This forms the main body of the sweater.
Divide for Armholes
Step 4: On the next round, knit 90 (100, 110, 120) sts for the front. Place the next 90 (100, 110, 120) sts on a stitch holder or waste yarn for the back. Turn your work and continue working flat on the front stitches only.
Front
Step 5: Work in St st (knit on RS, purl on WS) for 2 inches, starting with a WS row.
Step 6 – Shape Armholes: At each armhole edge, bind off 3 sts once. Then, decrease 1 st at each side every other row 3 times. To decrease, work K2tog on the RS or P2tog on the WS at the beginning and end of the row. Continue in St st until the armhole measures 7 (7, 8, 8) inches from the bind-off.
Step 7 – Shape Neck: Place the center 20 (22, 24, 26) sts on a stitch holder. Working each side separately, bind off at the neck edge 3 sts once, 2 sts twice, then 1 st three times. Continue working straight until the armhole measures 9 (9, 10, 10) inches. Bind off the remaining shoulder sts. Repeat for the other side of the neck.
Back
Step 8: Return the held back stitches to your needle. Work the same as the front, but continue straight (without neck shaping) until the armhole measures 8 (8, 9, 9) inches.
Step 9 – Shape Neck: Place the center 24 (26, 28, 30) sts on a stitch holder. Working each side separately, bind off at the neck edge 2 sts once, then 1 st twice. Continue until the armhole measures 9 (9, 10, 10) inches. Bind off the shoulder sts. Repeat for the other side.
Sleeves (Make 2)
Step 10: With MC and the 16-inch circular needle, CO 42 (46, 50, 54) sts. Place a marker and join in the round.
Step 11: Work in Wave Rib Pattern for 2 inches. This creates a matching textured cuff.
Step 12: Switch to St st (knit every round). Increase 1 st at each side (before and after the marker) every 6 rounds until you have 62 (66, 70, 74) sts on the needle. To increase, use M1 (make one) by picking up the bar between stitches and knitting it through the back loop.
Step 13: Continue in St st until the sleeve measures 17 (17, 18, 18) inches from the cast-on edge.
Step 14 – Shape Cap: Bind off 3 sts at the beginning of the next 2 rows (working flat now). Then, decrease 1 st at each side every other row until the cap measures 4 (4, 5, 5) inches. Bind off the remaining sts.
Finishing
Step 15: Sew the shoulder seams using a tapestry needle and matching yarn.
Step 16: Set in the sleeves by sewing the sleeve caps into the armholes, matching the bound-off edges to the armhole bind-offs and easing any fullness evenly.
Step 17 – Neckband: With AC (Cream) and the 16-inch circular needle, pick up and knit 80 (84, 88, 92) sts around the neckline, including the held stitches. Work in K1, P1 rib for 1 inch. Bind off loosely in rib pattern to maintain stretch.
Step 18: Weave in all ends with the tapestry needle, being careful to secure them neatly on the wrong side of the fabric.
Step 19 – Blocking: Block the sweater to the specified measurements. Lay it flat on a clean surface, pin it to shape if needed, and allow it to dry completely. Blocking will even out the stitches and enhance the wave texture.
Final Thoughts
Congratulations! You've completed your Amalfi Ribbed Sweater. This coastal-inspired pullover is as beautiful as it is comfortable, with its textured waves and fresh Mediterranean color palette. The relaxed fit makes it perfect for layering over a simple tee or wearing on its own with your favorite jeans. Wear it with pride, knowing you've created a one-of-a-kind handmade garment that captures the essence of the Amalfi Coast.
Happy knitting, and may your stitches always be even and your waves always gentle!


